Replacing an Internal Nonmirrored Disk Drive CRU This procedure describes how to replace an internal nonmirrored disk drive CRU in a NonStop S-series server online. You might need to replace a disk drive CRU if it has failed or partially failed or if you are upgrading the disk drives. You do not need to shut down the system before replacing a disk drive CRU. The following is a high-level summary of the tasks required to complete the replacement procedure.
e Stop the disk drive using either OSM, TSM, or SCF: ● OSM: Stop Disk action ● TSM: Down action ● SCF command: STOP DISK 2 Identify the group, module, and slot containing the disk drive CRU, using OSM, TSM, or SCF: ● OSM or TSM: check disk attributes ● SCF command: STATUS DISK, DETAIL 3 Power off and remove the disk drive CRU (it weighs nearly 4 pounds, or 2 kilograms). Caution: After using the OSM or TSM Power Off action, wait until the disk stops spinning before removing the disk.
7 Resume operations on the replacement disk drive: a Start the disk drive and check its status using OSM, TSM, or SCF: ● OSM: use Start Disk action and check disk attributes ● TSM: use the Up action and check disk attributes ● SCF commands: RESET DISK, START DISK, and STATUS DISK b Test all disk paths using SCF commands: (SWITCH DISK; PRIMARY DISK, FORCED; and STATUS DISK). c Find bad sectors on the replacement disk using the SCF command INFO DISK, BAD.
Change History for Replacing an Internal Nonmirrored Disk Drive CRU September 6, 2005 Updated topic references with their NTL location. September 24, 2003 Updated TSM references to include OSM. June 2, 2003 Changed references from the obsolete NonStop S-Series Hardware Support Guide to references to CSSI topics. March 19, 2001 ● Corrected the command for creating a new label for a disk volume.
● The titles of all instruction pages have been modified to correctly state the page content and to conform with the CSSI style. August 5, 1998 Step 2 of the instruction page, To Test Nonmirrored Disk Paths, has been changed. The CPU parameter has been added to the PRIMARY command line. June 12, 1998 ● Corrected the procedure for testing disk paths. Testing now comes after starting the disk. ● Added the FORCED keyword after the SCF PRIMARY command to ensure correct processor ownership.
Standard Operating Practices Caution. Replace only one CRU or FRU at a time. Attempting to replace more than one hardware component at a time might cause serious system outages, processor halts, and connectivity problems. Whenever you replace a CRU or a FRU, use the following standard operating practices to minimize any potential damage to the equipment: ● Complete HP training courses on system support for NonStop S-series servers.
For example, if your computer room has an ambient room temperature of 25°C (77°F) and is at an altitude of 1,524 meters (5,000 feet), you have approximately 38 minutes to replace or reinstall the second fan before components inside a system enclosure overheat.
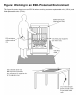
ESD Guidelines Figure: Working in an ESD-Protected Environment Observe the following electrostatic discharge (ESD) guidelines whenever servicing electronic components: ● Obtain an ESD protection kit and follow the directions that come with the kit. You can purchase an ESD kit from HP (T99247-A00) or from a local electronics store. Ensure that your ESD wriststrap has a built-in series resistor and that the kit includes an antistatic table mat.
Figure: Working in an ESD-Protected Environment This figure illustrates how to use an ESD kit when servicing customer-replaceable units (CRUs) and field-replaceable units (FRUs).
Stopping a Nonmirrored Disk Drive Using SCF Follow these instructions to stop a nonmirrored disk drive. In this example, the $DATA21 disk drive is being stopped to prepare it for replacement. If the disk drive is currently in the STARTED state, issue the SCF STOP DISK command, and type Y in response to the SCF prompt that asks if you want to stop the disk.
Locating an Internal Nonmirrored Disk Drive Using SCF Use the SCF STATUS DISK, DETAIL command to determine the physical location (group, module, slot) of an internal nonmirrored disk drive. TACL> SCF STATUS $DATA21, DETAIL STORAGE - Detailed Status DISK \TOYS.$DATA21 Disk Path Information: LDev Path Status 87 87 PRIMARY BACKUP ACTIVE INACTIVE State STARTED STARTED Substate Primary PID 2,262 2,262 Backup PID 3,262 3,262 General Disk Information: Device Type........... 3 Device Subtype...........
Powering Off and Removing an Internal Disk Drive CRU Follow these instructions to power off and remove an internal disk drive customer-replaceable unit (CRU). 1 Gather the proper tools you will use to replace the disk drive CRU. 2 Use the OSM or TSM Power Off action to power off the disk drive. 3 Follow standard operating practices when handling a disk drive CRU. 4 Unlock and open the appearance-side enclosure door.
9 Pull the disk drive CRU out far enough that you can support the bottom of the CRU with one hand (the CRU weighs 3.5 pounds, or 1.6 kilograms) while holding on to one of the thumbscrews with the other hand. Caution: The disk drive CRU is extremely fragile. Do not drop it, and do not subject it to sudden jarring movements. 10 Carefully lift the disk drive CRU all the way out of its slot and set it on its side on the antistatic mat. Detach the grounding clip of your ESD wriststrap.
Replacing an Internal Mirrored Disk Drive CRU This procedure describes how to replace an internal mirrored disk drive CRU online. You might need to replace a CRU if it has failed, partially failed, or if you are upgrading the disk drives. You do not need to shut down the system before replacing a disk drive CRU. Caution: On pre-G06.24 RVUs that are not running SPR T9753AFN or later, disable DBIO before stopping or disconnecting a mirrored drive.
2 Prepare the mirrored disk drive CRU for removal (necessary only if both primary and mirrored disk drives are functioning): a Verify that paths to the other half of the mirrored volume are up, using OSM, TSM, or SCF: ● OSM or TSM: check disk attributes ● SCF command: STATUS DISK b Before replacing the mirrored disk, be sure that it has no checksum errors on the other half of the mirrored volume. Use the OSM or TSM Validate Checksum action to check for errors.
4 Disable DBIO on pre-G06.24 systems that are not running SPR T9753AFN or later. ● First, determine the current state of DBIO by using the SCF Status SUBSYS $ZZSTO command. ● Verify that the Backup and Restore utilities are not running. These programs might use DBIO, if it is enabled, for enhanced performance. Enter the TACL commands: ❍ Status *, PROG $system.system.backup ❍ Status *, PROG $system.system.restore ● Wait until all Backup and Restore processes have finished before disabling DBIO.
7 After successful installation, write the logical name of the disk drive on the label near the top of the disk drive CRU faceplate. 8 Resume operations on the replacement mirrored disk drive: a Revive, monitor, and check the status of the disk drive using OSM, TSM, or SCF.
10 Enable DBIO if it was disabled in Step 4.
Change History for Replacing an Internal Mirrored Disk Drive CRU February 13, 2006 Changed the OSM Start Disk action to the OSM Start Volume action. The Start Disk action is designed to fail if the mirrored disk is already in an Up state because the mirror and primary disk volumes can have different data and require a revive operation. To revive and bring up the disks properly, use the OSM Start Volume action or SCF START DISK command.
mirror disk drive.) ● Added a note stating that downgrading using the revive operation is not supported. ● Added links to related CSSI topics to Other Sources of Information. December 12, 2001 ● Added information on how to use TANDUMP/CMFILE to Detect Errors on Mirrored Disks. March 19, 2001 Modified commands and report examples in Starting a Revive Operation on a Mirrored Disk Drive Using SCF. March 9, 2001 ● Included both TSM actions and SCF commands when available.
24-pin power connector has pins that need to be checked. ● The titles of all instruction pages have been modified to correctly state the page content and to conform with the CSSI style. August 5, 1998 Step 2 of the instruction page, To Test Mirrored Disk Paths, has been changed. The CPU parameter has been added to the PRIMARY command line. June 12, 1998 ● Moved the procedure for checking for bad sectors on the other half of the mirrored volume so that it comes before stopping the disk to be replaced.
Notes for Replacing an Internal Mirrored Disk Drive CRU Note: Certain rare events can occur during or after a disk drive replacement. Consult these documents: ● G06.24 and later (and H-series): DP2 FCHECK User’s Guide (NTL Support and Service > Service Information) ● G06.
Verifying That the Paths to the Other Half of a Mirrored Volume Are Up Using SCF Use the SCF STATUS DISK command to verify the state of the paths to the other half of a mirrored volume. In this example, the mirror half of the volume $DATA17 is to be replaced. TACL>SCF STATUS $DATA17-* STORAGE - Status DISK \TOYS.
Checking For and Sparing Bad Sectors on a Mirrored Disk Drive Using SCF Follow these instructions to check for and spare bad sectors on a mirrored disk drive CRU when preparing to replace the other half of its mirrored volume. In this example, the mirror half of the volume $DATA17 is to be replaced. 1 TACL> SCF INFO $DATA17, BAD STORAGE - Bad Sector Information Magnetic DISK \TOYS.$DATA17 Bad Sectors Information $DATA17 Primary: Logical Sector Address %H0000795C File Name DLSYS42X.
Stopping a Mirrored Disk Drive Using SCF Follow these instructions to shut down both paths to a disk drive. In this example, the $DATA17 mirror drive is being stopped to prepare it for replacement. If the disk drive is currently in the STARTED state, use the SCF STOP DISK command to shut down both paths to the disk drive.
Locating an Internal Mirrored Disk Drive Using SCF Use the SCF STATUS DISK, DETAIL command to determine the physical location (group, module, slot) of an internal mirrored disk drive. TACL> SCF STATUS DISK $DATA17, DETAIL STORAGE - Detailed Status DISK \TOYS.
Installing an Internal Disk Drive CRU Follow these instructions to install an internal disk drive customer-replaceable unit (CRU). 1 Follow standard operating practices when handling the disk drive CRU. 2 Unlock and open the appearance-side enclosure door, if necessary. Caution: Minimize the time the enclosure door is open to avoid overheating other components in the enclosure. Refer to Safe Operating Times With Enclosure Door Open.
7 Simultaneously tighten both thumbscrews on the faceplate of the disk drive CRU to seat the CRU against the backplane. Do not over-tighten the thumbscrews. Once the CRU is properly connected to the backplane, a power-on self-test (POST) runs. The amber LED becomes lit, then flashes, but upon successful completion of the POST, only the green power-on LED remains lit. If the POST fails, try reseating the CRU. If the POST fails a second time, try installing a different disk drive CRU.
Resetting and Verifying a Mirrored Disk Drive Using SCF Follow these instructions to reset and verify a mirrored disk drive. In this example, the $DATA17 mirror drive has just been replaced and is being prepared for a revive operation. Use the SCF RESET DISK command; then use the SCF STATUS DISK command to verify that the disk drive is in the STOPPED state with the substate DOWN. TACL>SCF RESET $DATA17 ->STATUS $DATA17-* STORAGE - Status DISK \TOYS.
Starting a Revive Operation on a Mirrored Disk Drive Using SCF Follow these instructions to revive a mirrored disk drive. In this example, the $DSMSCM mirror disk drive has been replaced and is being returned to operation. Note: A revive operation might affect system performance, especially for users of the disk being revived.
PRIMARY MIRROR (1,1,13) (1,1,14) DUAL DUAL PRESENT PRESENT See the SCF Reference Manual for the Storage Subsystem for more information on the STATUS DISK, DETAIL report. 3 Use the STATUS DISK-* command to verify successful completion of the revive operation. Both the primary and mirror disk drives should show State to be STARTED, as shown in the following example: ->STATUS $DSMSCM-* STORAGE - Status DISK \ALM171.
Switching and Testing Paths to a Mirrored Disk Drive Using SCF Follow these instructions to test all the paths to a mirrored disk drive. In this example, the $DATA17 mirror disk drive has been replaced. The -M and -MB paths are being tested before operations are resumed on the replacement disk drive CRU.
4 Use the SCF PRIMARY DISK, FORCED command again to switch the disk volume back to its primary processor; then use the SCF STATUS DISK command to verify the operation: ->PRIMARY $DATA17, FORCED ->STATUS $DATA17 STORAGE - Status DISK \TOYS.$DATA17 LDev Primary Backup Mirror 88 *STARTED STARTED *STARTED MirrorBackup STARTED Primary PID 1,266 Backup PID 0,282 -> Note: For G06.10 and earlier, including the FORCED keyword here ensures the correct processor ownership. For G06.
Gathering the Proper Tools to Assist With CRU and FRU Replacement You will need some or all of the following tools to replace a CRU or a FRU: Tool Used to... Electrostatic discharge (ESD) wriststrap with grounding clip Protect the CRU or FRU from damage caused by electrostatic discharge. Antistatic mat (recommended) Provide a static-free environment for removal and installation of a CRU or FRU. Flashlight Check the connectors for bent or broken pins.
Resetting and Verifying Nonmirrored Disk Drive Using SCF Follow these instructions to reset and verify a non mirrored disk drive. In this example, the $DATA21 drive has just been replaced and is being prepared for operation. Use the SCF RESET DISK command; then use the SCF STATUS DISK command to verify that the disk drive is in the STOPPED state with the substate DOWN. TACL> SCF RESET $DATA21 ->STATUS $DATA21-* STORAGE - Status DISK \TOYS.
Starting a Nonmirrored Disk Drive With SCF Follow these instructions to start and verify a nonmirrored disk drive. In this example, the $DATA21 disk drive has been replaced and is being returned to operation. Use the SCF START DISK command to start the disk drive; then use the SCF STATUS DISK command to verify that both paths are in the STARTED state. TACL> SCF START $DATA21 ->STATUS $DATA21-* STORAGE - Status DISK \TOYS.
Switching and Testing Paths to a Nonmirrored Disk Drive Using SCF Follow these instructions to test all paths to a nonmirrored disk drive. In this example, the disk drive $DATA21 has been replaced. The -P and -B paths are being tested before operations are resumed on the replacement disk drive CRU.
3 Use the SCF SWITCH DISK command again to switch the replacement disk drive back to its primary path; then use the SCF STATUS DISK command to verify that the disk path has been switched and is working properly: ->SWITCH $DATA21-P ->STATUS $DATA21-* STORAGE - Status DISK \TOYS.
Checking For and Sparing Bad Sectors on a Nonmirrored Disk Drive With SCF The following instructions describe how to check for and spare bad sectors on a replacement nonmirrored disk drive CRU before restoring data to it or allowing applications to use it. 1 SCF INFO $DATA17, BAD STORAGE - Bad Sector Information Magnetic DISK \TOYS.$DATA17 Bad Sectors Information $DATA17: Logical Sector Address %H0000795C File Name DLSYS42X.