
Replacing an Internal Disk Drive CRU
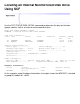


Powering Off and Removing an Internal Disk
Drive CRU
Follow these instructions to power off and remove an internal disk drive
customer-replaceable unit (CRU).
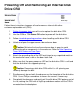
1 Gather the proper tools you will use to replace the disk drive CRU.
2 Use the OSM or TSM Power Off action to power off the disk drive.
3 Follow standard operating practices when handling a disk drive CRU.
4 Unlock and open the appearance-side enclosure door.
Caution: Minimize the time the enclosure door is open to avoid
overheating other components in the enclosure. Refer to Safe Operating
Times With Enclosure Door Open.
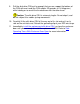
5 Attach the grounding clip of the ESD wriststrap to any unpainted metal on
the enclosure frame, such as the door latch stud.
6 Make sure that the green power-on LED on the disk drive CRU is unlit and
that the disk drive has stopped spinning.
Caution: Removing a disk drive CRU while it is still spinning can
seriously damage the disk.
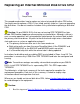
7 Simultaneously loosen both thumbscrews on the faceplate of the disk drive
CRU . Use a Phillips screwdriver to loosen the screws, if necessary.
8 Grasp both thumbscrews and gently pull the disk drive CRU partway out of
its slot, rocking the CRU with a slight up-and-down motion until the CRU is
unseated from the backplane.