
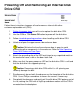
Replacing an Internal Disk Drive CRU


4 Disable DBIO on pre-G06.24 systems that are not running SPR T9753AFN
or later.
First, determine the current state of DBIO by using the SCF Status
SUBSYS $ZZSTO command.
●
Verify that the Backup and Restore utilities are not running. These
programs might use DBIO, if it is enabled, for enhanced performance.
Enter the TACL commands:
Status *, PROG $system.system.backup❍
Status *, PROG $system.system.restore❍
●
Wait until all Backup and Restore processes have finished before
disabling DBIO.
●
To disable DBIO, issue the SCF ALTER SUBSYS $ZZSTO, BULKIO OFF
command. Verify that it is disabled (OFF) by using the info SUBSYS
command.
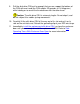
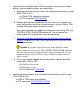
1> SCF
-> alter subsys $ZZSTO, BULKIO OFF
-> info subsys $zzsto
STORAGE - Info SUBSYS $ZZSTO
AutoConfigure AutoRevive AutoStart BulkIO LabelTape UPS
OFF OFF ON OFF ON
OFF
5 Power off and remove the disk drive CRU (it weighs nearly 4 pounds, or 2
kilograms).
Caution: After using the OSM or TSM Power Off action, wait until the
disk stops spinning before removing the disk. Removing a disk drive while
it is still spinning can seriously damage the disk.
6 Install the replacement disk drive CRU.
Cautions:
Before you install a CRU, carefully check its connecting pins. If any
pins are bent or damaged, do not install the CRU. Doing so could
damage the backplane. See Avoiding Connector and Backplane
Damage During CRU/FRU Replacement (NTL Support and Service >
Service Procedures) for more information.
●
The disk drive CRU is extremely fragile. Do not force it into the slot.●