
Replacing an Internal Disk Drive CRU


e Stop the disk drive using either OSM, TSM, or SCF:
OSM: Stop Disk action●
TSM: Down action●
SCF command: STOP DISK●
2 Identify the group, module, and slot containing the disk drive CRU, using
OSM, TSM, or SCF:
OSM or TSM: check disk attributes ●
SCF command: STATUS DISK, DETAIL●
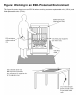
3 Power off and remove the disk drive CRU (it weighs nearly 4 pounds, or 2
kilograms).
Caution: After using the OSM or TSM Power Off action, wait until the
disk stops spinning before removing the disk. Removing a disk drive while it
is still spinning can seriously damage the disk.
4 Install the replacement disk drive CRU.
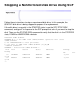
Cautions
Before you install a CRU, carefully check its connecting pins. If any pins
are bent or damaged, do not install the CRU. Doing so could damage
the backplane. See Avoiding Connector and Backplane Damage During
CRU/FRU Replacement (NTL Support and Service > Service
Procedures) for more information.
●
The disk drive CRU is extremely fragile. Do not force it into the slot.●
5 After successful installation, write the logical name of the disk drive on the
label near the top of the disk drive CRU faceplate.
6 If this is a new disk or a previously used disk requiring a new label, create a
new label identifying the disk (using the SCF ALTER DISK, LABEL
command). For example, the following command changes the volume name
of a disk from $DATA00 to $SPARE00:
-> ALTER $DATA00, LABEL $SPARE00
Caution: The SCF ALTER DISK, LABEL command deletes all files from
the disk.