
Replacing an IOMF 2 ServerNet PIC
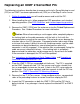


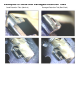

7 Install the PIC on the IOMF 2 board. The PIC is mounted face down.
Carefully orient the PIC, align the PIC's connector with the connector on the
IOMF 2 board, align the hole in the PIC with the nylon standoff, and press on
the PIC over the connector to seat the PIC. Make sure that both the
connector and the standoff fastener are secure and fully engaged. Reinstall
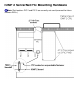
the 2 Torx T-10 screws and do not over tighten the screws. See IOMF 2
ServerNet PIC Mounting Hardware.
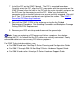
8 Reinstall the IOMF 2 CRU in the enclosure using the the Guided
Replacement Procedure. See Avoiding Connector and Backplane Damage
During CRU/FRU Replacement.
9 Remove your ESD wriststrap and disconnect the ground clip.
Note: If you are replacing a PIC because of failure symptoms, then before
replacing the PIC, first check that the PIC cables are securely connected. Poorly
connected cables can cause many PIC failure symptoms.
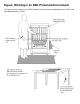
For IOMF 2 physical descriptions, see:
For G06.20 and later: NonStop S-Series Planning and Configuration Guide●
For G06.17 through G06.19: NonStop S-Series Hardware Support Guide ●
For G06.16 and earlier: Himalaya S-Series Hardware Support Guide●