
Replacing and Installing Enclosure Doors and Side Panels
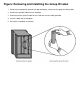

hardware, an appearance-side door, a service-side door, an adapter frame,
and mounting hardware.
Caution:
To avoid overheating, minimize the time the appearance-side enclosure door is
open. See Safe Operating Times With Enclosure Door Open.
●
Use appropriate ESD precautions and follow standard operating practices. (See
ESD Guidelines and Standard Operating Practices.)
●
Related Topics:
Quiescing Customer Applications ●
Definitions and Service Classes of CRUs and FRUs●
Part Number List for NonStop S-Series CRUs●
Part Number List for NonStop S-Series FRUs●
Removing and Installing Enclosure Doors
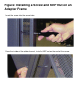
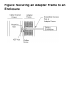
1 If a service-side door is being added and the adapter frame is not already
installed, see Installing a Service-Side Door Add-On Package.
2 Inspect the door being installed. If the door is damaged, order a new door.
3 If you are removing a door:
a. Unlock and open the door. See Unlocking and Opening a System
Enclosure Door.
b. To remove a door, see Removing an Enclosure Door.
c. If a short door is being replaced with a tall door, also remove the
power shelf panel below the door.
4 To Install a door, see Installing an Enclosure Door.
5 Install the group ID label. See Removing and Installing the Group ID Label.
6 Close and lock the enclosure door you just installed.
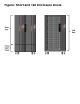
Installing the Side Panels