
Replacing Cooling Fans
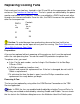


6 Unplug the fan's power cable from the PMCU connector. See Fan and Battery
Plugs and PMCU Faceplate.
Caution: Wait for the fan to slow its spinning before performing Step 7.
7 Press the latch on the fan interconnect cable that connects the two fans together,
and disconnect the interconnect cable. The fan that is not being replaced should
begin to speed up.
8 Remove the two screws that secure the fan and remove the fan from the
enclosure. Set the screws aside.
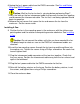
Installing A Fan:
9 Position the fan in the mounting space in the enclosure, with the airflow arrow
pointing down and the rotation arrow pointing counter-clockwise. See Installing
a Fan.
Caution: Do not connect the cables until after you have mounted the fan.
The blades begin to rotate as soon as the PMCU or interconnect cables are
attached.
10 Insert the two mounting screws through the fan housing and thread them into
the captive nuts. Tighten the screws using a Phillips screwdriver. Be careful not
to over-tighten them.
11 Plug the interconnect cable connectors of the two fans together. Check that
they are secure. Position the interconnect cable away from the fan exhaust and
against the bulkhead.
12 Plug the fan's power cable into the PMCU connector for that fan.
13 Reinstall the battery retainer on the frame. Position the battery retainer, insert
the screws, and tighten them using a Phillips screwdriver.
14 Close the enclosure door.