
Replacing or Installing MSEB Plug-In Cards (PICs)
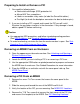
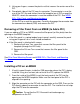
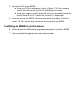
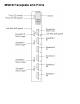
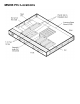
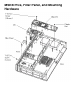
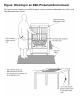
Table Of Contents
- Replacing or Installing MSEB Plug-In Cards (PICs)
- Replacing or Installing MSEB Plug-In Cards (PICs)
- MSEB Faceplate and Ports
- MSEB PIC Locations
- MSEB PICs, Filler Panel, and Mounting Hardware
- ESD Guidelines
- Fig: Working in an ESD Protected Environment
- Standard Operating Practices
- Unlocking and Opening a System Enclosure Door
- MSEB Cover Panel
- PIC Mounting Hardware
- Filler Panel Mounting Screws

Preparing to Install or Remove a PIC
1 You need the following tools:
Electrostatic discharge (ESD) protection kit●
#8 and #10 Torx screwdrivers●
Labels or removable sticky notes (to label the ServerNet cables)●
Flashlight (to check the backplane connectors for bent or broken pins) ●
2 If you are installing a PIC, unpack and inspect the PIC you will install.
Examine the connectors and pins in the connectors. If any damage is found,
obtain a good PIC before continuing.
Caution:
Use appropriate ESD precautions and follow standard operating practices.
(See ESD Guidelines and Standard Operating Practices).
●
To avoid overheating, minimize the time the enclosure door is open. See Safe
Operating Times With Enclosure Door Open.
●
Removing an MSEB From an Enclosure
3 Open the appearance-side enclosure door. See Unlocking and Opening a
System Enclosure Door.
4 Locate the MSEB you are installing a PIC in or removing a PIC from.
5 Use the appropriate OSM action or guided procedure to prepare and remove
the MSEB from its enclosure. See Guided Procedures for more information.
6 Place the MSEB on an antistatic mat with the cover panel side up. See
MSEB Cover Panel.
Removing a PIC From an MSEB
1 Remove the seven T-8 Torx screws that secure the cover panel to the
MSEB.
2 Slide the cover panel toward the rear of the MSEB and lift it off.
3 Verify the location of the PIC you are removing. See MSEB PIC Locations.
4 Remove the T-10 Torx screw that secures the front corner of the PIC (the
end nearest the faceplate) to the MSEB. See PIC Mounting Hardware.