
Replacing or Installing MSEB Plug-In Cards (PICs)
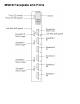
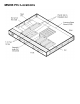
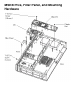
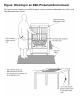
Table Of Contents
- Replacing or Installing MSEB Plug-In Cards (PICs)
- Replacing or Installing MSEB Plug-In Cards (PICs)
- MSEB Faceplate and Ports
- MSEB PIC Locations
- MSEB PICs, Filler Panel, and Mounting Hardware
- ESD Guidelines
- Fig: Working in an ESD Protected Environment
- Standard Operating Practices
- Unlocking and Opening a System Enclosure Door
- MSEB Cover Panel
- PIC Mounting Hardware
- Filler Panel Mounting Screws

5 Using your fingers, remove the plastic nut that secures the center rear of the
PIC.
6 Grasp both sides of the PIC near its connector. The connector is near the
rear of the PIC (the end farthest from the faceplate) on all PICs except the
NNA PIC, where the connector is near the middle of the PIC. See MSEB
PICs, Filler Panel, and Mounting Hardware.
Lift the PIC to unseat the connector. Carefully disengage the connector from
the common base board (CBB) and remove the PIC.
Removing a Filler Panel From an MSEB (to Add a PIC)
If you are adding a PIC to an MSEB, remove the filler panel (or filler plate) from the
opening on the MSEB faceplate:
If the filler panel is a spring-loaded snap-in panel, carefully remove the panel
using your fingernails or a small slotted screwdriver.
●
If the filler panel is attached with screws:●
Remove the 6-mm Torx screw that secures the filler panel to the
faceplate (through the LED hole).
1.
Remove the 20- mm Torx screw that secures the filler panel to the
CBB.
2.
Remove the filler panel.3.
See Filler Panel Mounting Screws and MSEB PICs, Filler Panel, and Mounting
Hardware.
Installing a PIC on an MSEB
1 Visually inspect the pins inside the CBB connector where the PIC is being
installed. If any pins are bent, do not install the PIC; replace the MSEB.
2 From the inside of the MSEB, insert the front panel of the PIC into the
opening on the MSEB faceplate. Make sure the front panel of the PIC is
aligned in the opening.
3 Align the connector on the PIC with the connector on the CBB. Press on the
PIC directly above the connector to seat the PIC. The stud for the nut helps
align the PIC over the connector.
Caution: Do not flex the PIC. Be careful not to damage any
components on the PIC.