
Replacing or Installing ServerNet Adapter Plug-In Cards (PICs)


Removing the Adapter From Its Enclosure
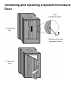
3 Open the appearance-side enclosure door. See Unlocking and Opening a
System Enclosure Door.
4 Locate the adapter that contains the PIC you will remove.
5 Prepare and remove the adapter from its enclosure.
For ServerNet/DAs:
For G06.08 and later RVUs, use the appropriate OSM action or
guided procedure. See Guided Procedures for more information.
❍
For earlier RVUs, use the instructions in the 6760 ServerNet/DA
Manual.
❍
●
For CCSAs:
Use the instructions in the 6763 Common Communication
ServerNet Adapter Installation and Support Guide.
❍
●
Removing the PIC From the Adapter
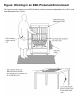
6 Place the adapter on an antistatic mat with the cover panel side up. See
Cover Panel on a ServerNet/DA or CCSA.
7 Remove the four T-9 Torx screws that secure the cover panel to the
adapter and set them aside.
8 Slide the cover panel toward the rear of the adapter and lift it off.
9 Verify the location of the PIC you are removing. See PICs Inside a
ServerNet/DA or CCSA.
10 Turn over the adapter (open side down) on the antistatic mat.
11 Locate the four T-9 Torx screws on the bottom that secure the PIC to the
adapter. See PIC Mounting Screws on a ServerNet/DA or CCSA.
12 Remove these four screws and set them aside.
13 Turn over the adapter (open side up) on the antistatic mat.
14 Carefully lift the rear of the PIC (the end farthest from the faceplate) away
from the common base board (CBB) to disengage the three connectors.
Remove the PIC. See PIC Connectors in ServerNet/DA or CCSA.