
Replacing or Installing ServerNet Adapter Plug-In Cards (PICs)


Preparing to Install the PIC
15 If you are installing a replacement PIC, continue with Step 16.
If you are adding a PIC to an existing adapter, prepare the adapter using
Steps 1 through 8.
PICs must be installed in numerical order, beginning with SAC 1.
●
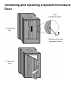
Remove the blank panel from the opening in the faceplate for the PIC
you are installing (See SAC 4 in Opening in Faceplate of a
ServerNet/DA or CCSA.)
●
Installing the PIC on the Adapter
16 From the inside of the adapter, insert the front panel of the PIC into the
opening in the faceplate. Align the front panel of the PIC in the opening.
17 Align the connectors on the PIC with the connectors on the common base
board (CBB) and seat the connectors by pressing on the PIC directly
above the connectors. Do not flex the CBB. Be careful not to damage any
of the components on the PIC or CBB.
18 Turn over the adapter so the open side is down on the antistatic mat.
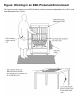
19 Install the four T-9 Torx screws that secure the PIC to the adapter.
Install two 3/16-inch screws toward the front of the adapter.
●
Install two 1/2-inch screws toward the middle of the adapter.●
See PIC Mounting Screws on a ServerNet/DA or CCSA.
20 Turn over the adapter over so the open side is up.
21 Slide on the cover panel from the rear of the adapter, and install the four
T-9 Torx screws that secure the cover panel to the adapter. See Cover
Panel on a ServerNet/DA or CCSA.
Installing the Adapter in Its Enclosure