ATI RADEON 7500 PCI Graphics Controller Installation Guide First Edition Revision A Manufacturing Part Number: AB551-96002 – Revision April 2005 A © Copyright 2004-2005 Hewlett-Packard Development Company, L.P.
Legal Notices Copyright Notices. © Copyright 2004-2005 Hewlett-Packard Development Company, L.P. The information contained herein is subject to change without notice. The only warranties for HP products and services are set forth in the express limited warranty statements accompanying such products and services. Nothing herein should be construed as constituting an additional warranty. HP shall not be liable for technical or editorial errors or omissions contained herein.
Contents 1 OVERVIEW ................................................................................................................1 Introduction...................................................................................................................................................... 1 Module Description.......................................................................................................................................... 1 Connector Pinouts...................................
Contents ATI RADEON 7500 PCI Graphics Controller Installation Guide Default Visual Information ....................................................................................................................... 18 Configuring Graphics Resolution or Vertical Refresh Rate for HP-UX ..................................................... 19 Current Graphics Resolution ....................................................................................................................
Preface This preface contains the following sections: • • • • • • Intended Audience Document Structure Notational Conventions Reader Comments and Feedback Related Information Printing History Intended Audience This manual is for managers and operators of HP AlphaServer systems with ATI RADEON 7500 PCI graphics controllers. Document Structure This manual has the following chapters. Chapter 1, Overview, provides a brief overview of the ATI RADEON 7500 PCI graphics controllers.
Preface ATI RADEON 7500 PCI Graphics Controller Installation Guide Example: “Enter the ls -l filename command” means you must replace filename with your own text. • Keyboard keys and graphical interface items (such as buttons, tabs, and menu items) are represented using this font. Examples: The Control key, the OK button, the General tab, the Options menu. • Menu —> Submenu represents a menu selection you can perform.
Preface ATI RADEON 7500 PCI Graphics Controller Installation Guide Diagnostics and Event Monitoring: Hardware Support Tools Complete information about HP’s hardware support tools, including online and offline diagnostics and event monitoring tools, is at the http://docs.hp.com/hpux/diag/ Web site. This site has manuals, tutorials, FAQs, and other reference material. Web Site for HP Technical Support: http://us-support2.external.hp.com HP’s IT resource center Web site at http://us-support2.external.hp.
1 Overview Introduction This chapter provides a brief overview of the ATI RADEON 7500 PCI graphics controller. Module Description The ATI RADEON 7500 PCI graphics controller/accelerator module is a single expansion-slot 32 bit, 66/33 MHz Universal PCI option that provides 2D and 3D graphics acceleration for supported HP systems running HP OpenVMS I64 and 2D for supported HP-UX systems The ATI RADEON 7500 graphic card is based on ATI’s RV200 graphics chip.
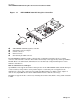
Overview ATI RADEON 7500 PCI Graphics Controller Installation Guide Figure 1-1 ATI RADEON 7500 PCI Graphics Controller 27300 CRT S-VIDOUT 2 DVI R 1 4 3 5 MR0494 X Y Z [ \ ATI RADEON 7500 PCI graphics controller DVI-I VGA connector adaptor S-Video connector DVI-I connector Standard 15-pin VGA connector The ATI RADEON 7500 PCI graphics controller has a standard 15-pin VGA connector, a DVI-I connector and an S-Video connector. The S-Video functionality is not supported by either OpenVMS or HP-UX.
Overview ATI RADEON 7500 PCI Graphics Controller Installation Guide Connector Pinouts Table 1-2 contains a listing of the pins and signals found on the standard 15-pin VGA connector and the DVI-I to VGA adaptor (part number 209815-001 not included in kit). Table 1-2 Standard 15-Pin VGA Connector Pinout Pin No.
Overview ATI RADEON 7500 PCI Graphics Controller Installation Guide This Page Intentionally Left Blank 4 Chapter 1
2 Installation Introduction This chapter provides information on unpacking the graphic controller and installing the ATI RADEON 7500 PCI graphics controller module in a supported HP product. Unpacking The graphics option hardware is packaged in a single carton that contains one graphic controller and one installation guide.
Installation ATI RADEON 7500 PCI Graphics Controller Installation Guide 7. Grasp the top edge of the graphics option, carefully insert it into the slot, and seat it firmly. 8. Secure the module with the screw. 9. Replace the computer cover. 10. Ensure that the monitor cable is connected to the video output connector located on the back of the graphics option. 11. Reconnect the AC power cables to the wall outlet (or turn on the circuit breakers if applicable to your system) to restore power to the system.
3 HP OpenVMS I64 – Graphics Software Installation and Customization This chapter provides information for installing and modifying the software required to support 2D and 3D graphics with the ATI RADEON 7500 PCI graphics controller under the HP OpenVMS I64 operating system. The ATI RADEON 7500 PCI graphics controller is directly supported by OpenVMS I64 without additional software.
HP OpenVMS I64 – Graphics Software Installation & Customization ATI RADEON 7500 PCI Graphics Controller Installation Guide Restrictions, Limitations and Defaults This section of the document contains limitations, restrictions and defaults for the ATI RADEON 7500 hardware and software. Minimum Console Revision The minimum console firmware version for support of the ATI RADEON 7500 graphics controller under OpenVMS I64 is system dependent.
HP OpenVMS I64 – Graphics Software Installation & Customization ATI RADEON 7500 PCI Graphics Controller Installation Guide Multiple Colormaps (8 Bits Per Pixel) Multiple colormaps are not supported by the hardware. The ATI RADEON 7500 PCI graphics controllers support only one installed colormap at one time. Exceeding this limit in 8 bits per pixel depth, may cause colormap ‘flashing’, also known as "Technicolor". Applications should not install or de-install colormaps themselves.
HP OpenVMS I64 – Graphics Software Installation & Customization ATI RADEON 7500 PCI Graphics Controller Installation Guide the libraries provide support for the ATI RADEON 7500 TCL hardware, hardware alpha and stencil planes, 3D multi-texturing, and 3D cube map textures. The RADEON 7500 Mesa3D software will, by default, force a direct-rendered 3D context whenever the 3D client requests connection to the X11 server using the LOCAL transport.
HP OpenVMS I64 – Graphics Software Installation & Customization ATI RADEON 7500 PCI Graphics Controller Installation Guide Screen Order and Forcing Single Headed Operation Screen order is determined by the bus ordering of devices, and will vary across platforms. The DECW$PRIVATE_SERVER_SETUP.COM file allows the user to override the ordering of screens, or to force single headed operation. See the documentation in the file, and in the Motif documentation for more information.
HP OpenVMS I64 – Graphics Software Installation & Customization ATI RADEON 7500 PCI Graphics Controller Installation Guide To override the default settings, follow these steps: 1. Copy or rename the SYS$MANAGER:DECW$PRIVATE_SERVER_SETUP.TEMPLATE file to create a new command (.com) file called DECW$PRIVATE_SERVER_SETUP.COM. 2. Now make the edits for the settings you want to change using a text editor, and save the file. 3.
HP OpenVMS I64 – Graphics Software Installation & Customization ATI RADEON 7500 PCI Graphics Controller Installation Guide More extensive logging of server events can be enabled by modifying the DECW$PRIVATE_SERVER_SETUP.COM DCL procedure and setting: $ DECW$SERVER_AUDIT_LEVEL == “n” Where n is a value between 0 and 4 (with 0 being none, and 4 being high).
HP OpenVMS I64 – Graphics Software Installation & Customization ATI RADEON 7500 PCI Graphics Controller Installation Guide Problem Description Solution resolution and refresh rate being used? Some monitors may need to be manually adjusted using their front panel controls.
4 HP-UX Configuration This chapter describes how to configure the ATI RADEON 7500 graphics controller in a system running the HP-UX operating system. NOTE: Chapter 4 pertains to the HP-UX operating system only; if you are running the OpenVMS operating system, see Chapter 3 The examples in this manual show version numbers applicable at publication. To determine the most recent version of the operating system or video driver, refer to the Release Notes on the CD-ROM or on the Web at www.hp.com.
HP-UX Configuration ATI RADEON 7500 PCI Graphics Controller Installation Guide Changing the Boot Console When an ATI RADEON 7500 is installed in the system, the only supported console is the serial console. Use the following instructions to switch the console to the serial device.
HP-UX Configuration ATI RADEON 7500 PCI Graphics Controller Installation Guide Verification of Hardware Installation After the ATI RADEON 7500 graphics controller has been installed and the system has rebooted, verify the graphics card was correctly installed and identify which device file corresponds to which card. 1. Run the command ioscan –fun –C graphics Output similar to the following should appear. There should be one line for every graphics device in the system.
HP-UX Configuration ATI RADEON 7500 PCI Graphics Controller Installation Guide Resolutions ATI RADEON 7500 graphics controllers can support various graphics resolutions and refresh rates as shown in Table 4-1. In addition to these standard resolutions and refresh rates, the ATI RADEON 7500 graphics controller will also support any resolutions and refresh rates that are supported by the specific monitor that it is connected to the ATI RADEON 7500 card.
HP-UX Configuration ATI RADEON 7500 PCI Graphics Controller Installation Guide Section “Screen” Identifier “Screen 0” DefaultDepth 24 […] SubSection “Display” Depth 24 […] EndSubSection SubSection “Display” Depth 8 […] EndSubSection EndSection The following lines will select an 8-bit default depth visual: Section “Screen” Identifier “Screen 0” DefaultDepth 8 […] SubSection “Display” Depth 24 […] EndSubSection SubSection “Display” Depth 8 […] EndSubSection EndSection Restart the Xserver after editing the Xse
HP-UX Configuration ATI RADEON 7500 PCI Graphics Controller Installation Guide Multihead Support Multihead support is provided through changes to the Xserver’s configuration file which is located at /etc/X11/XF86Config. In order to do this correctly, you will need to know which device files to use. See “Verification of Hardware Installation” on page 17 for details on how to determine which device files to use. Dual-screen By default, an ATI RADEON 7500 appears as a single screen device.
HP-UX Configuration ATI RADEON 7500 PCI Graphics Controller Installation Guide Section Screen Identifier “Screen 0-1” Device “ATI Radeon 7500 QW(0) Connector 1” Monitor “Monitor 0” # Include other Screen info here, including other SubSections EndSection Section Screen Identifier “Screen 0-2” Device “ATI Radeon 7500 QW(0) Connector 2 Monitor “Monitor 0” # Include other Screen info here, including other SubSections EndSection Section Screen Identifier “Screen 1-1” Device “ATI Radeon 7500 QW(1) Connector 1” M
HP-UX Configuration ATI RADEON 7500 PCI Graphics Controller Installation Guide Messages Xserver messages are typically logged to /var/X11/Xserver/logs. The two files that contain the messages are: /var/X11/Xserver/logs/Xf86.*.log /var/X11/Xserver/logs/Xstartup.*.log Where * is the display instance of the Xserver, which is usually 0. The Xstartup.*.log file contains messages from the X loader. The Xf86.*.log file contains messages from the Xf86 Xserver. The Xf86.*.