HP StorageWorks Booting Windows Server 2003 for Itanium-based systems from a storage area network application notes Part number: AA–RV22F–TE Sixth edition: August 2006
Legal and notice information © Copyright 2006 Hewlett-Packard Development Company, L.P. © Copyright 2006 Emulex Corporation. © Copyright 2006 QLogic Corporation. The information contained herein is subject to change without notice. The only warranties for HP products and services are set forth in the express warranty statements accompanying such products and services. Nothing herein should be construed as constituting an additional warranty.
About this document These application notes describe storage area network (SAN) boot setup procedures on Windows® Server™ 2003 for Itanium®-based systems for specific software solutions, Fibre Channel host bus adapter (HBA) firmware versions, and Extensible Firmware Interface (EFI) driver versions. For the latest version of these application notes and other documentation, see the HP storage web site http://h18006.www1.hp.com/storage/saninfrastructure.html.
Introduction Traditionally, HP ProLiant servers boot operating systems from internal SCSI and IDE storage devices. With the support of external booting with StorageWorks Fibre Channel HBAs and RAID arrays, customers can optionally eliminate server-based internal boot devices. Booting from an external device decreases downtime through faster server replacement in the event of a server failure.
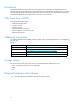
Table 2 Required hardware and software Feature Requirement Operating systems Datacenter and Enterprise Editions of: • Windows Server 2003 for Itanium-based systems • Windows Server 2003 with SP1 for Itanium-based systems RAID arrays Enterprise Virtual Arrays Modular Smart Arrays XP Disk Arrays Fibre Channel switches B-Series, C-Series, and M-Series switch products. See the HP StorageWorks SAN design reference guide on the website http://h18006.www1.hp.com/products/storageworks/san/ documentation.
NOTE: The memory paging system requires fast access to the pagefile.sys file. In some cases, in SAN environments with heavy I/O loads, the access request for moving information to or from the paging file may be delayed. This can cause the operating system to halt, requiring a reboot to recover. Microsoft recommends that if paging errors occur, page files should be relocated to disks that are built into the server using its internal data paths.
Server replacement in the event of a server failure You must retain the HBAs to ensure that the replacement server hardware components are identical to the ones you are replacing. Place each HBA in the PCI slots of the new server in the same order as they were placed in the old server. If you are using an internal disk for your paging file system, move this disk to the replacement server. You can also use a new disk, but you must format it and manually reset the paging to that disk.
Switch-based zoning You must be familiar with switch-based zoning. For information about zoning for your environment, see your switch’s installation guide. Setting up switch zoning You must set up switch zoning as part of your configuration. See the figures in "Cabling options for single-channel HBAs" on page 6 and "Cabling options for dual-channel HBAs" on page 9. Setting up initial zoning 1.
SHR2622C.
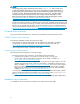
The configurations shown in Figure 4 and Figure 5 support SCSIPORT or Storport miniport drivers.
The configuration shown in Figure 6 supports SCSIPORT or Storport miniport drivers.
Server Figure 7 Single server, one dual-channel HBA, one switch, straight-cable storage configuration SHR-2619C Figure 8 Single server, one dual-channel HBA, one switch, straight-cable storage configuration Figure 9 Single server, one dual-channel HBA, two switches, cross-cable storage configuration 10
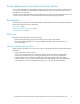
The configuration shown in Figure 10 requires a Storport miniport driver.
The configuration shown in Figure 12 supports Storport miniport drivers. SHR-2619C Figure 12 Single server, one dual-channel HBA, two switches, cross-cable HA storage configuration Special considerations Storport miniport driver support for boot from SAN configurations HP supports the Storport miniport driver for Windows Server 2003 SP1 for boot from SAN configurations. For more information about the Storport miniport driver, see the following document: http://www.microsoft.
NOTE: You must run the Smart Component from a command line environment as shown in the following example to ensure that you have the proper driver parameter settings: C:\>cp00xxxx.exe /x Considerations for multipath environments Multipathing provides high-availability computing through a redundant data path to the RAID array. Microsoft requires that the boot HBA be different from the shared-data HBA.
3. Verify that the HBA is online by entering the following command: HSG> show connections 4. Optionally, rename the connection. 5. Allow the HBA to access the LUN by entering the following command: HSG> set dl enable_access_path=!newcon01 For more information about LUN Configuration, see the HP StorageWorks HSG80 installation and configuration guide. Creating a LUN on Enterprise Virtual Arrays To create a LUN on Enterprise Virtual Arrays: 1.
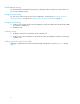
Updating the HBA firmware and EFI driver To update the HBA firmware and EFI driver: 1. Insert the Smart Setup media in the CD-ROM drive while the system is booting up. NOTE: Use the Smart Setup media available with your Integrity server, or download the latest Smart Setup software at: http://h71028.www7.hp.com/enterprise/cache/277215-0-0-225-121.html. 2. Select Bootable DVD to display the EFI-Based Setup Utility (EBSU) Boot Manager. Figure 13 EFI Boot Manager menu 3. Click OK to access the main menu. 4.
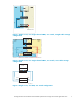
Figure 14 EFI Boot Manager main menu 5. Verify that the HBA contains the latest firmware and EFI driver. 6. Select the devices you want to update. Figure 15 Selecting a device to update 7. Press Tab to the Begin Flash option to flash the HBA. 8. At the prompt, press Tab to the Continue option, and then press Enter to begin the flash. When the flash is completed, the utility automatically reboots the server and starts the EBSU. The EBSU indicates that the flash was successful.
Figure 16 Firmware Flash Results 9. Press Enter twice to return to the main menu. Configuring the HBAs This section describes how to configure the HBAs. Configuring the boot device for Emulex HBAs To configure the boot device for Emulex HBAs: 1. Select Configure Storage Adapter and then select an HBA. Figure 17 Configure Storage Adapter screen 2. Press Enter to select and configure the HBA.
Figure 18 Configure the Fibre Channel card screen 3. Select an HBA. 4. Select Setup Utility. 5. Select Reset to Default Values. 6. Enter Yes at the Do you want to force defaults? prompt. 7. Select Enable or Disable BIOS. 8. Select Enabled. 9. Press ESC to return to the main menu. 10. Select Configure the HBA parameters. 11. Select Topology. 12. Select Point to Point. 13. Press Esc twice to return to the main menu. 14. Select Configure Boot Parameters (The boot table should be empty). 15.
NOTE: For Disk Array XP, you must run Scan Targets a second time after you create LUN 0 and present it to the host. Doing so makes the WWNN of the boot HBA available so it can be presented to the LUN. 21. On the boot server, press Enter to display a LUN. (This is the LUN to which your boot device has access.) Press Enter. 22. Select Boot this device via WWN. The boot table has one entry that displays the boot device target WWN and LUN information. 23. Press ESC until you exit the utility.
6. Install multipathing software if applicable. 7. Install the latest operating system service pack. 8. Reboot the server to complete the installation. 9. Follow through on for each additional controller port assignment to the HBAs. 10. Connect any nonbooting HBAs. 11. Follow the procedure in "Finalizing zoning " on page 6. 12. Create and assign all other storage LUNs to the appropriate HBAs.
3. At the command prompt, change to the location of the Diskpart Utility: Shell> fs1: fs1:\> cd efi\efi_utils 4. Run the DiskPart Utility: fs1:\efi\efi_utils> diskpart.efi 5. List the partitions available: DiskPart> list Output similar to the following appears: ### BlkSize BlkCount --- ------- ---------------0 200 B40 1 200 4800000 NOTE: Device 0 is the virtual floppy disk and Device 1 is the LUN created to install the operating system.
NOTE: Do not press F6 to load any mass-storage device drivers. 2. Use the latest HP Smart Setup CD-ROM to update the system drivers and agents. 3. To re-install the HBA driver, run the Smart Component by selecting Drivers > Driver for FC HBA. This sets the HP-supported registry parameters. When you reboot, these changes are implemented (step 5). 4. Install multipathing software. 5. Reboot the server to complete the installation. NOTE: For single-path configurations, skip steps 6 through 8. 6.
Adding the NOVESA settings 1. Select the EFI shell and change the directory to the boot LUN (fs1:). NOTE: The boot disk might be mounted in a location other than fs1. 2. Change the directory to MSUTIL, and then enter the NVRBOOT command. The following example shows the results: Shell:\>fs1: fs1:\> dir Directory of: fs1:\ 07/17/03 11:48a 127 fail_file.txt 03/25/03 05:00a 841,216 SETUPLDR.