hp Integrity rx1620 Installation Guide Regulatory Model Number: RSVLA-0406 Second Edition Manufacturing Part Number: AB430-96004 February 2005 U.S.A. © Copyright 2005 Hewlett-Packard Development Company, L.P..
Legal Notices Copyright Notices. © Copyright 2005 Hewlett-Packard Development Company, L.P. The information contained herein is subject to change without notice. The only warranties for HP products and services are set forth in the express warranty statements accompanying such products and services. Nothing herein should be construed as constituting an additional warranty. HP shall not be liable for technical or editorial errors or omissions contained herein.
Contents 1. About This Document What’s in This Document . . . . . . . . . . . . . . . . . . . . . . . . . . . . . . . . . . . . . . . . . . . . . . . . . . . . . . . . . . . . . . Typographical Conventions . . . . . . . . . . . . . . . . . . . . . . . . . . . . . . . . . . . . . . . . . . . . . . . . . . . . . . . . . . . Related Documents . . . . . . . . . . . . . . . . . . . . . . . . . . . . . . . . . . . . . . . . . . . . . . . . . . . . . . . . . . . . . . . . . . . HP Encourages Your Comments . . . .
Contents Power and System LEDs . . . . . . . . . . . . . . . . . . . . . . . . . . . . . . . . . . . . . . . . . . . . . . . . . . . . . . . . . . . . Command Line Interface . . . . . . . . . . . . . . . . . . . . . . . . . . . . . . . . . . . . . . . . . . . . . . . . . . . . . . . . . . . . . . Command Line Interface Menu . . . . . . . . . . . . . . . . . . . . . . . . . . . . . . . . . . . . . . . . . . . . . . . . . . . . . . . Troubleshooting Example Using CLI . . . . . . . . . . . . . . . . . . . . .
Figures Figure 2-1. hp Integrity rx1620 Server . . . . . . . . . . . . . . . . . . . . . . . . . . . . . . . . . . . . . . . . . . . . . . . . Figure 2-2. hp Integrity rx1620 Server (Front View with Bezels Removed). . . . . . . . . . . . . . . . . . . Figure 2-3. hp Integrity rx1620 Server (Rear View) . . . . . . . . . . . . . . . . . . . . . . . . . . . . . . . . . . . . . Figure 3-1. Front View . . . . . . . . . . . . . . . . . . . . . . . . . . . . . . . . . . . . . . . . . . . . . . . . . . . . . . . .
Figures 6
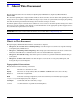
1 About This Document This document describes how to install your hp Integrity rx1620 Server, Regulatory Model Number: RSVLA-0406. The document printing date and part number indicate the document’s current edition. The printing date will change when a new edition is printed. Minor changes may be made at reprint without changing the printing date. The document part number will change when extensive changes are made.
About This Document Related Documents Related Documents The HP Server Documentation CD-ROM has been provided with your server. It contains a complete documentation set for the server, including localized versions of key documents. Included on the CD-ROM are the Site Preparation, Operations, and Maitenance guides, which contain in-depth troubleshooting, installation, and repair information. The CD will autorun when you insert it into a Windows workstation, or, point your browser at the index.
About This Document Where to Get Help • The product number of your server. This can be found on the identification label, which is found at the front of the unit (typically AB430A). • The serial number of your server. This can be found on the identification label. Step 3.
About This Document Where to Get Help 10 Chapter 1
2 Server Overview and Unpacking Server Overview The hp Integrity rx1620 Server is a two-way IPF rack-mount server based on the Itanium® processor family architecture. The hp Integrity rx1620 Server accommodates up to 8 DIMMs and internal peripherals including disks and DVD-ROM. The supported operating systems include HP-UX, Windows, and Linux.
Server Overview and Unpacking Server Overview Figure 2-2 hp Integrity rx1620 Server (Front View with Bezels Removed) Figure 2-3 hp Integrity rx1620 Server (Rear View) 12 Chapter 2
Server Overview and Unpacking Unpacking the Server Unpacking the Server Hewlett-Packard shipping containers protect their contents under normal shipping conditions. After the equipment arrives, carefully inspect each carton for signs of shipping damage. A tilt indicator is installed on each carton shipped. The beads in the indicator will roll to the upper position if the container has been tilted to an angle that could cause equipment damage.
Server Overview and Unpacking Unpacking the Server 14 Chapter 2
3 Installing and Configuring This chapter provides information about the controls and indicators, both front and rear panels and procedures required in installing additional components and configuring the hp Integrity rx1620 Server. Control Panel The control panel of the hp Integrity rx1620 Server provides the controls and indicators commonly used for operation.
Installing and Configuring Control Panel Table 3-1 Name Control Panel LEDs and Switches Function Power On/Off LED The green on/off LED is illuminated when the power is on. Power On/Off Button This is the power on/off switch for the server. System LED The System LED provides information about the system status. When operation is normal, the LED is green. When there is a system warning, the LED is flashing yellow. When there is a system fault, the LED is flashing red.
Installing and Configuring Additional Controls and Indicators Additional Controls and Indicators The hp Integrity rx1620 Server can have up to two low-voltage differential (LVD), 3.5 inch form factor hard disk drives installed. These hard disk drives have LEDs that provide status and activity information. Hard Disk Drive Indicators The hard disk drives have two LEDs per drive, as described below. • Activity LED—The Drive Activity LED is green and indicates disk drive activity.
Installing and Configuring Additional Controls and Indicators Optional Removable Media Drive The hp Integrity rx1620 Server is delivered without a removable media drive. Either a DVD or CD-RW/DVD drive may be added. Each of these optional devices has one activity LED.
Installing and Configuring Rear Panel Rear Panel The hp Integrity rx1620 Server rear panel includes communication ports, I/O ports, AC power connector, and the locator LED/button.
Installing and Configuring Service Tools Required Table 3-4 Rear Panel Connectors and Switches (Continued) Connector/Switch Function Locator Button and LED The locator button and LED are used to help locate a server within a rack of servers. When the button is engaged, the blue LED illuminates and an additional blue LED on the front panel of the server illuminates. This function may be remotely activated. Video (optional) 15-pin female video connector for the optional management processor card.
Installing and Configuring Installing Internal Hard Disk Drives Installing Internal Hard Disk Drives This section provides information about installing internal hard disk drives. CAUTION Figure 3-6 A hot-plug device may require interaction with the operating system before the device can be safely installed into the server. Verify that the operating system supports installing disk drives while the operating system is running.
Installing and Configuring Installing Internal Hard Disk Drives CAUTION If the HP Server is to be operated with only a single hard disk drive installed, the hard disk drive slot filler must be installed to insure proper cooling. If a hard disk drive is installed in slot 1, retain the slot filler to be reinstalled if the drive is removed. Figure 3-7Filler Removal from Slot 1 Step 2. Slide the hard disk drive into slot 1 until it is seated.
Installing and Configuring Installing Internal Hard Disk Drives CAUTION When sliding the hard disk drive into the slot, be careful not to damage the EMI shielding of the drive. The drive should fit into the slot without excessive use of pressure. Figure 3-8Disk Drive Installation in Slot 1 Step 3. Close the drive-ejector handle by pushing it down until it clicks. Step 4. The hard disk drive is now correctly installed. Step 5. Validate the hard disk drive installation by: a.
Installing and Configuring Removing and Replacing the Cover Removing and Replacing the Cover CAUTION Do not operate the server without the cover in place. Operation of the server without the cover in place will result in system failure. Operation of the server without the cover in place will make the server susceptible to EMI and overheating problems. Observe all ESD safety precautions before attempting this procedure. Failure to follow ESD safety precautions could result in damage to the server.
Installing and Configuring Removing and Replacing the Cover Step 1. Open the cover by moving the latch handle counter-clockwise. Step 2. Slide the cover toward the rear of the chassis and lift the cover to free the tabs from the slots on the sides of the chassis. Replacing the Cover To replace the cover, perform the following steps: Step 1. Align the tabs on the cover with the slots on the sides of the chassis.
Installing and Configuring Installing Processors and Memory Step 2. Close the cover by moving the latch handle clockwise. Figure 3-11 Closing the Cover OPEN CLOSED Installing Processors and Memory This section provides information about installing processors and memory. The processors and memory slots are located on the system board, which is accessible by removing the system cover. WARNING Voltages are present at various locations within the server whenever an AC power source is connected.
Installing and Configuring Installing Processors and Memory Observe all ESD safety precautions before attempting this procedure. Failure to follow ESD safety precautions could result in damage to the server. Avoid contact with the processor heatsink if the server has been operating prior to the installation of the additional processor. The heatsink will be safe to touch after the cover has been removed for a few seconds.
Installing and Configuring Installing Processors and Memory Step 1. Remove the cover. See “Removing and Replacing the Cover”. Step 2. Remove sheet metal air duct by pulling it straight up. Step 3. If the CPU airflow blocker is installed, remove the airflow blocker. Step 4. If the CPU dust cover is installed, remove the CPU dust cover. CAUTION If the HP Server is to be operated with only a single processor installed, the CPU airflow blocker must be installed to ensure proper cooling.
Installing and Configuring Installing Processors and Memory CAUTION The zero insertion force (ZIF) socket for the processor is locked and unlocked by 1/2 of a full turn of the 2.5 mm hex tool. The counterclockwise 180 degree rotation (1/2 turn) unlocks the socket. A clockwise 180 degree rotation locks the socket. Attempting to turn the locking mechanism more that 180 degrees can severely damage the socket. Figure 3-14 Unlocking the Processor Locking Mechanism 5NLOCKED ,OCKED Front of server Step 6.
Installing and Configuring Installing Processors and Memory Step 7. Place the processor and heatsink assembly over the processor socket. Use the four locator posts on the assembly to align with the locator holes on the system board. Make certain that the connector that will mate with the processor power pod is pointing toward the back of the chassis.
Installing and Configuring Installing Processors and Memory Step 8. Use the special processor tool (P/N 5069-5441) shipped with your replacement processor assembly to lock the processor in place on the system board. To do this, insert the special processor tool into the lock and rotate it clockwise 180 degrees.
Installing and Configuring Installing Processors and Memory Step 10. Slide the power module on the system board metal mounting bracket forward to mate the power module connector with the processor connector. Figure 3-18 Connecting the Processor Power Pod &RONT OF SERVER Step 11. Align the two mounting screw holes on the power module with their screw holes on the system board’s metal mounting bracket. Screw in the power module mounting screws.
Installing and Configuring Installing Processors and Memory Step 12. Connect the power pod cable to the power connector on the system board. Figure 3-20 Connecting the Power Cable &RONT OF SERVER Step 13. Reinstall sheet metal air duct. Step 14. Replace the cover. Step 15. Verify that the newly installed processor works: Chapter 3 • Run the info cpu command at the EFI shell prompt, or • Run cpu diag from Offline Diagnostic CD for full functional check.
Installing and Configuring Installing Additional Memory Installing Additional Memory The hp Integrity rx1620 Server has 8 memory sockets for installing DDR SDRAM memory modules. These memory modules can either be 256MB, 512MB, 1GB, or 2GB size. The system supports combinations from 512 MB up to 16GB. Supported DIMM sizes Supported DIMM sizes are 256MB, 512MB, 1GB, 2GB. Dissimilar DIMM sizes may be used in any available slot pairs but all DIMMs in each pair must match.
Installing and Configuring Installing Additional Memory Figure 3-21 DIMM Loading Order Front Rear Pair 4 2A 1A 2B Pair 2 1B 3A Pair 3 0A 3B 0B Pair 1 DIMM Locations Eight DIMM slots are provided on the system board. These DIMM slots are designated in ordered pairs. 0A and 0B, 1A and 1B, 2A and 2B, and 3A and 3B. DIMM sizes within each pair must match. Loading order for the DIMM slots is sequential with the loading order being slot 0, slot 1, slot 2 and slot 3.
Installing and Configuring Installing Additional Memory Each DIMM within a quad must be identical to all the other DIMMs in the quad. Figure 3-22 DIMM Locations DIMM Slot 1B DIMM Slot 0B DIMM DIMM DIMM Slot 2B Slot 1A Slot 2A DIMM DIMM DIMM Slot 3B Slot 0A Slot 3A Installing DIMMs To install DIMMs, perform the following steps: Step 1. Turn off the system, disconnect all cables, and remove the system cover.
Installing and Configuring Installing Additional Memory CAUTION To ensure that memory modules are not damaged during removal or installation, power off the server and unplug the power cord from the AC power outlet. Wait until the power on/off LED on the control panel turns off before removing or installing memory. Observe all ESD safety precautions before attempting this procedure. Failure to follow ESD safety precautions could result in damage to the server. Step 2.
Installing and Configuring Installing Additional PCI Cards Step 7. Verify that the newly installed memory works: • Run the info mem command at the EFI shell prompt, or • Run memdiag from the Offline Diagnostics DC to ensure that the memory is functional Installing Additional PCI Cards The server may contain up to 2 PCI cards. PCI cards are located on the I/O riser assembly.
Installing and Configuring Installing Additional PCI Cards Step 2. Release the PCI I/O riser by turning the jackscrew. This action frees the PCI I/O riser from the system board.
Installing and Configuring Installing Additional PCI Cards Step 3. Remove the PCI I/O Riser from the chassis.
Installing and Configuring Installing Additional PCI Cards Step 4. Remove the PCI slot cover. Figure 3-26 Removing a PCI Slot Cover Step 5. Grasp the edges of the PCI card being installed and gently press the connector into the PCI I/O riser connector. NOTE Full length PCI cards may only be installed in slot 1, the top slot of the PCI I/O riser assembly. The lower slot (slot 2) can only accept half length cards. Figure 3-27 Installing a PCI Card Step 6.
Installing and Configuring Optional Management Processor Card (MP) Step 7. Replace the PCI I/O riser assembly by positioning the connector over the mating connector on the system board and then turning the jackscrew to complete the connector mating. Step 8. Connect any cables that are required by the PCI card. Step 9. Replace the cover. See “Removing and Replacing the Cover”. Optional Management Processor Card (MP) The management processor is an independent support system for the server.
Installing and Configuring Optional Management Processor Card (MP) Step 4. Remove the blank retaining tab out of its socket on the system chassis and remove the blank from the system. Figure 3-28 Removing the MP Card Blank Step 5. Remove the insulator between the battery and the battery socket on the management processor card. Step 6. Align the MP card over the two mounting posts on the system board and align the three connectors of the MP card with the cutouts on the rear panel. Step 7.
Installing and Configuring Optional Management Processor Card (MP) Step 9. Screw in the two mounting screws that connect the MP card to the internal chassis post.
Installing and Configuring Optional Management Processor Card (MP) Step 10. Screw in the two external mounting posts that are located on both sides of the 25-pin serial connector. Figure 3-30 Installing the External Mounting Posts Step 11. Replace the system cover and reconnect the power and external cables. Information required to access, configure, and utilize the management processor is provided under “Utilities” in the hp Integrity rx1620 Operations Guide.
Installing and Configuring Optional Management Processor Card (MP) 46 Chapter 3
4 Troubleshooting This chapter provides troubleshooting instructions used in the maintenance of the hp Integrity rx1620 Server. Troubleshooting Tips WARNING Before removing a cover, always disconnect the AC power cord and unplug cables. Disconnect the AC power cord to avoid exposure to high energy levels that may cause burns when parts are short-circuited by metal objects such as tools or jewelry.
Troubleshooting Possible Problems — Analyze the alert by using the system event log (SEL) to identify the last error logged by the baseboard management controller. Use either the EFI shell command line interface (CLI) or if the optional management processor card is installed, use the MP commands to view the SEL. Step 3. At this point you will have a good idea about which area of the system requires further analysis.
Troubleshooting Possible Problems The system will not boot. Step 1. Examine the display panel LEDs for warning or fault indications. The system LED will be flashing yellow with a warning indication and flashing red with a fault indication. Step 2. Examine the four diagnostic LEDs for indications of specific warning or fault indications. The diagnostic LEDs present patterns that categorize the source of the warning or fault. Step 3.
Troubleshooting Possible Problems Step 8. Reseat the main memory DDR DIMMs. Step 9. If date and time or customer settings are being cleared, the system board battery may need to be replaced. The system LED or diagnostic LEDs are not on and no error messages appear. If the server does not work, with no LEDs illuminated and no error messages appearing, check the following: Step 1. Make sure that all cables and the AC power cord are plugged into their proper receptacles. Step 2.
Troubleshooting Possible Problems Step 4. First check to make sure power is getting to the server. Plug a known working device into the power outlet. Step 5. Check for proper ventilation for the server. The server should have at least three inches of space around the front and rear for proper airflow when installed in a rack. NOTE Temperature problems may be caused by a fluctuating power supply. Step 6.
Troubleshooting Troubleshooting and FRU identification Troubleshooting and FRU identification Once you have determined the current system state, you must troubleshoot the system to determine what the problem symptoms are and what repair actions to take. Use this guide to assist you in repairing the system by matching the problem symptom with the appropriate troubleshooting step.
Troubleshooting Troubleshooting and FRU identification Table 4-1 Problem Symptoms Repair Actions (Continued) Problem or Symptom Problem Indicators System will not power on when display panel Power switch is turned on. • Display panel power LED stays off when power is turned on. • System LED may be flashing yellow (attention indication). Normal Functioning Indicators • Power switch on. • Power LED on steady green. • System LED is off. Troubleshooting Steps Potential FRUs 1.
Troubleshooting Verifying Hard Disk Drive Operation Table 4-1 Problem Symptoms Repair Actions (Continued) Problem or Symptom Problem Indicators Cannot boot to initial system loader (ISL) • Console messages indicating problems booting from the primary or alternate boot path. Normal Functioning Indicators • Console messages and prompt indicating you are at ISL. Troubleshooting Steps Potential FRUs 1. Use EFI shell commands to verify I/O and presence of valid devices.
Troubleshooting Verifying Hard Disk Drive Operation On the hp Integrity rx1620 Server only the Activity LED is used. The Status LED is disconnected. NOTE Figure 4-1 LED Apertures on Hard Disk Drive Status LED (not used) Activity LED Lightpipes on the disk drive transmit light to these apertures from LEDs on the inside rear of the hot-swap mass storage cage. Verify that the LED shows the correct activity indication for all disk drives that you installed: Step 1.
Troubleshooting Identifying and Diagnosing Hardware Problems d. Restart the HP Server to determine whether the LED now becomes illuminated during the boot. If not, contact your reseller. Step 5. At the EFI shell prompt input shell> info io to check the SCSI drives.
Troubleshooting Identifying and Diagnosing Hardware Problems Table 4-2 System LED States (Continued) System LED State Blinking red (2/sec.) Fault indication: System alert level 7 detected, LED will blink until the problem is resolved and the system boots successfully or until it is manually turned off. The LED will turn off once the event log has been read.
Troubleshooting Identifying and Diagnosing Hardware Problems Step 5. For a complete explanation of configuring the management processor and using the MP commands, see “Utilities” in the hp Integrity rx1620 Operation Guide. System Event Logs (SEL) Logs Step 1. Access the management processor command prompt. Step 2. Run the sl command.
Troubleshooting Identifying and Diagnosing Hardware Problems L Last entry J Jump to entry number H View mode configuration - Hex K View mode configuration - Keyword T View mode configuration - Text A Alert Level Filter options U Alert Level Unfiltered ? Display this Help menu Q Quit and return to the Event Log Viewer Menu Ctrl-B Exit command, and return to the MP Main Menu MP:SL (+,-,,D, F, L, J, H, K, T, A, U, ? for Help, Q or Ctrl-B to Quit) >a Alert Level Threshold Filter: 1 :
Troubleshooting Identifying and Diagnosing Hardware Problems L Last entry J Jump to entry number V View mode configuration (text, keyword, hex) ? Display this Help menu Ctrl-B Quit and return to the Main Menu Step 4. Select a, then a threshold filter number to filter events to desired level.
Troubleshooting Identifying and Diagnosing Hardware Problems Data1: Device Removed/Device Absent 0x203E4D0AC6020220 FFFF0008F61B0300 Log Entry 73: 00:00:12 Alert Level 3: Warning Keyword: Type-02 050301 328449 The server's built-in sensors have detected an open chassis door.
Troubleshooting Identifying and Diagnosing Hardware Problems • If a management processor card is installed, the boot process will be monitored by the management processor card. The diagnostic LEDs are disabled. Figure 4-2 Diagnostic LEDs LED 2 LED 4 LED 1 LED 3 Locator Button and LED • Power On/Off LED System LED LAN LED Diagnostics LEDs Power On/Off Button The system LED indicates the severity of the error.
Troubleshooting Identifying and Diagnosing Hardware Problems Table 4-4 LED 1 Diagnostic LEDs Fault and Warning Categories (Continued) LED 2 LED 3 LED 4 Category Red Anya Anya Red Temperature Anya Red Anya Red Power Supply Red Red Red Red Unknown a. This LED can display any color other than red (for example, green or off).
Troubleshooting Identifying and Diagnosing Hardware Problems Table 4-7 System LED Flashing Yellow System Board Warnings LED 1 Green Table 4-8 System LED LED 2 LED 3 Green LED 4 Red Off LED 3 LED 4 Problem Solution Battery voltage low Replace the system board battery. Fan Warnings LED 1 LED 2 Problem Solution Flashing Yellow Green Off Off Red Cooling Unit 1 (PSU) is not functioning properly Replace the fan that is not functioning.
Troubleshooting Identifying and Diagnosing Hardware Problems Table 4-11 System LED Flashing Yellow Video Warnings LED 1 LED 2 LED 3 Off Red Red Table 4-12 System LED Flashing Yellow LED 4 Off Problem No video adapter present Solution Install a video adapter. See the installation instructions shipped with the video adapter. Power Supply Warnings LED 1 Green LED 2 LED 3 Red Off LED 4 Red Problem Power supply fault Solution Check the power supply LED. Replace the power supply.
Troubleshooting Identifying and Diagnosing Hardware Problems Table 4-14 System LED Flashing Red Memory Faults (Continued) LED 1 Red Table 4-15 System LED Flashing Red Green LED 3 Green LED 4 Green Problem Solution Bad Memory. One or more DIMMs are bad or not seated properly. Reseat the DIMMs. If the error persists, replace them.
Troubleshooting Identifying and Diagnosing Hardware Problems a. Refer to the hp Integrity rx1620 Maintenance Guide for detailed instructions on the maintenance action.
Troubleshooting Command Line Interface Table 4-21 System LED Power Supply Errors LED 1 LED 2 LED 3 LED 4 Problem Solution Flashing Red Off Red Off Red VRM or power pod fault View the SEL for additional information. Flashing Red Green Red Off Red Power Supply fault View the SEL for additional information. Replace the power supply if necessary. Flashing Red Green Red Green Red 12V out of range (power supply interface fault) View the SEL for additional information.
Troubleshooting Command Line Interface Troubleshooting Example Using CLI This example uses the cli and the SEL to display error messages indicating that no memory is installed.
Troubleshooting LAN LEDs LAN LEDs The front panel LAN LED indicates the system is communicating over the Gigabit or system management LAN: • Blinking green, the system is communicating over the LAN. • Solid green, LAN link is established, no current LAN activity. Rear Panel LAN LEDs There are three LAN connectors on the rear panel.
Troubleshooting LAN LEDs Optional Management Processor LAN C Connector LEDs The optional 10/100Mb LAN C interface provides four LEDs on the rear panel if the management processor card is installed: Table 4-24 Optional Management Processor Card LAN C LEDs LAN LED Self-test 10BT 100BT Standby Power Chapter 4 Location Top 2nd from top 2nd from bottom Bottom Color State Yellow Management processor running selftest or error Off Management processor has booted Green 10BT link established Blin
Troubleshooting System Board Diagnostic LEDs System Board Diagnostic LEDs There are three additional LEDs that can help when troubleshooting the system. These LEDs are located on the system board close to the back of the system and can be viewed through the small cooling holes in the system case.
Troubleshooting Running Diagnostic Software Tools Running Diagnostic Software Tools This section includes information on the following diagnostic tools: • HP e-DiagTools Hardware Diagnostics Before you run the HP diagnostic software, take note of any LED error messages. To find out more about the error, note any event messages and use the tool appropriate for your system to determine what failed.
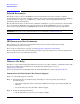
Troubleshooting Running Diagnostic Software Tools Shell> fs0: fs0:> Step 3. Navigate to the EFI\BOOT directory on the CD: a. Change to the EFI directory on the diagnostics CD. fs0:> cd EFI fs0\EFI:> b. Execute the ls command to list the contents of the directory. fs0:\EFI> ls Directory of: fs0:\EFI 11/07/02 11/07/02 11/07/02 11/07/02 04:41p 04:41p 04:41p 04:45p
1,024 . 0 .. 1,024 HP 1,024 BOOT 0 File(s) 0 bytes 4 Dir(s) c. Change to the BOOT subdirectory.Troubleshooting Running Diagnostic Software Tools Producing a Support Ticket To produce a complete record of your system’s configuration and test results, you must create a support ticket. This is a simple text file that contains essential information and is designed to assist your local or HP support agent. To produce a support ticket, from the Welcome to e-DiagTools Menu: Step 1. Start e-DiagTools and select Run e-DiagTools for IPF from the main menu. Step 2.
Troubleshooting Running Diagnostic Software Tools • The current support ticket is the one produced by the last execution of e-DiagTools. When running e-DiagTools, you can create a support ticket on demand in the configuration description screen. When you run the basic system tests or advanced system tests, a support ticket is created automatically. Browse the support ticket screen for information that can help you troubleshoot your system.
Troubleshooting Using Offline Diagnostic Tools NOTE If you are unable to boot from your DVD drive, restart your system and check the boot options from the Boot Options Maintenance Menu to ensure that your system is configured to boot from the DVD drive. For further information, see http://docs.hp.com/hpux/diag under the section titled “Offline Diagnostics.” This site includes links to a FAQ, a conceptual overview, and a quick reference guide to ODE.
Troubleshooting Recommended Cleaning Procedures Offline Diagnostic Environment (ODE) ODE is used to evaluate specific hardware components via a Command Line Interface. To access ODE, perform the following: Step 1. Power on your HP Server and insert the IPF Offline Diagnostics and Utilities CD into the DVD-ROM tray. Step 2. Do not permit the server to boot into an Operating System and at the EFI Boot Manager, select EFI Shell. Step 3.
Troubleshooting Where to Get Help Support is available on the web and by phone. For information on contacting the HP IT Resource Center (ITRC) near you, go to http://www.itrc.hp.com. Information to Collect Before you Contact Support Before you contact HP support, you should: Step 1. Check the previous sections of this chapter and attempt to solve the problem. • Note failure symptoms and error indications (LEDs and messages). • Try to determine precisely what did or did not happen. Step 2.
Troubleshooting Where to Get Help Phone Support To contact HP customer support by phone, go to the HP IT Resource Center (ITRC) near you, at http://www.itrc.hp.com. Local phone numbers are listed in your native language for help.
5 Cable Connections AC Input Power The hp Integrity rx1620 Server comes with one power supply with a single AC input connector. The input for the connector is rated for 100 to 240 VAC at 13 Amps. WARNING Figure 5-1 Voltage is present at various locations within the server whenever an AC power source is connected. This voltage is present even when the main power switch is in the off position. Failure to observe this warning could result in personal injury or damage to equipment.
Cable Connections External Core I/O Connections External Core I/O Connections Each hp Integrity rx1620 Server external core I/O includes: • Two external USB ports • Two 10/100/1000 Base -T ethernet LAN ports • One 16550 compatible serial port Additional external I/O ports are available when the optional management processor (MP) card is installed. • VGA video port • DB-25 serial port providing three serial DB-9 connections for console, remote and UPS.
Cable Connections External Core I/O Connections During installation, communicating with the management processor enables such tasks as: • Verifying that the components are present and installed correctly • Setting the LAN IP addresses Setting Terminal Parameters After powering on the terminal, ensure the communications settings are as follows: • 8/none (parity) • 9600 baud • None (Receive) • None (Transmit) If the terminal is a PC using Reflection 1, check or change these communications setting
Cable Connections External Core I/O Connections NOTE Adding an entry to the ARP table is typically done using the ARP command with the appropriate option. For example, arp -s is used with Windows. Consult your operating system documentation for more information. Step 4. Use the ping command from the host that has the new ARP table entry. The destination address is the IP address that is mapped to the MAC address of the management processor.
Cable Connections External Core I/O Connections Web Console Port Number: 2023 Do you want to modify the LAN hardware configuration? (Y/[N]) Do you want to modify the LAN configuration? (Y/[N]) y The value in the “IP address” field is set at the factory. The customer must provide the actual management processor LAN IP address. NOTE Step 2. At the prompt, Do you want to modify the Lan hardware configuration?, enter y.
Cable Connections External Core I/O Connections Table 5-1 Management Processor Commands and Descriptions (Continued) Command Description CT Configure Trace DATE Display date DC Default Configuration DF Display FRUID DI Disconnect Remote or LAN Console FW MP Firmware upgrade HE Display Help for Menu or Command ID System Information IT Modify MP Inactivity Timers LC LAN Configuration LOC Locater LED Control LS LAN Status MA Return to Main Menu MR Modem Reset MS Modem Status
Cable Connections External Core I/O Connections Table 5-1 Management Processor Commands and Descriptions (Continued) Command Description UC User Configuration VT Display software trace VFP Virtual Front Panel WHO Display Connected management processor Users XD MP Diagnostics and/or Reset Chapter 5 87
Cable Connections Booting the Server Booting the Server To boot the server, perform the following step. Step 1. Depress the power switch located to the right of the Front Panel LEDs. If the autoboot function is enabled, the system will boot to the installed operating system. If autoboot is not enabled, the system will enter the EFI Boot Manager. The EFI Boot Manager allows you to control the server’s booting environment.
Index A acetone, 78 Activity LED, 54 ammonia, 78 B benzene, 78 C Caution light pipes, 55 commands lc (LAN configuration), 85 cover removing and replacing, 24 D diagnostic, 73 E e-DiagTools, 73, 76 G Gigabit LAN, 70, 71 H hard disk drive modules, 54 Hot Swap Disk Drive, 17 Hot-swap disk drive module, 54 HP e-DiagTools, 76 HP IPF Offline Diagnostics and Utilities CD, 73 I Indicators, LED, 55 installing management processor card, 42 installing additional internal hard disk drive, 21 memory, 34 PCI cards, 38 pr
Index 90