
Installation Guide, Second Edition - HP Integrity rx1620

Chapter 3
Installing and Configuring
Installing Processors and Memory
28
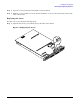
Step 1. Remove the cover. See “Removing and Replacing the Cover”.
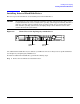
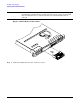
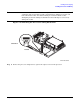
Step 2. Remove sheet metal air duct by pulling it straight up.
Step 3. If the CPU airflow blocker is installed, remove the airflow blocker.
Step 4. If the CPU dust cover is installed, remove the CPU dust cover.
CAUTION If the HP Server is to be operated with only a single processor installed, the CPU
airflow blocker must be installed to ensure proper cooling. If a second processor is
installed in location CPU 1, retain the airflow blocker to be reinstalled if the
processor is removed.
Figure 3-13 Removing the Air Duct, Airflow Blocker, and Dust Cover
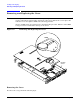
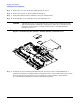
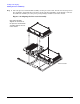
Step 5. Unlock the processor-locking mechanism using the special processor tool (P/N 5069-5441), or
equivalent 2.5 mm hex tool, shipped with your replacement processor assembly. Insert the tool into
the lock and rotate the special processor tool 180 degrees counterclockwise. Verify that the
processor-locking mechanism is rotated into the unlocked position.