Getting Started Guide HP Integrity rx2600 server and HP workstation zx6000 Document Part Number: A9664-90020 June 2003 7KLV JXLGH SURYLGHV DQ RYHUYLHZ RI WKH V\VWHP IURQW DQG UHDU SDQHO FRQQHFWRUV LQVWUXFWLRQV RQ KRZ WR VHW XS DQG FRQILJXUH \RXU V\VWHP DQG WURXEOHVKRRWLQJ WLSV 7KH DSSHQGLFHV LQFOXGH ZDUUDQW\ VWDWHPHQWV DQG UHJXODWRU\ QRWLFHV
Contents +HZOHWW 3DFNDUG &RPSDQ\ 0LFURVRIW :LQGRZV :LQGRZV DQG :LQGRZV ;3 DUH UHJLVWHUHG WUDGHPDUNV RI 0LFURVRIW &RUSRUDWLRQ LQ WKH 8 6 DQG RWKHU FRXQWULHV ,QWHO DQG ,WDQLXP DUH UHJLVWHUHG WUDGHPDUNV RI ,QWHO &RUSRUDWLRQ LQ WKH 8 6 DQG RWKHU FRXQWULHV $OO RWKHU SURGXFW QDPHV PHQWLRQHG KHUHLQ PD\ EH WUDGHPDUNV RI WKHLU UHVSHFWLYH FRPSDQLHV +HZOHWW 3DFNDUG &RPSDQ\ VKDOO QRW EH OLDEOH IRU WHFKQLFDO RU HGLWRULDO HUURUV RU RPLVVLRQV FRQWDLQHG KHUHLQ RU IRU LQFLGHQWDO RU FRQVHTXHQWL
Contents Important Safety Warnings Å WARNING: Avoiding Electrical Shocks. To avoid electrical shock, do not open the power supplies. There are no user-serviceable parts inside. To avoid electrical shock and harm to your eyes by laser light, do not open the DVD laser module. The laser module should be serviced by service personnel only. Do not attempt to make any adjustment to the laser unit. Refer to the label on the DVD for power requirements and wavelength. This product is a class I laser product.
Contents Ä CAUTION: Avoiding Static Electricity. Static electricity can damage electronic components. Turn OFF all equipment before installing an accessory card. Don’t let your clothes touch any accessory card. To equalize the static electricity when replacing an accessory card, rest the accessory card bag on top of the system unit while you are removing the card from the bag. Handle the card as little as possible and with care. Ä CAUTION: Information on Ergonomic Issues.
Contents 1 Setting Up and Using Your System 6\VWHP &RQILJXUDWLRQV ¤ )URQW 3DQHO ¤ 5HDU 3DQHO ¤ 6HWWLQJ 8S
Contents :KHUH WR *HW +HOS ¤ ,QIRUPDWLRQ WR &ROOHFW %HIRUH
1 setting up and using your system 7KLV FKDSWHU LQFOXGHV ■ GHVFULSWLRQV RI WKH V\VWHP IURQW DQG UHDU SDQHOV ■ LQIRUPDWLRQ RQ KRZ WR VHW XS \RXU V\VWHP ■ LQVWUXFWLRQV IRU VWDUWLQJ DQG VWRSSLQJ \RXU V\VWHP ■ EDVLF V\VWHP FRQILJXUDWLRQ LQIRUPDWLRQ system configurations 7KH +3 ,QWHJULW\ U[ VHUYHU DQG +3 ZRUNVWDWLRQ ][ DUH DYDLODEOH LQ WRZHU DQG UDFN PRXQW FRQILJXUDWLRQV Accessory Slots Fan Type/ Speed Management Processor Redundant Hot-swap Power Supply zx6000 workstation tower 3 PCI
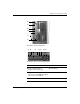
Setting Up and Using Your System front panel 7KH IURQW SDQHOV RI WKH U[ DQG ][ KDYH WKH IROORZLQJ IHDWXUHV 1–2 ■ 3RZHU /(' LV JUHHQ ZKHQ WKH SRZHU LV RQ RU WKH SRZHU EXWWRQ LV SXVKHG LQ ,I WKH SRZHU LV RQ DQG WKH EXWWRQ LV SXVKHG LQ WKH OLJKW VWD\V RQ HYHQ DIWHU WKH V\VWHP LV SRZHUHG GRZQ :KHQ WKH EXWWRQ LV UHOHDVHG WKH JUHHQ OLJKW WXUQV RII ■ 3RZHU %XWWRQ WXUQV WKH V\VWHP SRZHU RQ DQG RII ■ /$1 /(' LQGLFDWHV WKH V\VWHP LV FRPPXQLFDWLQJ RYHU WKH *LJDELW RU 6\VWHP 0DQDJHPHQW /$1
Setting Up and Using Your System 7 6 5 4 3 1 Front Panel, Tower Configuration 1 2 3 4 5 6 7 Front Panel, Rack-mounted Configuration 1 e-buzzer Icon 5 System LED 2 Locator LED and Button (rack-mounted system only) 6 Power Button 3 Diagnostic LEDs 1-4 7 Power LED (active only on zx6000 workstations with no MP card installed) 4 LAN LED HP Integrity rx2600 server and HP workstation zx6000 Getting Started Guide 1–3
Setting Up and Using Your System rear panel 7KH UHDU SDQHO KDV WKH IROORZLQJ IHDWXUHV 1–4 ■ &RQQHFWRUV DUH VKDSHG WR JR LQ RQH ZD\ RQO\ WR SUHYHQW LPSURSHU FDEOH DWWDFKPHQW ■ 3RUWV DUH ODEHOHG IRU HDV\ LGHQWLILFDWLRQ ■ 0DQDJHPHQW 3URFHVVRU 03 SRUWV DUH SRVLWLRQHG DERYH UDFN PRXQW RU WR WKH ULJKW RI WRZHU VWDQGDUG FRQQHFWRUV RSWLRQDO RQ ][ ZRUNVWDWLRQ ■ /$1 /('V SURYLGH DGGLWLRQDO LQIRUPDWLRQ ❏ )RXU *LJDELW /$1 /('V ❏ 7ZR 6\VWHP 0DQDJHPHQW /$1 /('V ❏ )RXU 03 /$1 /('V
Setting Up and Using Your System 1 2 14 3 4 13 12 11 10 9 56 7 8 Rear Panel Connectors 1 Power (PWR2) 8 USB ports (mouse and keyboard ports labelled) 2 Power (PWR1) 9 TOC button 3 MP VGA, serial, LAN, reset (optional on zx6000 workstation) 10 Locator LED and button 4 System lock 11 10/100 LAN 5 Serial port A (console) 12 LAN LEDs 6 Serial port B 13 10/100/1000 LAN 7 Monitor connector(s) (zx6000 workstation only) 14 LVD/SE SCSI HP Integrity rx2600 server and HP workstation zx6000 Gett
Setting Up and Using Your System setting up your system Å WARNING: If you have any doubt that you can lift the system or monitor safely, do not try to move them without help.
Setting Up and Using Your System tools
Setting Up and Using Your System connecting devices %HIRUH FRQQHFWLQJ DQ\ FRUGV RU FDEOHV WR \RXU V\VWHP SOHDVH UHDG WKH :DUQLQJ 1RWLFHV LQ WKH IURQW RI WKLV PDQXDO keyboard, mouse and power 7KH U[ DQG ][ V\VWHPV VKLS ZLWK D 86% NH\ERDUG DQG PRXVH 3OXJ WKH NH\ERDUG DQG PRXVH LQWR 86% FRQQHFWRUV RQ WKH UHDU SDQHO RI WKH FRPSXWHU 3RUWV DUH ODEHOOHG 7KHUH DUH WZR SRZHU UHFHSWDFOHV RQ WKH UHDU SDQHO RI WKH V\VWHP Å 1–8 ,I \RX SXUFKDVHG \RXU V\VWHP ZLWKRXW D VHFRQG SRZHU VXSSO\
Setting Up and Using Your System graphics cards and monitors ,QWHJULW\ U[ VHUYHUV DQG ][ ZRUNVWDWLRQV ZLWK 0DQDJHPHQW 3URFHVVRU 03 FDUGV VXSSRUW D 9*$ PRQLWRU FRQQHFWHG WR WKH 9*$ SRUW RQ WKH 03 FDUG ][ ZRUNVWDWLRQV ZLWK QR 03 FDUGV DUH DYDLODEOH ZLWK D UDQJH RI $*3 JUDSKLFV FDUGV ■ *UDSKLFV FDUGV PD\ LQFOXGH DQ SLQ FRQQHFWRU DQ SLQ FRQQHFWRU RU ERWK 2QO\ RQH FRQQHFWLQJ FDEOH LV QHHGHG IRU HDFK PRQLWRU ■ 6RPH YLGHR FDUGV DUH SUH LQVWDOOHG LQ WKH V\VWHP ZKLOH RWKHUV DUH
Setting Up and Using Your System starting and stopping your system +3 ,QWHJULW\ U[ VHUYHUV DQG ][ ZRUNVWDWLRQV FRPH LQ PDQ\ GLIIHUHQW FRQILJXUDWLRQV 3D\ FDUHIXO DWWHQWLRQ WR WKH GLUHFWLRQV EHORZ DQG FKRRVH WKH RSWLRQV WKDW PDWFK WKH 26 DQG SDFNDJLQJ \RX SXUFKDVHG starting your system 7R VWDUW \RXU V\VWHP 7XUQ RQ WKH PRQLWRU EHIRUH \RX VWDUW \RXU V\VWHP 3UHVV WKH SRZHU EXWWRQ RQ WKH IURQW SDQHO 7KH V\VWHP VWDUWV 'XULQJ V\VWHP VWDUWXS WKH GLVSOD\ PD\ UHPDLQ EODQN IRU XS WR RQH PLQX
Setting Up and Using Your System initializing your software 7KH U[ DQG ][ FDQ EH FRQILJXUHG ZLWK WKH 2SHUDWLQJ 6\VWHP 26 SUH LQVWDOOHG RU SDFNDJHG VHSDUDWHO\ ■ ,I \RX SXUFKDVHG D V\VWHP ZLWK WKH 26 SUH LQVWDOOHG WKH LQLWLDOL]DWLRQ SURFHVV VWDUWV ZKHQ \RX VWDUW WKH ZRUNVWDWLRQ IRU WKH ILUVW WLPH 7KH VRIWZDUH LQLWLDOL]DWLRQ SURFHVV WDNHV D IHZ PLQXWHV
Setting Up and Using Your System installing hardware components ,I \RX SXUFKDVHG DQ DFFHVVRU\ FDUG D JUDSKLFV FDUG RU RWKHU KDUGZDUH FRPSRQHQWV WKDW ZHUH QRW LQVWDOOHG LQ \RXU V\VWHP DW WKH IDFWRU\ \RX PXVW LQVWDOO WKRVH FRPSRQHQWV QRZ Å WARNING: For most hardware installation procedures, you must power off the system and unplug the power cord from the outlet.
Setting Up and Using Your System firmware and drivers 7R GRZQORDG WKH ODWHVW GULYHUV DQG ILUPZDUH IRU \RXU *R WR http://www.hp.
Setting Up and Using Your System configuring your system 7KUHH WRROV DUH DYDLODEOH WR FRQILJXUH \RXU V\VWHP ■ ([WHQVLEOH )LUPZDUH ,QWHUIDFH (), SDJH ■ 0DQDJHPHQW 3URFHVVRU 03 RSWLRQDO RQ ][ ZRUNVWDWLRQV SDJH ■ %DVHERDUG 0DQDJHPHQW &RQWUROOHU %0& SDJH 7KLV VHFWLRQ SURYLGHV D EULHI LQWURGXFWLRQ WR WKHVH WRROV )RU FRPSOHWH LQIRUPDWLRQ UHIHU WR ¦6\VWHP &RQILJXUDWLRQ§ LQ WKH KS U[ ][ 2SHUDWLRQ DQG 0DLQWHQDQFH *XLGH extensible firmware interface 7KH ([WHQVLEOH
Setting Up and Using Your System
Setting Up and Using Your System 7R DFFHVV WKH (), UHPRWHO\ :LWK WKH ZRUNVWDWLRQ WXUQHG RII FRQQHFW WKH VHULDO FDEOH SURYLGHG ZLWK \RXU V\VWHP +3 SDUW QXPEHU RU D FRPSDWLEOH FDEOH WR 6HULDO 3RUW $ RQ WKH UHDU SDQHO RI WKH ZRUNVWDWLRQ DQG WR \RXU UHPRWH GHYLFH &RQILJXUH WKH WHUPLQDO HPXODWLRQ VRIWZDUH ZLWK WKHVH VHWWLQJV ❏ %DXG UDWH ❏ %LWV ❏ 3DULW\ 1RQH ❏ 6WRS %LWV RQH ❏ )ORZ &RQWURO ;21 ;2)) 8VLQJ WKH WHUPLQDO HPXODWLRQ VRIWZDUH FRQQHFW WR WKH ZRUNV
Setting Up and Using Your System using the EFI shell 7R DFFHVV WKH (), VKHOO :KHQ WKH (), ERRW RSWLRQ VFUHHQ GLVSOD\V XVH WKH DUURZ NH\V WR KLJKOLJKW (), 6KHOO WKHQ SUHVV (QWHU $ OLVW RI ILOH V\VWHPV GULYHV DQG SDUWLWLRQV DQG EORFN GHYLFHV RQ KDUG GULYHV LV GLVSOD\HG )RU H[DPSOH Device mapping table fs0: Acpi(HWP0002,100)/Pci(1|0)/Scsi(Pun0,Lun0)/HD(Part1,Sig00112233) blk0: Acpi(HWP0002,0)/Pci(2|0)/Ata(Primary,Master) blk1: Acpi(HWP0002,100)/Pci(1|0)/Scsi(Pun0,Lun0) 7KH (), VKHOO ILUVW
Setting Up and Using Your System cls E 3UHVV (QWHU WR H[HFXWH WKH FRPPDQG ◆ 6RPH FRPPDQGV UHTXLUH DGGLWLRQDO DUJXPHQWV WR IXUWKHU GHILQH WKHLU DFWLRQ )RU H[DPSOH WR GLVSOD\ LQIRUPDWLRQ DERXW WKH V\VWHP PHPRU\ \RX PXVW W\SH WKH FRPPDQG QDPH SOXV WKH GHVLUHG FDWHJRU\ RI LQIRUPDWLRQ WR GLVSOD\ fs0:\> info mem ◆ :KHQ \RX HQWHU LQGLYLGX
Setting Up and Using Your System 7KH IROORZLQJ VHFWLRQ SURYLGHV D OLVW RI (), FRPPDQG FDWHJRULHV )RU PRUH LQIRUPDWLRQ VHH WKH KS U[ ][ 2SHUDWLRQ DQG 0DLQWHQDQFH *XLGH RU XVH WKH (), VKHOO KHOS V\VWHP 7R DFFHVV D ■ /LVW RI (), FRPPDQG FODVVHV H[HFXWH help DW WKH (), VKHOO SURPSW ■ 'HWDLOHG GHVFULSWLRQ RI D FRPPDQG H[HFXWH help DQG WKH FRPPDQG QDPH DW WKH (), VKHOO SURPSW )RU H[DPSOH fs0:\> help date (), FRPPDQGV DUH RUJDQL]HG LQWR GLIIHUHQW FODVVHV EDVHG RQ WKHLU IXQFWLRQV 7KH FO
Setting Up and Using Your System using the boot option maintenance menu 7KLV PHQX DOORZV \RX WR VHOHFW FRQVROH RXWSXW DQG LQSXW GHYLFHV DV ZHOO DV YDULRXV ERRW RSWLRQV 7R ■ GLVSOD\ WKH KHOS DYDLODEOH IRU WKH FRPPDQG VHOHFW +HOS ■ UHWXUQ WR WKH PDLQ %RRW 2SWLRQV 0DLQWHQDQFH PHQX VHOHFW ([LW ■ KLJKOLJKW DQ LWHP XVLQJ WKH DUURZ NH\V WKHQ SUHVV (QWHU ■ VDYH \RXU FKDQJHV VHOHFW 6DYH 6HWWLQJV WR 195$0 127( ,I \RX DUH XVLQJ WKH (), 6KHOO \RX PXVW H[LW WKH VKHOO DQG UHWXUQ WR WKH (), %RRW 0DQDJHU
Setting Up and Using Your System ■ Select Active Console Output Devices OHWV \RX GHILQH GHYLFHV WR GLVSOD\ RXWSXW IURP WKH V\VWHP FRQVROH ❏ 7R VHOHFW D PRQLWRU FRQQHFWHG WR WKH 03 9*$ SRUW FKRRVH Acpi (HWP0002, 700)/Pci(2|0). ❏ 7R VHOHFW D PRQLWRU FRQQHFWHG WR DQ $*3 JUDSKLFV FDUG FKRRVH Acpi (HWP0003, 0)/Pci(0|0).
Setting Up and Using Your System using the system configuration menu 7KH System Configuration Menu DYDLODEOH RQ V\VWHPV ZLWK (), ILUPZDUH YHUVLRQ RU KLJKHU LQFOXGHV WKH IROORZLQJ RSWLRQV 7KH Security/Password Menu OHWV \RX FKDQJH WKH DGPLQLVWUDWRU DQG XVHU SDVVZRUGV ■ 7KH Advanced System Information Menu GLVSOD\V LQIRUPDWLRQ DERXW V\VWHP DQG FRPSRQHQW FRQILJXUDWLRQ ■ 1–22 ■ Set System Date OHWV \RX PRGLI\ WKH V\VWHP GDWH ■ Set System Time OHWV \RX PRGLI\ WKH V\VWHP WLPH ■ Reset Configur
Setting Up and Using Your System security/password menu
Setting Up and Using Your System advanced system configuration menu 7KH Advanced System Configuration Menu GLVSOD\V ■ DOO V\VWHP LQIRUPDWLRQ ■ V\VWHP LQIRUPDWLRQ ■ SURFHVVRU LQIRUPDWLRQ ■ FDFKH LQIRUPDWLRQ ■ PHPRU\ LQIRUPDWLRQ ■ ERRWDEOH GHYLFHV LQIRUPDWLRQ ■ ERRW LQIRUPDWLRQ ■ ILUPZDUH LQIRUPDWLRQ ■ ZDUQLQJ DQG VWRS ERRW LQIRUPDWLRQ ■ FKLS UHYLVLRQ LQIRUPDWLRQ using the security/password menu 7KH Security/Password Menu RQ V\VWHPV ZLWK (), ILUPZDUH YHUVLRQ RU ORZHU LV LGHQWLFDO WR
Setting Up and Using Your System management processor 7KH 0DQDJHPHQW 3URFHVVRU 03 LV DQ LQGHSHQGHQW VXSSRUW SURFHVVRU IRU WKH V\VWHP FRQVROH 03 SURYLGHV VHUYLFHV WKDW IDFLOLWDWH WKH PDQDJHPHQW RI WKH KRVW V\VWHP 127( 1RW DOO V\VWHPV LQFOXGH D 03 FDUG 7R GHWHUPLQH LI WKH FDUG LV LQVWDOOHG ORRN DW WKH EDFN SDQHO RI \RXU V\VWHP ,I WKH 03 FDUG LV LQVWDOOHG \RX ZLOO VHH D SLQ 6HULDO 3RUW Feature Description Always on capability The MP is alive as long as the power cord is plugged in.
Setting Up and Using Your System baseboard management controller 7KH %DVHERDUG 0DQDJHPHQW &RQWUROOHU %0& VXSSRUWV WKH LQGXVWU\ VWDQGDUG ,QWHOOLJHQW 3ODWIRUP 0DQDJHPHQW ,QWHUIDFH ,30, VSHFLILFDWLRQ 7KLV VSHFLILFDWLRQ GHVFULEHV WKH PDQDJHPHQW IHDWXUHV WKDW KDYH EHHQ EXLOW LQWR WKH V\VWHP ERDUG 7KHVH IHDWXUHV LQFOXGH ■ ORFDO DQG UHPRWH GLDJQRVWLFV ■ FRQVROH VXSSRUW ■ FRQILJXUDWLRQ PDQDJHPHQW ■ KDUGZDUH PDQDJHPHQW ■ WURXEOHVKRRWLQJ )RU D FRPSOHWH OLVWLQJ RI %0& &RPPDQGV VHH WKH 6\VWHP &RQ
2 troubleshooting 7KLV FKDSWHU FRQWDLQV EDVLF LQIRUPDWLRQ WR KHOS \RX JHW \RXU +3 ,QWHJULW\ U[ VHUYHU DQG +3 ZRUNVWDWLRQ ][ XS DQG UXQQLQJ LQ WKH XQOLNHO\ HYHQW WKDW \RX H[SHULHQFH D SUREOHP 7RSLFV LQFOXGH ■
Troubleshooting your system does not start properly The system doesn’t power on. Make sure... How The system’s power cord is properly connected. Connect the power cord to a working power outlet and to the rear of the system. There is a buzzing noise. A beep code when the system starts up means that there is a configuration problem. Many of the e-buzzer codes relate to the LED diagnostic codes. See section “Using the LEDs and e-buzzer to Troubleshoot Your System.” Make sure...
Troubleshooting you find a hardware problem keyboard problems The keyboard doesn’t work. Make sure... How The keyboard cable is correctly connected. Plug the cable into the correct connector on the back of the system. (Keyboard port is labelled.) The keyboard is free of debris. Check all keys are at the same height, and none are stuck down. The keyboard itself is not defective. Either replace the keyboard by a known working unit or try the keyboard with another system.
Troubleshooting mouse problems The mouse doesn’t work. Make sure... How The mouse cable is correctly connected and the driver has loaded properly. Plug the cable into a USB port on the rear panel of the system. (Mouse port is labelled.) Reboot the system to reload the mouse driver during startup. Download and install the latest driver. You are using the correct driver.
Troubleshooting graphics and monitor problems The monitor doesn’t work. The system’s power indicator light works but the monitor remains blank. Make sure... How The monitor power cord is correctly connected. Ensure the power cord is plugged into a working grounded power outlet and into the monitor. The monitor is switched ON (LED is on). Refer to the monitor manual for an explanation of the LED signals. The graphics card is installed and the video cable is correctly connected.
Troubleshooting troubleshooting with the LEDs 6HYHUDO /('V DUH RQ WKH IURQW SDQHO RI WKH V\VWHP 7KH IROORZLQJ VHFWLRQV GHVFULEH WKHLU IXQFWLRQV power and system LEDs 7KH 3RZHU DQG 6\VWHP /('V LQGLFDWH WKH VWDWH RI WKH V\VWHP Power LED System LED State Off Off Off On (green) Solid green Running On (green) Blinking green Booting On (green) Blinking orange (1/sec.) Attention On (green) Blinking red (2/sec.
Troubleshooting diagnostic LEDs ,I WKH V\VWHP KDV QR 0DQDJHPHQW 3URFHVVRU FDUG LQVWDOOHG WKH IRXU GLDJQRVWLF /('V RQ WKH IURQW SDQHO ZDUQ RI LPSHQGLQJ IDLOXUHV DQG DOORZ \RX WR WDNH SUHYHQWLYH DFWLRQ )RU H[DPSOH \RX PD\ ZDQW WR EDFN XS \RXU GDWD RU UHSODFH D FRPSRQHQW EHIRUH LW IDLOV ■ ,I QR 03 FDUG LV LQVWDOOHG WKH ERRW SURJUHVV LV PRQLWRUHG E\ 'LDJQRVWLF /('V 'XULQJ WKH ERRW XS WKH /('V WXUQ RQ LQ VHTXHQFH XQWLO WKH (), SURPSW LV UHDFKHG ■ ,I DQ 03 FDUG LV LQVWDOOHG WKH ERRW SURFHVV
Troubleshooting LAN LEDs 7KH IURQW SDQHO /$1 /(' LQGLFDWHV WKH V\VWHP LV FRPPXQLFDWLQJ RYHU WKH *LJDELW RU 6\VWHP 0DQDJHPHQW /$1 ■ EOLQNLQJ JUHHQ WKH V\VWHP LV FRPPXQLFDWLQJ RYHU WKH /$1 ■ VROLG JUHHQ /$1 OLQN LV HVWDEOLVKHG QR FXUUHQW /$1 DFWLYLW\ ■ QRW JUHHQ WKH V\VWHP LV RII )RXU *LJDELW /$1 /('V DUH RQ WKH UHDU SDQHO LAN LED Location Color State 1.
Troubleshooting 7ZR 6\VWHP 0DQDJHPHQW /$1 /('V DUH RQ WKH UHDU SDQHO LAN LED Location Color State 1. Speed Tower: Right On Port linked at 100 Mb/s Rack-mounted: Top Off Port linked at 10 Mb/s Tower: Left On Port linked Rack-mounted: Bottom Off No link established 2. Activity )RXU 03 /$1 /('V DUH DOVR RQ WKH UHDU SDQHO LI WKH V\VWHP KDV D 03 FDUG LQVWDOOHG LAN LED Location Color State 1.
Troubleshooting troubleshooting with the e-buzzer :KHQ \RXU V\VWHP VWDUWV XS WKH V\VWHP ILUPZDUH SHUIRUPV SUH ERRW GLDJQRVWLFV WR WHVW \RXU KDUGZDUH FRQILJXUDWLRQ IRU DQ\ SUREOHPV ,I D SUREOHP LV GHWHFWHG GXULQJ SUH ERRW WKH H EX]]HU HPLWV DXGLEOH EHHSV DQG DQ HQFRGHG HUURU PHVVDJH 7KH H EX]]HU HPLWV D GLIIHUHQW QXPEHU RI EHHSV IRU HDFK W\SH RI HUURU ,I \RX PLVV WKH EHHS FRGH VHQG WKH VLJQDO DJDLQ E\ SUHVVLQJ WKH SRZHU VXSSO\ EXWWRQ IRU VHFRQGV DQG UHOHDVH LW RQFH WKH VRXQG EHJLQV 7KH H EX]]H
Troubleshooting Number of Beeps Component Description 1 Processor Processor absent or not correctly connected. Reseat or replace processor. 2 Power Supply Power supply failure. Replace power supply. 3 Memory No memory, bad memory modules or incompatible memory module. Check memory module loading order. Reseat or replace memory modules. 4 Graphics Card Graphics card problem. Reseat or replace the graphics card.
Troubleshooting the system event log 7KH V\VWHP /('V DQG H EX]]HU GR QRW UHSRUW DOO SUREOHPV RQO\ WKH SUREOHPV OLVWHG EHORZ ,I WKH H EX]]HU LQGLFDWHV DQ HUURU WKH V\VWHP HYHQW ORJ 6(/ ZLOO SURYLGH D PRUH GHWDLOHG H[SODQDWLRQ RI WKH IDLOXUH )RU DGGLWLRQDO LQIRUPDWLRQ RQ DFFHVVLQJ DQG UHDGLQJ WKH 6(/ VHH WKH KS U[ ][ 2SHUDWLRQ DQG 0DLQWHQDQFH *XLGH 2–12 HP Integrity rx2600 server and HP workstation zx6000 Getting Started Guide
Troubleshooting software diagnostics tools 7KLV VHFWLRQ LQFOXGHV LQIRUPDWLRQ RQ WKH +3 H 'LDJ7RROV +DUGZDUH 'LDJQRVWLFV %HIRUH \RX UXQ WKH +3 GLDJQRVWLF VRIWZDUH WDNH QRWH RI DQ\ H EX]]HU DQG /(' HUURU PHVVDJHV 7R ILQG RXW PRUH DERXW WKH HUURU QRWH DQ\ HYHQW PHVVDJHV DQG XVH WKH WRRO DSSURSULDWH IRU \RXU V\VWHP WR GHWHUPLQH ZKDW IDLOHG 127( (YHQW PHVVDJHV DUH OLVWHG LQ $SSHQGL[ ' RI WKH KS U[ ][ 2SHUDWLRQ DQG 0DLQWHQDQFH *XLGH hp e-diagtools hardware diagnostics
Troubleshooting starting hp e-diagtools ,QVHUW WKH +3 ,3) 2IIOLQH 'LDJQRVWLFV DQG 8WLOLWLHV &' LQ WKH &' RU '9' GULYH )URP WKH (), VKHOO SDJH VHOHFW WKH &' '9' GULYH D 8VH WKH map FRPPDQG WR OLVW WKH GULYHV RQ \RXU V\VWHP )RU H[DPSOH Shell> map Device mapping table fs0:Acpi(HWP0002,0)/Pci(2|0)/Ata(Primary,Master)/CDROM... fs1:Acpi(HWP0002,100)/Pci(1|0)/Scsi(Pun0,Lun0)/HD(Part... blk0:Acpi(HWP0002,0)/Pci(2|0)/Ata(Primary,Master)...
Troubleshooting D &KDQJH WR WKH %227 VXEGLUHFWRU\ fs0\EFI:> cd BOOT fs0\EFI\BOOT:> E ([HFXWH WKH ls FRPPDQG WR OLVW WKH FRQWHQWV RI WKH GLUHFWRU\ fs0:\EFI\BOOT> ls Directory of: fs1:\EFI\BOOT 11/07/02 04:45p
1,024 11/07/02 04:45p 1,024 11/07/02 01:54p 731,136 11/07/02 01:54p 2,763 11/07/02 01:54p 731,136 11/07/02 01:54p 2,995 11/07/02 01:54p 3,977 5 File(s) 1,472,007 bytes 2 Dir(s) . .. LaunchMenu.efi IO.ini BOOTIA64.EFI LaunchMenu.ini View_Doc.Troubleshooting producing a support ticket 7R SURGXFH D FRPSOHWH UHFRUG RI \RXU V\VWHP©V FRQILJXUDWLRQ DQG WHVW UHVXOWV \RX PXVW FUHDWH D 6XSSRUW 7LFNHW 7KLV LV D VLPSOH WH[W ILOH WKDW FRQWDLQV HVVHQWLDO LQIRUPDWLRQ DQG LV GHVLJQHG WR DVVLVW \RXU ORFDO RU +3 6XSSRUW $JHQW 7R SURGXFH D 6XSSRUW 7LFNHW IURP WKH Welcome to e-DiagTools 0HQX 6WDUW H 'LDJ7RROV DQG VHOHFW Run eDiagTools for IPF IURP WKH PDLQ PHQX 6HOHFW 2 - Run e-DiagTools Basic System Test (BST) WR UXQ WKH EDVLF GLDJQRVWLFV RQ \
Troubleshooting $IWHU WKH WHVW LV FRPSOHWH SUHVV 4 7KH 6XSSRUW 7LFNHW ZLOO GLVSOD\ RQ WKH VFUHHQ )RU H[DPSOH -----------------------------------------HEWLETT-PACKARD e-Diagtools Support Ticket -----------------------------------------~~~~~~~~~~~~~~~~~~~~~~~~~~~~~~~~~~~~~~~~~~ Your system: HP - zx6000 Diagnostic: System Test Passed Date/Time: 05/01/2003 14:37:41 ~~~~~~~~~~~~~~~~~~~~~~~~~~~~~~~~~~~~~~~~~~ ❏ 7KH 6XSSRUW 7LFNHW LV D VFUHHQ WKDW GLVSOD\V D FRPSOHWH UHFRUG RI WKH WHVW UHVXOWV DQG WKH
Troubleshooting restoring the OS
Troubleshooting where to get help +3 &XVWRPHU &DUH &HQWHUV FDQ KHOS \RX VROYH SUREOHPV UHODWHG WR +3 SURGXFWV DQG LI QHFHVVDU\ LQLWLDWH DSSURSULDWH VHUYLFH SURFHGXUHV 6XSSRUW LV DYDLODEOH RQ WKH ZHE DQG E\ SKRQH )RU LQIRUPDWLRQ RQ FRQWDFWLQJ +3 &XVWRPHU &DUH JR WR www.hp.
Troubleshooting 7DNH QRWH RI DQ\ /(' DQG H EX]]HU HUURU PHVVDJHV DQG WU\ WR VROYH WKH SUREOHP DFFRUGLQJ WR WKH VROXWLRQV VXJJHVWHG ❏ $UH WKHUH DQ\ /(' HUURUV" 'LVSOD\V RQ VFUHHQ GXULQJ ERRW 6HH ¦7URXEOHVKRRWLQJ ZLWK WKH /('V§ RQ SDJH IRU D OLVW RI FRPPRQ /(' HUURUV DQG UHFRPPHQGHG VROXWLRQV ❏ $UH WKHUH DQ\ H EX]]HU HUURUV" $XGLEOH EHHSV GXULQJ ERRW 6HH ¦7URXEOHVKRRWLQJ ZLWK WKH H EX]]HU§ RQ SDJH IRU D OLVW RI H EX]]HU EHHS VHTXHQFHV DQG UHFRPPHQGHG VROXWLRQV 8VH WKH GLDJQRVWL
Troubleshooting additional documentation 7KH IROORZLQJ GRFXPHQWDWLRQ LV DYDLODEOH RQ WKH 'RFXPHQWDWLRQ DQG 8WLOLW\ &' SURYLGHG ZLWK \RXU V\VWHP DQG RQ WKH VXSSRUW ZHE VLWH OLVWHG DERYH ■ 4XLFN 6WDUW *XLGH¥ EDVLF LQIRUPDWLRQ RQ VHWWLQJ XS \RXU QHZ V\VWHP ■ *HWWLQJ 6WDUWHG *XLGH WKLV GRFXPHQW ¥ LQIRUPDWLRQ RQ VHWWLQJ XS DQG FRQILJXULQJ \RXU V\VWHP DORQJ ZLWK EDVLF WURXEOHVKRRWLQJ LQIRUPDWLRQ ■ 2SHUDWLRQV DQG 0DLQWHQDQFH *XLGH ¥ GHWDLOHG LQIRUPDWLRQ RQ LQVWDOOLQJ DQG UHSODFLQJ SDUWV WURXEOHV
Troubleshooting 2–22 HP Integrity rx2600 server and HP workstation zx6000 Getting Started Guide
A Regulatory Information This appendix includes: ■ Declaration of conformity ■ International regulatory statements HP Integrity rx2600 server and HP workstation zx6000 Getting Started Guide A–1
Regulatory Information declaration of conformity Declaration of Conformity according to ISO/IEC Guide 22 and EN 45014 Manufacturer: Hewlett-Packard Company 3404 East Harmony Rd. Fort Collins, CO 80528 USA Declares that the: Product Type: Computer Workstation/Server Marketing Designation(s): zx6000, rx2600 Regulatory Model Number: FCLSA-0201 Product Options: All conforms to the following specifications: Safety.
Regulatory Information federal communications commission radio frequency interference statement (for usa only) This equipment has been tested and found to comply with the limits for a Class A digital device, pursuant to Part 15 of the FCC Rules and the Canadian Department of Communications. These limits are designed to provide reasonable protection against harmful interference when the equipment is operated in a commercial environment.
Regulatory Information Si le cordon secteur n’est pas livré avec votre ordinateur, utiliser un cordon secteur en accord avec votre code electrique national. ■ USA: utiliser un cordon secteur “UL listed,” de type SVT. ■ Canada: utiliser un cordon secteur certifié CSA. Pour votre sécurité, ne jamais retirer le capot de l’ordinateur sans avoir préalablement débranché le cordon secteur et toute connection à un réseau de télecommunication.
Regulatory Information noise declaration for germany Lärmangabe nach Maschinenlärmverordnung - 3 GSGV (Deutschland) LpA < 70 db am Arbeitsplatz normaler Betrieb nach EN27779: 11.92.
Regulatory Information A–6 HP Integrity rx2600 server and HP workstation zx6000 Getting Started Guide
B Warranty Statements This is your product warranty statement. Read it carefully. To contact HP for warranty service: ■ Worldwide, go to: www.hp.com/cpso-support/guide/psd/cscus.html ■ In the United States and Canada, call 1-800-593-6631. hardware and software warranties Hewlett-Packard (HP) warrants this hardware product against defects in materials and workmanship under normal use, for a period of one (1) year from receipt by the original end-user purchaser or date of purchase.
Warranty Statements warranty limitations If HP receives notice of above defined defects during the warranty period, HP will either, at its option, repair or replace products, which prove to be defective. Should HP be unable to repair or replace the product within a reasonable amount of time, the customer's alternate exclusive remedy shall be a refund of the purchase price upon return of the product to HP.
Warranty Statements QUALITY, AND FITNESS FOR A PARTICULAR PURPOSE. SOME STATES, PROVINCES OR COUNTRIES DO NOT ALLOW LIMITATIONS ON HOW LONG AN IMPLIED WARRANTY LASTS, SO THE ABOVE LIMITATION OR EXCLUSION MAY NOT APPLY TO YOU.
Warranty Statements Some states, provinces or countries do not allow the exclusion or limitation of incidental or consequential damages — including lost profit — so the above limitation or exclusion may not apply to you. THE WARRANTY TERMS AND CONDITIONS CONTAINED HEREIN, EXCEPT TO THE EXTENT LAWFULLY PERMITTED, DO NOT EXCLUDE, RESTRICT OR MODIFY, AND ARE IN ADDITION TO, THE MANDATORY STATUTORY RIGHTS APPLICABLE TO THE SALE OF THIS PRODUCT TO YOU.
Warranty Statements obtaining on-site warranty service Support can be obtained from 1-800-593-6631 (U.S. and Canada). For Worldwide locations, visit: www.hp.com/cpso-support/guide/psd/cscus.html You will be asked to provide the product model number and serial number and may be required to provide dated proof of purchase. During the on-site warranty period, customer-replaceable components may be serviced through expedited part shipment.
Warranty Statements obtaining parts warranty service The customer may be responsible for installing the replacement part and restoring any operating system, applications, or data. HP may, at its option but is not obligated to, repair the product at the customer’s premises or “on-site.” If HP is unable to repair or replace the product, the customer will be entitled to a refund of the purchase price upon return of the product/parts.
Warranty Statements hp telephone support services HP provides free telephone support for your workstation during the warranty period. This service will also provide technical assistance with the basic configuration and setup of your HP workstation and for the bundled or pre-loaded operating system. HP does NOT provide telephone support for workstations configured as network servers. We recommend the HP Integrity rx2600 server for your network server requirements.
Warranty Statements B–8 HP Integrity rx2600 server and HP workstation zx6000 Getting Started Guide
index A accessory slots 1–1 Add a Boot Option 1–20 Administrator 1–23 Advanced System Configuration Menu 1–24 Advanced System Information Menu 1–22 AGP graphics card 1–21 Auto Boot TimeOut 1–20 B Baseboard Management Controller 1–26 BMC 1–26 Boot 1–24 boot 1–14 Boot commands 1–19 Boot from a File 1–20 Boot menu 1–14 Boot Options Maintenance menu 1–20 Bootable Devices 1–24 BootNext 1–20 C Cache 1–24 Change Boot Order 1–20 Chip Revision 1–24 Cold Reset 1–21 components 1–6, 1–12 configuration 1–1, 1–26 Confi
Index G O Gigabit LAN 1–4, 2–8 graphics cards 2–1, 2–5, 2–11 ODE 2–13 Offline Diagnostics Environment (ODE) 2–13 OS 2–1, 2–18 H hardware problem 2–1 help 1–23, 2–1, 2–19 HP Customer Care 2–19 HP e-DiagTools 2–13 HP-UX 1–11, 2–18 P keyboard 1–5, 2–1, 2–3 password 1–14, 1–23, 1–25, 2–5 Passwords 1–23 PCI cards 2–11 ports 1–4 power 1–1, 1–2, 1–3, 1–5, 1–11, 2–2, 2–6, 2–11 Processor 1–24 processor 2–11 L R LAN 1–5, 2–8 LAN LED 1–3, 1–4 LAN LEDs 2–8 LED 2–1 Linux 1–11, 2–18 Locator button 1–2, 1–4 Loc
Index shut down 1–11 software 1–11 start 1–10 startup.
Index Index–4 HP Integrity rx2600 server and HP workstation zx6000 Getting Started Guide