Internal Cabling Guide for the HP NetRAID-2M on an HP Server rx2600 April 2003 (Second Edition) Part Number 5971-4217 HP CONFIDENTIAL Codename: Longs Peak Part Number: 5971-4217 Last Saved On: 4/2/03 2:24 PM
© 2003 Hewlett-Packard Development Company, L.P. Microsoft®, and Windows® are U.S. registered trademarks of Microsof Corporation. Intel® Itanium™ Processor Family is a trademark of Intel Corporation in the U.S. and other countries and is used under license. Hewlett-Packard Company shall not be liable for technical or editorial errors or omissions contained herein. The information in this document is provided “as is” without warranty of any kind and is subject to change without notice.
Contents Introduction......................................................................................................................... 5 Installing the HP NetRAID-2M Card................................................................................... 6 Cabling the HP NetRAID-2M to the Server........................................................................ 8 Default SCSI Cabling ................................................................................................................
Introduction This document describes how to cable an HP NetRAID-2M 2 channel, Ultra160 accessory (HP product number P7749A) to the internal hard drives of an HP Server rx2600. NOTE: These instructions do not apply if you are connecting the HP NetRAID-2M to an external mass storage box. Proceed to the HP NetRAID-1M and 2M Installation and Configuration Guide that shipped with your HP NetRAID-2M accessory.
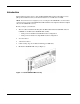
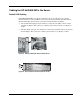
Installing the HP NetRAID-2M Card 1. If the server is running, shut down the OS and power off the server. 2. Remove the server's side cover (if you have a tower system) and metal system cover as described in the server's operation and maintenance guide. 3. Lift up the PCI cage release lever along with the back edge of the PCI cage, and lift the PCI cage out of the system. See Figure 2. Figure 2: Removing the PCI Cage 4. Grasp the PCI cage cover and slide it away from the bulkhead end of the PCI cage.
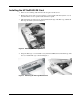
5. Install the HP NetRAID-2M card in PCI Slot 4 (see Figure 4). This is required when connecting the NetRAID-2M to the internal hard disk drives. 1 2 3 4 Figure 4: PCI Card Order When the installation is complete, proceed to the next section for cabling instructions.
Cabling the HP NetRAID-2M to the Server Default SCSI Cabling If the HP NetRAID-2M is not already installed in your server from the factory, then the internal hard drives for the rx2600 are connected to the integrated SCSI controller with two internal SCSI cables attached to the system board and the hard drive backplane. • One internal SCSI cable (p/n A7231-63017) is connected to the CH A connector of the hard drive backplane. This connector is cabled to physical drives 0 and 1 (see Figures 5 and 6).
Recabling for RAID Your server's internal hard disk drives may be set up for single or dual channel RAID support. To use RAID with your server's internal hard disk drives, disconnect the internal SCSI cable(s) from their controller and the hard disk drive backplane (described below). Then connect the HP NetRAID-2M card to the hard disk drive backplane using either the single channel cable or the dual channel cable that is supplied. Follow the instructions below to accomplish these tasks. 1.
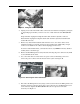
Figure 9: Lifting the Fan Power Bridge 4. Unplug one or both of the SCSI cables connected to the hard drive backplane (see Figure 5), depending upon whether you want to use one or both channels of the HP NetRAID2M. Single Channel: Unplug the backplane SCSI cable channel A (bottom) connector. Dual Channel: Unplug the backplane SCSI cable channel A (bottom) and SCSI cable channel B connectors. 5.
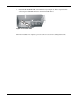
Figure 11: Disconnecting the Management Card Connector and Removing the Card 9. Disconnect and remove any unused SCSI cables from the system board as shown in Figure 12. Figure 12: Disconnecting Unused SCSI Cables from the System Board For single channel support, plug one end of the A7231-63019 single channel cable into the HP NetRAID-2M card's internal channel 0 (CH 0) connector (see Figure 13). The cable connectors are marked for clarity.
0 90 CH0 Figure 13: Single Channel RAID Cabling from the HP NetRAID-2M (Installed in the PCI Cage) For dual channel support, plug one end of the A7231-63007 dual channel cable into the HP NetRAID-2M card's internal channel 0 (CH 0) and 1 (CH 1) connectors (see Figure 14). The cable connectors are marked for clarity. Note that part of the cable must be folded down (90 degrees) as shown in Figure 14.
1 Figure 15: RAID Cable Routing through the PCI Cage Board Cover 11. Place the PCI cage back into the system. Note that the RAID cable(s) must be flush against the server chassis as it exits the PCI cage cable channel (see 1 in Figure 16). It must then be routed around the chassis side of fan 3 to the hard drive backplane (see 2 in Figure 16) to avoid crimping. 2 1 Figure 16: RAID Cable Routing 12. Connect the free end(s) of the RAID cable from the HP NetRAID-2M to the backplane.
Configuring the Server for RAID To complete the installation and set up RAID for your server's internal hard disk drives, follow the instructions in the documents listed below. To perform this task: Look in this document: Configure your HP NetRAID-2M accessory in an Intel® Itanium™ Processor Family HP server. Use HP NetRAID2M utilities and command line options from the EFI Shell.