HP Integrity Servers with Microsoft Windows Server 2003 for Itanium-based systems SmartSetup Scripting Toolkit Deployment Guide HP Part Number: 5992-0901 Published: June 2007
© Copyright 2007 Hewlett-Packard Development Company, L.P Confidential computer software. Valid license from HP required for possession, use or copying. Consistent with FAR 12.211 and 12.212, Commercial Computer Software, Computer Software Documentation, and Technical Data for Commercial Items are licensed to the U.S. Government under vendor's standard commercial license. The information contained herein is subject to change without notice.
Table of Contents About This Document.........................................................................................................7 Intended Audience.................................................................................................................................7 Typographic Conventions......................................................................................................................7 HP Encourages Your Comments..................................................
Create a bootable USB flash device on a Linux workstation...........................................................46 Boot from the USB flash device.......................................................................................................46 Using USB flash device as external media......................................................................................48 Using network boot..............................................................................................................
Example...........................................................................................................................................75 hwquery................................................................................................................................................76 Synopsis...........................................................................................................................................76 Description................................................
About This Document This document describes how to use the SmartSetup Scripting Toolkit (SSTK) to develop custom scripts that simplify server deployments by automating various hardware configuration and software installation operations. Intended Audience This document is for system administrators who need to deploy a large number of HP Integrity® servers rapidly and efficiently.
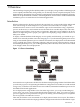
1 Overview The SmartSetup Scripting Toolkit (SSTK) enables you to deploy a large number of HP Integrity® servers rapidly and efficiently. Using SSTK, you can develop custom scripts that simplify server deployments by automating various hardware configuration and software installation operations. SSTK can set specific EFI boot variables, create disk partitions, and tie into the standard unattended installation process to install the OS and selected applications.
The SSTK is designed for administrators who have some expertise in unattended installations of Windows Server 2003 and familiarity with Integrity servers. The SSTK provides sample scripts and utilities that run in a staging environment based on Debian Linux for IA-64. The kit uses Linux merely as a launch pad for unattended server configuration and Windows installation. You do not need to know Linux well to use the toolkit but you must be able to read and modify shell scripts.
kernel, root file system, and boot configuration) for you to copy onto the boot device (Figure 1-3). Figure 1-3 Linux Boot Files Scripts Data Files Utilities Boot Config Kernel File System Boot Loader • • The SSTK boot device — a CD or DVD, a network share, or a USB flash drive — holds files that allow servers to boot to the toolkit environment. You can also use the SSTK boot device to hold the repository of scripts, utilities, configuration files, OS files, and application files.
• • slipstreamed SP1 both exceed the capacity of a CD that already contains the toolkit environment. Flexibility: The choice between the CD and the USB flash drive boils down to the flexibility that you need from the toolkit environment and custom scripts. You can quickly edit the Linux boot loader configuration file, a script, or configuration file on a USB flash drive but burning a new CD is more complicated.
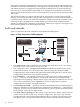
NOTE: SSTK does not support Microsoft Windows Server 2003 Datacenter Edition or HP Reinstallation media. Creating a server profile A server profile is like the DNA of all servers in the deployment. It includes the server EFI environment variables, the I/O configuration, the OS and drivers, and installed applications. The server profile is stored in the repository. Creating it involves the following tasks: 1. 2. 3. 4. 5.
2. then runs utilities that capture and write the server configuration to the repository on the SSTK workstation. Edit these configuration files if needed. Launch the hardware configuration and software installation: If the target system is cell-based you must create a hard partition for OS installation. Select the Windows installation (win) option when prompted. The script runs utilities that configure the target server hardware and then launches the software installation.
2 Creating a server profile A server profile is like the DNA of all the servers in the deployment. It includes the server EFI environment variables, the I/O configuration, the OS and drivers, and installed applications. The server profile is stored in the repository. This chapter shows you how to create the server profile. Because you need to perform this task on the workstation using the SSTK, we begin by setting up this workspace.
Figure 2-1 Console Configuration Window At the Integrity server (the model server and each target server) using the Legacy interface: 1. 2. 3. 4. Select EFI Boot Manager->Boot Option Maintenance Menu. Select Select Active Console Input Devices. Select only one Acpi(HWP—2,700)PCI ~~/Uart~~ device. Select Select Active Console Output Devices. Set input console to be the same as the output console device. (Figure 2-2) Select Select Active Standard Error Devices.
NOTE: If multiple consoles are configured, the console output defaults to the local video console. The workstation is then unable to display the console output (or the Linux prompt). If the input, output, and error consoles do not match, the system firmware automatically matches the input console with output console. On cell-based servers, select the serial device Acpi(HWP0002,xxx)PCI ~~/Uart~~ as the primary input and output device, and the VGA device as the secondary input and output device.
Figure 2-3 SSTK Archive C:\SSTK readme.txt SSSIK_DeploymentGuide.pdf boot_files efi boot bootia64.efi elilo.conf elilo.efi linux rootfs.gz data_files acu.ini conrep.dat hba.ini drivers Network Others storage software EFI_TOOLS windows os unattended.txt windows 2003-enterprise scripts capture.sh deploy.sh main_toolkit_launch.sh windows-setup.sh utilities alboards.xml conrep conrep.xml cpqacuxe_7.60-18_ia64.tar.
-elilo.conf: -elilo.efi: -linux: -rootfs.gz: • configuration file for the Linux boot loader Linux boot loader Linux kernel Linux root file system in a compressed file The data_files directory is a placeholder that is used to store drivers and software that is installed when a deployment occurs. - acu.ini: -conrep.dat: -hba.ini: -drivers: The captured RAID configuration file. This file is created when the readhwconfig option is executed on a target server with a supported RAID controller. The acu.
setupldr.efi) application to the ESP partition, configuring the winnt.sif file, specifying the Windows Setup boot option, and rebooting the server. • The utilities directory contains the following files: -allboards.xml: -conrep: -conrep.xml: -cpqacuxe: -efi\modeset.efi: -efibootmgr: -gen-setupldr-options: -hpia64info: -hwdisc: -hpqlarep: -hwquery: -ifhw: -parted: -setacpi: The allboards.
specific target servers. For example, you could upload the OS files for the English and the Japanese versions of the SP1 and non-SP1 versions and install a particular OS based on server selection criteria. NOTE: The Integrity SSTK currently supports Microsoft Windows Server 2003, Enterprise Edition for Itanium-based systems in English and Japanese with and without SP1 or SP2. Populate the /os/windows/2003-enterprise/ directory with the unmodified contents of the OS installation CD.
| +---os | \---windows | |---2003-enterprise | \---2003-enterprise-sp2 | +---data_files | \---drivers | \---storage | |---saP600 | | \---windows | | |---2003-enterprise | | \---2003-enterprise-sp2 | \---sa6400 | \---windows | |---2003-enterprise | \---2003-enterprise-sp2 | Set up unattended OS installation The Windows directory contains a file to drive an unattended Windows installation. This file, which Microsoft refers to as an “answer file”, is called unattended.txt.
[LicenseFilePrintData] AutoMode = "PerServer" AutoUsers = "5" [Display] BitsPerPel = 16 XResolution = 800 YResolution = 600 VRefresh = 70 [Branding] BrandIEUsingUnattended = No IEBrandingFile = install.ins [Networking] [WindowsFirewall.Standard] Services = RemoteDesktop [WindowsFirewall.
Type = 2 [TerminalServices] AllowConnections = 1 Installing tools from the Integrity Support Pack To install Integrity Support Pack tools, copy the executable file for each tool you want to install into the appropriate directory, \data_files\software\windows\ISP, in the repository. The Support Pack tools are located on the HP SmartSetup CD in the \contents\supportpack\isp directory. Edit the PostInstall.cmd file located at \data_file\software\windows\, adding command line to install each tool.
• 2. 3. the use of this mode, create the boot-files/$OEM$/TEXTMODE directory under data_files/drivers/storage/saP600/windows/2003-enterprise/. In graphical mode, drivers for all the devices, including boot devices, are loaded. To support the loading of all OEM drivers, create the other-files/$OEM$/$1 directory under data_files/drivers/storage/saP600/windows/2003-enterprise/. Copy driver files into these directories.
| | | | | | | | | | | | | | | | | | | | | | | | | | | | | | | | | | | | | | | | | | | | | | | | | | | | | | | | | | | | | | | | | | | | | | | | | | | | | | | | | | | | | | | | | | | | | | | | | | | | | | | | | | | | | | | | | | | | | | | | | | | | | | | | | | | | | | | | | PROUnstl.exe | | e1000msg.dll | | e1e5164.cat | | e1e5164.din | | e1e5164.inf | | e1e5164.inf | \---unattended.txt +---broadcom | \---windows | \---2003-enterprise | | unattended.
| | | | | | | | | | | | | | | | | | | | | | | | | | | | | | | | | | | | | | | | | | | | | | | | | | | | | | | | | | | | | | | | | | | | | | | | | | | | | | | | | | | | | | | | | | | | | | | | \---2003-enterprise | unattended.txt | +---boot-files | \---$OEM$ | \---TEXTMODE | lpscsi | lpsimdev.cat | lpsimdev.inf | lpxftr.sys | lpxnds.cat | lpxnds.dll | lpxnds.sys | oemsetup.inf | txtsetup.oem | \---other-files \---$OEM$ \---$1 \---PnPDrivers \---Storage \---emulex lpscsi lpsimdev.cat lpsimdev.inf lpxftr.
| | | | | | | | | | | | | | | | | | | | | | | | | | | | | | | | | | | | | | | | | | | | | | | | | | | | | | | | | | | | | | | | | 28 | | | | | | | | | | | | | | | | | | | | | | | | | | | | | | | | | | | | | | | | | | | | | | | | | | | | | | | | | | | | | | | | | | +---boot-files | | \---$OEM$ | | \---TEXTMODE | | cpqciss.dll | | cpqcisse.cat | | cpqcisse.inf | | cpqcisse.pdb | | cpqcisse.sys | | cpqcissm.cat | | cpqcissm.dll | | cpqcissm.inf | | cpqcissm.pdb | | cpqcissm.sys | | install.xml | | txtsetup.
| \---software | +---EFI_TOOLS | | +---networking | | | ftp.efi | | | ifconfig.efi | | | ping.efi | | | route.efi | | | SETUPLDR.EFI | | | tcpipv4.efi | | | | | \---toolkit | | | Readme.txt | | | version.txt | | | | | \---PYTHON1.5 | \---windows | | PostInstall.cmd | | | \---ISP | cp006523.exe | cp006535.exe | cp006567.exe | cp006569.exe | cp006573.exe | cp006578.exe | cp006579.exe | cp006607.exe | cp006691.exe | cp006834.exe | +---os | | unattended.
(as described in the previous section). This section describes how the windows-setup.sh copies and installs all available drivers from the OEM folder and unattended file. You can generalize from this example to any other OEM driver. Here is the portion of the script that installs the driver: echo "Copying OEM and unattended file" # Copying OEM folder and unattended file mkdir -p $MSDATA/\$win_nt\$.
For example, the directory for an SA6402. would be the following: \data_files\drivers\storage\sa6400\windows\2003-enterprise.
3 Setting up the toolkit environment Setting up the toolkit environment involves editing scripts that control the boot and operation of the toolkit. The EFI loader launches the Linux boot loader, which in turn executes a bootstrap script in the root file system. The bootstrap script invokes the main toolkit launch script, which uses a Windows setup script to trigger the OS installation. This chapter provides guidance on editing these scripts. Edit elilo.
• The image options are specific to a particular kernel image. Each kernel image must be identified with a logical name called a label. At least one image MUST be defined.
• The following entry boots executes the main toolkit launch script by getting it from a Windows machine using the administrator username and password. The script then reads the server hardware configuration and writes it to the repository. image=linux label=readhw-windows initrd=rootfs.gz root=/dev/ram append="rw ramdisk_size=524288 ssstk_init=/bootstrap ssstk_mount_type=smbfs ssstk_mount=//192.168.39.23/ssst13 ssstk_script=scripts/main_toolkit_launch.
/usr/sbin/cpqacuxe -c "${CONFIGDIR}/acu.ini" — Executes conrep to get the EFI environment variables from the server configuration. The script writes this data to the conrep.dat file. ./conrep --read -f ${CONFIGDIR}/conrep.dat — Run the hpqlarep utility to enable or disable the EFI boot setting on QLogic 2G or 4G HBAs. The script writes this data to the hba.ini file: $UTILITIES/hpqlarep /S "${CONFIGDIR}/hba.
For example: BOOTCONTROLLER = $ {SM_64XX} • Partition sizes The ESP and HPSP partitions have a fixed size of 100 MB and 400 MB respectively. The size of the MSR partition depends on the size of the disk: — — On drives less than 16 GB, the MSR is 32 MB On drives greater than or equal to 16 GB, the MSR is 128 MB The windows-setup.shscript defines the size of the MSDATA partition as the remainder of free space on the disk after the MSR on disks not greater than 32 GB.
4 Setting up the boot mechanism Setting up the boot mechanism involves one of the following options: creating a bootable CD or DVD, creating a bootable USB device, or setting up a network boot environment. This chapter shows you how to perform each task at either a Windows workstation or a Linux system. On a Windows workstation, you can create a bootable CD or DVD using any CD or DVD-burning application. This chapter illustrates this task using Nero and Roxio.
Create the ISO using Roxio This section shows you how to use the Roxio Easy CD Creator program to create an ISO file containing the bootable image along with the files used by the toolkit. 1. 2. 3. 4. Launch Easy CD Creator and select Disc Creator Classic (Figure 4-2). When the main screen is loaded, select File->New Project->Bootable Disc. From the Bootable Disc Type drop down menu, select No Emulation. In Emulation Option, click Browse to select the image file.
Figure 4-3 Roxio Project Area 6. Select File->Create Disc Image (Figure 4-4). In the dialog box, enter a file name, select the path, and click Save to finalize.
Figure 4-4 Create Disc Image 7. Select File->Burn Disc from Image. Create the ISO using Nero To use Nero to create the ISO file: 1. 2. 3. 42 Launch Nero, select the Data icon, and select Make a data disc. Select File->New. In the New Compilation screen (Figure 4-5), select the CD-ROM (Boot) icon. In the Source of boot image data group, select Bootable logical drive. Use the drop down menu to select the drive where the boot files are located. Ensure Enable expert settings is checked.
Figure 4-5 New Compilation Window 4. 5. Select the Burn tab (Figure 4-6). In the Action group, ensure only the Write option is checked. From the Write Method dropdown menu, select Track-At-Once. Check Use Multiple Recorders. Figure 4-6 Burn Tab 6. 7. 8. Click New. The Nero Burning ROM screen appears. Copy the image files to the left pane of the Nero Burning ROM explorer. Click burn the current compilation or click Recorder->Burn compilation...
Create a bootable disk image The SSTK includes the files you need to create a bootable disk image. Creating the disk image involves copying these boot files to a small FAT partition and creating the image (.img) file. The bootable disk image must be a FAT file system to be available at the EFI level. Also, if a bootloader file named bootia64.efi is located in \efi\boot directory, the Integrity server automatically executes that boot loader. To create a bootable disk image: 1.
Table 4-1 mkisofs command options Option Description -o linuxbootCD.iso Specifies the ISO file. -b boot/boot.img Specifies boot.img as the bootable disk image. -V LinuxBootCD Specifies the volume label of the CD. ./linuxbootCD Specifies the target directory as the root of the CD. 1. To create the ISO image, execute the following command at the shell prompt: mkisofs –J -iso-level 3 –r -R -o linuxbootCD.iso \ -b boot/boot.img -c boot/boot.cat \ -V LinuxBootCD -no-emul-boot ./linuxbootCD 2.
Figure 4-7 Copy Boot files Create a bootable USB flash device on a Linux workstation To create a bootable USB flash device: 1. 2. Insert the USB flash device and determine the name of the device. Format the USB flash device with FAT file system: mkdosfs 3. -I /dev/sda1 Create a directory and mount the USB flash device on this directory: mkdir –p /mntmount /dev/sda1 /mnt 4. Create the bootable directory for Integrity servers (/efi/boot): mkdir –p /mnt/efi/boot 5.
Figure 4-8 EFI shell Window 3. 4. Enter the EFI Boot Manager menu, and select Boot Configuration (Figure 4-9). Select Add Boot Option to add Removable Media Boot for the USB device. Figure 4-9 Boot Configuration Selection Window 5. In the EFI Boot Manager, select to boot from the Linux USB device (Figure 4-10).
Figure 4-10 Boot from Linux USB Device Window Using USB flash device as external media Assuming the USB device is /dev/sda you can mount your MS-DOS formatted USB device using: mount –t msdos /dev/sda /mnt Using network boot The following sections show you how to set up a network boot environment using a Windows system or a Linux system. Setting up a Windows network boot server The DHCP server leases dynamic IP addresses.
Setting up a DHCP server The DHCP server must be configured to provide the name of the image to be downloaded by the Integrity server. The following options must be configured in the DHCP server: • • Option 66 — TFTP server name: host name or IP address of the machine running the TFTP server. This must be set even if the TFTP server is running on the same machine as the DHCP server. Option 67 — Bootfile name: file name of the boot image. In this application this is bootia64.efi.
user = root server = /usr/sbin/in.tftpd server_args = -s /tftpboot disable = yes per_source = 11 cps = 100 2 } In this example, “disabled” is the default setting, and /tftpboot is the root directory for all client access. To enable the TFTP service on your server, edit the disable line to read: disable = no Populating the TFTP directory share Use the /tftpboot directory as the directory from which TFTP clients will get their files. To populate the TFTP directory share: 1. 2.
6. 7. 8. 9. 10. Select N-No Directed LAN. Select N-No Boot Option. Select Y-Yes to save changes to NVRAM. Select Exit until you access the EFI Boot Manager menu. “LAN1” or the name you entered is listed as an option in the EFI Boot Manager menu. Select this option in the boot menu, and press the Enter key. 11. Press the Enter key. 12. After PXE boots over the network, you have the option of pressing the Tab key to view the mounting options of the ELILO.conf file.
5 Utilities Reference This chapter contains reference information and usage examples for the utilities provided in the toolkit. You can get online help for each utility by using the -h or -?option. conrep Synopsis conrep ( -l [-f ] [-F] | -s [–x ] [-f ] | -c | -d | -h ) [-v] Description The conrep utility replicates the configuration data stored in the EFI variables. It reads the EFI variables from the NVRAM of the model server and writes the results to a DAT file.
Examples Example 5-1 Sample conrep.dat file 54 00 69 ... 07 00 00 00 19 74 58 be 5f 61 f7 da c6 17 79 fd 50 fc 5b 45 Example 5-2 conrep.xml file
Table 5-2 Return codes (continued) Value Meaning Cause 8 The conrep.xml file was not found There is no conrep.xml file in the Create a conrep.xml file with the EFI current directory. variables that should be read from NVRAM. 9 At least one EFI variable in The conrep.xmlfile has some the conrep.xml file was not variables that do not exist in the found in the system. current system. Conrep cannot capture these variables.
Action = Configure Method = Custom ; Controller Options ; Controller Compaq Smart Array 5300 Controller = Slot 5 ReadCache = 50 WriteCache = 50 RebuildPriority = Low ExpandPriority = Low ; Array Options Array = A OnlineSpare = No Drive = 2:0,2:1 ; Logical Drive Options LogicalDrive = 1 RAID = 1 Size = 17359 Sectors = 32 StripeSize = 256 ArrayAccelerator = Enabled ; HBA SSP Specifications HBA_WW_ID= 10000000C9272B34 ConnectionName= TestConn HostMode= Windows Options Table 5-3 Options Option Description -C
• • • Array options — Specify and describe a particular array in the configuration. These options are invalid if there is not a preceding controller option section. This set of options must start with the Array option, and all the following options up to the next Array or Controller option are assumed to belong to the array being defined. These options can be specified in any order, but an option from another category of options cannot occur between any two options in this category.
Table 5-4 Automatic script file options Option Value Action Defines if you are changing existing arrays and logical drives or adding new ones. This option is required. Configure: Existing arrays are not modified. If unassigned physical drives exist, new arrays and logical drives are automatically created. Reconfigure: Existing arrays might be modified in a non-data-destructive manner.
Table 5-4 Automatic script file options (continued) Option Value DeleteLicenseKey Specifies a license key to uninstall a controller feature. If the license key is installed, it will be uninstalled. XXXXX-XXXXX-XXXXX-XXXXX-XXXXX This is a 25-character key separated by hyphens. The hyphens are optional. ReadCache Specifies the Read Cache percentage. This option is not required. If this option is not specified, the Read/Write cache ratio will remain unchanged. This value is a numeric value from 0 to 100.
The following is a custom script file syntax: The following is a custom script file syntax: Action = Configure|Reconfigure Method = Custom ; Controller Options ; There can be multiple controller specifications in the file Controller = All|Slot [N][:N]|WWN [N]| First | SerialNumber [N]| IOCabinet [N],IOBay [N],IOChassis [N], Slot [N],Cabinet [N],Cell [N] ClearConfigurationWithDataLoss = Yes|No LicenseKey = XXXXX-XXXXX-XXXXX-XXXXX-XXXXX DeleteLicenseKey = XXXXX-XXXXX-XXXXX-XXXXX-XXXXX RaidArrayId = “XXXXXXXXX
Table 5-5 Custom script file options Option Value Action Defines if you are changing existing arrays and logical drives or adding new ones. This option is required. Configure: Existing arrays are not modified. Only new arrays and new logical drives can be created in this mode. Reconfigure: Existing arrays and logical drives might be modified in a non-data-destructive manner.
Table 5-5 Custom script file options (continued) Option Value LicenseKey Specifies a license key to install a controller feature. XXXXX-XXXXX-XXXXX-XXXXX-XXXXX This is a 25-character key separated by hyphens. The hyphens are optional. DeleteLicenseKey Specifies a license key to uninstall a controller feature. If the license key is installed, it will be uninstalled. XXXXX-XXXXX-XXXXX-XXXXX-XXXXX This is a 25-character key separated by hyphens. The hyphens are optional.
Table 5-5 Custom script file options (continued) Option Value PreferredPathMode Specifies the preferred path mode when redundant array controllers are in an active-active configuration. This option is only available for certain redundant array controllers. If the option is not specified, it remains unchanged. This option is ignored in active-standby configurations. This option is optional. • Auto: This is the default value.
Table 5-5 Custom script file options (continued) Option Value LogicalDrive Specifies the Logical Drive ID. [1-32]: In Configure mode, a new logical drive is created. The logical drive number specified must be the next available logical drive number in the existing configuration. In Reconfigure mode, the logical drive number can identify an existing logical drive, or it can identify the next available logical drive in the existing configuration to create a new logical drive.
Table 5-5 Custom script file options (continued) Option Value StripeSize Specifies the Stripe Size for the logical drive in KB. In Configure mode, the Stripe Size is the Stripe Size for the new logical drive. In Reconfigure mode, if the logical drive already exists and the Stripe Size is different than the existing Stripe Size on the logical drive, the cpqacuxe utility attempts to migrate the logical drive to the specified Stripe Size. The Stripe Size option is not required.
Table 5-5 Custom script file options (continued) Option Value PreferredPath Specifies the preferred path for the logical drive when redundant array controllers are in an active-active redundancy mode and the preferred path mode is set to Manual. This option is only available for certain redundant array controllers. If the option is not specified, the preferred path remains unchanged for the logical drive.
Table 5-6 Error codes Code Error Reason 0 Success Success 1 General error Problem spawning ACU process (user is not authenticated to use ACU or ACU is already running). 2866 Failure opening capture file Error opening capture file. '%s' 2867 Failure opening input file '%s' Error opening input file. 2868 Failure opening error file '%s' Error opening error file. 2869 ‘%s’ command expected The specified command is missing or in the incorrect place in the file.
Table 5-6 Error codes (continued) 68 Code Error Reason 2826 Array not specified The array command is missing from the script file. Some commands were found that require an array to work on. 2827 New Array ID does not match The Array ID in the script file does not match the Array ID of the next available Array ID the newly created array. For example, if you have Array A already and the script file tries to create Array C (without Array B), the script generates this error.
Table 5-6 Error codes (continued) Code Error Reason 2839 Cannot migrate Logical Drive The controller does not support migration, or the current configuration of the controller does not allow migration to occur. Raid 2840 Cannot migrate Logical Drive The controller does not support migration, or the current configuration of the controller does not allow migration to occur.
Table 5-6 Error codes (continued) 70 Code Error Reason 2851 Invalid Raid Array ID The entered Raid Array ID is invalid. The Raid Array ID can only consist of the following characters: a-z, A-Z, 0-9, ! @ # * ( ) , - _ + : . / [space]. It cannot end with a space character or exceed the maximum number of characters allowed by the controller. 1091 Controller does not support The controller does not support SSP.
efibootmgr Synopsis efibootmgr [command]... [option]... Description The efibootmgr utility is used from a script file to manager the EFI Boot variables. The efibootmgr utility is used for creating or destroying the EFI BOOT variables and to update the BOOT NEXT, BOOT ORDER and TIMEOUT variables.The BOOT ORDER variable defines the boot entries sequence to be shown in menu. The TIMEOUT sets the time-out to select automatically the boot variables, according to BOOT ORDER.
Table 5-8 Commands (continued) Commands Description -L | --label label Boot manager display label (defaults to “Linux”). -p | --part part Partition number that containing boot loader (defaults to 1) -q | --quiet Be quiet. --test filename Do not write to NVRAM, writes to filename. -u | --unicode | --UCS-2 Pass extra args as UCS-2 (default is ASCII). -U | --acpi_uid XXXX Set the ACPI UID (used with -i). -v | --verbose Print additional information.
gen-setupldr-options Synopsis gen-setupldr-options <–d device> [-p number] <-w path> [-o file] [-h] Description The gen-setupldr-options utility generates options for the setup loader, which launches the Windows installation process. Use gen-setupldr-options along with the efibootmgr utility. Options Table 5-10 Options Options Description -d Sets the device file. -w Sets the working path. -p Sets the partition number. -o Sets the output file name.
Options The hpia64info utility has one option, -v. This option displays the version of the hpia64info utility.
SelectiveLogin=1 ; input from customer EnableSelectiveLUN=1 ; input from customer BootDeviceWWNN=2000000000000000 ; input from BootDeviceWWPN=2200000000000000 ; input from BootDeviceLUN[0]=0 ; input from customer • - 1 (Enable) or 0 (Disable) - 1 (Enable) or 0 (Disable) customer - Boot Device Node name customer - Boot Device Port name – Boot Device LUN ID For 4G HBAs [HBA0] ; section for each HBA - HBA No WWID=11223344 ; read-only variable - HBA WWPN SelectiveLogin=1 ; input from customer - 1 (Enable) or
Server rx2620 52JAPE4343073100 rx2620 1.10 01.56 E.02.
Table 5-13 Options (continued) Command line argument Description variable= In this argument, variableis the name of an environment variable and is a PCI device name or the name of an element from the hardware discovery file. Arguments must be in quotes if contains spaces. The name is case-sensitive. ... You can specify multiple variable=arguments. Examples • To produce an hwdisc.
Options Table 5-14 Options Option Description [path]hwdiscfilename This argument specifies the hardware discovery file used to run the query. [path]allboards.xml This argument specifies the allboards.xml PCI device list file, which is used to convert PCI IDs found in hardware discovery into device names, such as “Smart Array 6402 Controller.” This argument specifies the query expression. Examples The ifhw utility may use XML files as input to query the hardware discovery file.
Table 5-15 Options (continued) Operator or term Result PCI: True if a PCI device whose name includes is found in the hardware discovery file. is case-sensitive. HWQ: The hardware discovery file is searched for , and the corresponding value is the value of this term. is case-sensitive. A literal string, used for comparison. A literal number, used for comparison. parted Synopsis parted [-v | -i | -s | -h]...
• To create a partition: mkpart PTYPE START END PTYPE is partition type: primary, logical or extended. For GPT partition table only “primary” is used. • To create a partition with a file system: mkpartfs PTYPE FTYPE START END PTYPE is partition type: primary, logical or extended. For GPT partition table only “primary” is used. FTYPE is file system type: fat16, fat32, ext2 and linux-swap.
• To set the ESP partition GUID in the first partition on the table: parted -s /dev/cciss/c0d0 set 1 boot on • To set the name of the second partition of the /dev/cciss/c0d0 partition table to “HP Service Partition” use: parted -s /dev/sda name 2 “HP Service Partition” parted 81