
SmartSetup Scripting Toolkit Deployment Guide for HP Integrity Servers with Microsoft Windows Server 2003 for Itanium-based Systems
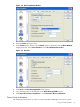
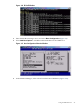
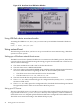
Table Of Contents
- SmartSetup Scripting Toolkit Deployment Guide
- Table of Contents
- About This Document
- 1 Overview
- 2 Creating a server profile
- 3 Setting up the toolkit environment
- 4 Setting up the boot mechanism
- Using a bootable CD/DVD
- Using a USB flash device
- Using network boot
- Interrupting the SSTK deployment process
- 5 Utilities Reference
user = root
server = /usr/sbin/in.tftpd
server_args = -s /tftpboot
disable = yes
per_source = 11
cps = 100 2
}
In this example, “disabled” is the default setting, and /tftpboot is the root directory for all
client access. To enable the TFTP service on your server, edit the disable line to read:
disable = no
Populating the TFTP directory share
Use the /tftpboot directory as the directory from which TFTP clients will get their files. To
populate the TFTP directory share:
1. Create a /tftpboot directory, if needed.
2. Copy the necessary boot files to the /tftpboot directory:
bootia64.efi (the boot loader file)
elilo.efi
elilo.conf (the ELILO configuration file)
rootfs.gz (the Linux file system)
linux (the Linux kernel)
3. The /tftpboot directory should now contain the following items:
/tftpboot/bootia64.efi
/tftpboot/elilo.efi
/tftpboot/elilo.conf
/tftpboot/rootfs.gz
/tftpboot/linux
4. Make sure the ELILO.conf file is configured as stated in Chapter 3 (page 33).
Setting up the Integrity server for PXE-enabled boot
Be sure the Integrity server has a PXE-compliant NIC and is physically connected to a configured
DHCP server. Set the NIC as the default boot device or select it in the EFI Boot Manager Menu:
1. Boot the server to EFI, and access the EFI Boot Manager menu.
2. Select Boot Configuration.
3. Select Add Boot Entry.
4. Select Load File [core LAN GB A], where A represents the NIC.
5. Enter a name for the boot entry, and click Save.
6. “Core LAN GB A” or the name you entered is listed as an option in the EFI Boot Manager
menu. Select this option in the boot menu, and press the Enter key.
7. After PXE boots over the network, you have the option of pressing the Tab key to view the
mounting options of the ELILO.conf file.
Setting up a Cellular-based Integrity server for PXE-enabled boot
Be sure that the Cellular-based Integrity server has a PXE-compliant NIC and is physically
connected to a configured DHCP server. Set the NIC as the default boot device or select it in the
EFI Boot Manager menu:
1. Boot the server to EFI, and access the EFI Boot Manager menu.
2. Select Boot Option Maintenance Menu->Add a Boot Option.
3. Select Load File [Acpi..../Mac(xxxx)], where Mac represents the Mac address of a NIC.
4. Select E-Edit or N-New to create a new entry.
5. Enter a new description name. For example, “LAN1.”
50 Setting up the boot mechanism