Tower to Rack and Rack to Tower System Conversion Guide HP Workstation zx6000 HP Server rx2600 Manufacturing Part Number : A7857-90017 Edition E0802 © Copyright 2002 Hewlett-Packard Company.
Legal Notices The information contained in this document is subject to change without notice. Hewlett-Packard makes no warranty of any kind with regard to this material, including, but not limited to, the implied warranties of merchantability and fitness for a particular purpose. Hewlett-Packard shall not be liable for errors contained herein or for incidental or consequential damages in connection with the furnishing, performance, or use of this material.
Preface Important Warnings Avoid Electrical Shocks WARNING To avoid electrical shock, do not open the power supply. There are no user-serviceable parts inside. To avoid electrical shock and harm to your eyes by laser light, do not open the laser module. The laser module should be serviced by service personnel only. Do not attempt to make any adjustment to the laser unit. Refer to the label on the CD-ROM for power requirements and wavelength. This product is a class I laser product.
Potential Metallic Particulate Contamination Metallic particulates can be especially harmful around electronic equipment. This type of contamination may enter the data center environment from a variety of sources, including, but not limited to, raised floor tiles, worn air conditioning parts, heating ducts, rotor brushes in vacuum cleaners or printer component wear. Because metallic particulates conduct electricity, they have an increased potential for creating short circuits in electronic equipment.
1 Converting a Tower System to a Rack System This chapter explains how to convert your zx6000/rx2600 tower system to a rack system. For information on installing your system in a rack enclosure, read the document Installation Guide for Midweight Slide Kit (HP Part Number: 5064-9640).
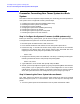
Converting a Tower System to a Rack System Process for Converting Your Tower System to a Rack System Process for Converting Your Tower System to a Rack System This section covers the sequence of steps necessary for converting your tower system to a rack system. Here is a high-level summary of these steps: 1. 2. 3. 4. 5. 6. 7.
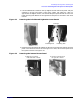
Converting a Tower System to a Rack System Process for Converting Your Tower System to a Rack System 2. Use the indentations located on the top edge of the left-side access panel and pull outward to un-snap and rotate it away from system. See Figure 1-1. After an approximate 45 degree rotation, lift the left-side panel upwards and off of the two lower retaining tabs. Note that the right-side access panel is removed in this same manner.
Converting a Tower System to a Rack System Process for Converting Your Tower System to a Rack System 4. Use the indentation on the top edge of the front access panel and pull outward to un-snap and rotate it away from the system. See Figure 1-3. After an approximate 45 degree rotation, lift the front access panel upwards and off of the two lower retaining tabs.
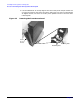
Converting a Tower System to a Rack System Process for Converting Your Tower System to a Rack System 5. Press in on the top panel’s retaining snap to release it and slide the top panel toward the back of the system’s chassis. See Figure 1-4. Figure 1-4 Slide the Top Access Panel Toward the Back of the System’s Chassis Top Access Panel Retaining Snap that you have to press in to release the Top Access Panel Back of system‘s chassis 6. Lift the top panel off of the system’s chassis. See Figure 1-5.
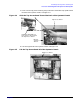
Converting a Tower System to a Rack System Process for Converting Your Tower System to a Rack System Step 3: Removing the System’s Pedestal Here are the steps required to remove the tower system’s pedestal: 1. Remove the pedestal mounting screws and slide the pedestal in the direction of the large arrow. See Figure 1-6. Figure 1-6 Remove the Pedestal Mounting Screws Slide the pedestal in the direction of the large arrow. Mounting Screws Pedestal Retaining Posts and Slots 2.
Converting a Tower System to a Rack System Process for Converting Your Tower System to a Rack System Step 4: Changing the System’s Fans (zx6000 systems only) This section explains how to change the system’s fans for use in a rack enclosure. There are four fan modules (not including the processor’s turbo fan or fans) that keep the system cool when it is running. See Figure 1-8. If you have a rx2600, you can skip to the section “Step 5: Installing the System’s Rack Latches” in this chapter.
Converting a Tower System to a Rack System Process for Converting Your Tower System to a Rack System 2. Replace the fans you removed from the system with the fans from your conversion kit. Fans 1A and 1B are to be replaced with HP Part Number A7231-04014 and fan 2 is to be replaced with HP Part Number A7231-04015. See Figure 1-10. Press firmly to ensure the fans are seated properly. Figure 1-10 Replace System Fan Modules 1A, 1B and 2 1. Insert Fan 1A into its slot in the system 2.
Converting a Tower System to a Rack System Process for Converting Your Tower System to a Rack System 2. Connect the left-side rack latch bracket to the system’s chassis by screwing in its mounting screws. See Figure 1-12. Figure 1-12 Connecting the Left-side Mounting Bracket to the System’s Chassis Left Front Panel Rack Latch Bracket Mounting Screws 3. Insert the right-side rack latch bracket’s retaining tab into its retaining slot on the system’s chassis. See Figure 1-13.
Converting a Tower System to a Rack System Process for Converting Your Tower System to a Rack System Step 6: Installing the System’s Right Front Access Panel To install the rack system’s right front access panel, position the panel at approximately 45 degrees to the front of the system and place the panel’s retaining slots onto the chassis retaining tabs. Rotate the panel inward until its retaining clips snap in place. See Figure 1-15.
2 Converting a Rack System to a Tower System This chapter explains how to convert your zx6000/rx2600 rack system to a tower system.
Converting a Rack System to a Tower System Process for Converting Your Rack System to a Tower System Process for Converting Your Rack System to a Tower System This section covers the sequence of steps necessary for converting your rack system to a tower system. Here is a high-level summary of these steps: 1. 2. 3. 4. 5. 6. 7. 8.
Converting a Rack System to a Tower System Process for Converting Your Rack System to a Tower System Step 2: Removing the System from its Rack Enclosure To remove a rack system from its rack enclosure, reverse the instructions in the document Installation Guide for Midweight Slide Kit (HP Part Number: 5064-9640) that was shipped with your rack installation kit.
Converting a Rack System to a Tower System Process for Converting Your Rack System to a Tower System Step 4: Removing the System’s Rack Latch Brackets The rack system has two rack latch brackets for the purpose of securing the system in the rack enclosure. The left rack latch bracket has the left front panel attached to it. Here are the required steps for removing the rack system’s rack latch brackets: 1. Unscrew the left-side rack latch bracket’s screws from the system’s chassis. See Figure 2-2.
Converting a Rack System to a Tower System Process for Converting Your Rack System to a Tower System 3. Unscrew the right-side rack latch bracket’s screws from the system’s chassis. See Figure 2-4. Figure 2-4 Unscrew the Left-side Rack Latch Bracket’s Screws Mounting Screws Rack Latch Bracket 4. Rotate the rack latch bracket assembly away from the chassis and remove the right-side rack latch bracket’s retaining tab from its retaining slot on the system’s chassis. See Figure 2-5.
Converting a Rack System to a Tower System Process for Converting Your Rack System to a Tower System Step 5: Removing the System’s Access Panel You need to remove the access panel to gain access to the system’s internal components. Here are the steps required to remove the access panel: 1. Rotate the access panel’s blue release lever toward the back of the system and slide the cover toward the back of the system. See Figure 2-6.
Converting a Rack System to a Tower System Process for Converting Your Rack System to a Tower System Step 6: Changing the System’s Fans (zx6000 systems only) This section explains how to change the system’s fans for use in a tower system. There are four fan modules (not including the processor’s turbo fan or fans) that keep the system cool when it is running. See Figure 2-8.
Converting a Rack System to a Tower System Process for Converting Your Rack System to a Tower System 2. Replace fans 1A, 1B and 2 that were removed in step 1 in this section with HP Part Number A7231-04017. See Figure 2-10. Figure 2-10 Replace Fan Modules 1A, 1B and 2 1a. Replace Fan 1A 2a. Replace Fan 1B 3a. Replace Fan 2 1b. Connect Fan 1A’s power connector 2b. Connect Fan 1B’s power connector 3b. Connect Fan 2’s power connector 3.
Converting a Rack System to a Tower System Process for Converting Your Rack System to a Tower System Step 7: Installing the System’s Pedestal Here are the steps required to install the tower system’s pedestal: 1. Place the pedestal’s retaining slots on their retaining posts. See Figure 2-11. Figure 2-11 Place the Pedestal Retaining Slots on their Retaining Posts Retaining Posts Retaining Slots 2.
Converting a Rack System to a Tower System Process for Converting Your Rack System to a Tower System Step 8: Installing the System’s Access Panels Here are the steps required to install the access panels on the tower system: 1. Locate of the top access panel retaining hooks and their associated retaining slots on the system’s chassis. You must align the retaining snaps with their retaining slots. See Figure 2-13. Figure 2-13 Locate the Top Access Panel’s Retaining Snaps and Slots 1a.
Converting a Rack System to a Tower System Process for Converting Your Rack System to a Tower System 2. Place the top access panel on the system’s chassis, press downward and slide the top panel toward the front of the system until it snaps into place. See Figure 2-14. Ensure that all hooks are in place. Figure 2-14 Slide the Top Access Panel onto the System’s Chassis Top Panel Front of System 3.
Converting a Rack System to a Tower System Process for Converting Your Rack System to a Tower System 4. Position the front access panel at an approximate 45 degree angle with the front of the system and insert its retaining slots onto the retaining tabs located on the system’s chassis. See Figure 2-16. Rotate the front access panel inward until it snaps in place. Figure 2-16 Install the Front Panel Front Access Panel Front of System Retaining Tabs Retaining Slots 5.