
Tower to Rack and Rack to Tower System Conversion Guide


Converting a Tower System to a Rack System
Process for Converting Your Tower System to a Rack System
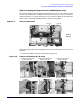
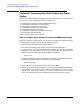
2. Replace the fans you removed from the system with the fans from your conversion
kit. Fans 1A and 1B are to be replaced with HP Part Number A7231-04014 and fan 2
is to be replaced with HP Part Number A7231-04015. See
Figure 1-10. Press firmly
to ensure the fans are seated properly.
Figure 1-10 Replace System Fan Modules 1A, 1B and 2
1. Insert Fan 1A into its
2. Insert Fan 1B into its
3. Insert Fan 2 into its
slot in the system
slot in the system
slot in the system
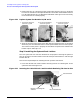
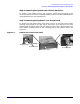
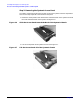
3. Align the internal access panel’s front edge with the alignment mark on the optical
drive’s bay area and slide the internal access panel toward the front of the system.
The internal access panel is properly secured when the panel’s blue release lever
latches in place. See
Figure 1-2.
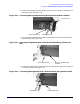
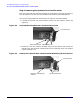
Step 5: Installing the System’s Rack Latches
The rack system has two rack latch brackets for the purpose of securing the system in
the rack enclosure. The left bracket has the left front panel attached to it and the right
bracket does not.
Here are the required steps for installing the rack system’s rack latches:
1. Insert the left-side rack latch bracket’s retaining tab into its retaining slot on the
system’s chassis. See
Figure 1-11.
Figure 1-11 Inserting the Left-side Rack Latch Bracket’s Retaining Tab into Its Slot
Left Front Panel
Bracket’s Retaining Tab
Rack Latch Bracket
and Slot
12
Chapter 1