
Tower to Rack and Rack to Tower System Conversion Guide

Converting a Rack System to a Tower System
Process for Converting Your Rack System to a Tower System
Process for Converting Your Rack System to a Tower
System
This section covers the sequence of steps necessary for converting your rack system to a
tower system. Here is a high-level summary of these steps:
1. Configuring the system’s firmware (zx6000 systems only)
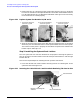
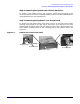
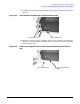
2. Removing the system from its rack enclosure
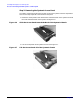
3. Removing the system’s front access panel
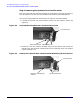
4. Removing the system’s rack latch brackets
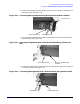
5. Removing the system’s access panel
6. Changing the system’s fans (zx6000 systems only)
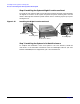
7. Installing the system’s pedestal
8. Installing the system’s access panels
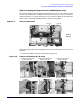
Step 1: Configuring the System’s Firmware (zx6000 systems only)
Before you remove any system panels, you will have to configure your system’s firmware
to recognize the new system fans. To do this, follow these steps:
1. Boot the system and select the EFI shell menu item.
2. Insert the Documentation and Utilities CD into the system’s optical drive.
3. Execute the map -r command at the EFI shell prompt and look for the CD-ROM
mapping in the display. Next, enter the file system name associated with that
mapping at the EFI shell prompt and press Enter. For example:
Shell> fs0:
4. Change to the directory where the racktower.efi utility is located by executing the
following command at the EFI shell prompt and pressing Enter:
Shell> cd \utils
5. Type racktower.efi at the EFI shell prompt and press Enter.
6. Answer yes to the prompts that appear by typing Y and pressing Enter. Note that the
utility knows if you are going from a tower to rack configuration or rack to tower
configuration. Once the last question is answered, remove the CD from the optical
drive. The system firmware is now configured, and you are ready to go to step 2.
16
Chapter 2