Smart Setup Guide HP Integrity Servers for Microsoft Windows Server 2003 Manufacturing Part Number: 5990-8222 January 2005 © Copyright 2005 Hewlett-Packard Development Company, L.P.
Legal Notices © Copyright 2005 Hewlett-Packard Development Company, L.P Confidential computer software. Valid license from HP required for possession, use or copying. Consistent with FAR 12.211 and 12.212, Commercial Computer Software, Computer Software Documentation, and Technical Data for Commercial Items are licensed to the U.S. Government under vendor's standard commercial license. The information contained herein is subject to change without notice.
Contents 1. Planning the installation Overview. . . . . . . . . . . . . . . . . . . . . . . . . . . . . . . . . . . . . . . . . . . . . . . . . . . . . . . . . . . . . . . . . . . . . . . . . . . . 6 Choosing an installation scenario . . . . . . . . . . . . . . . . . . . . . . . . . . . . . . . . . . . . . . . . . . . . . . . . . . . . . . . . 7 Choosing an installation environment . . . . . . . . . . . . . . . . . . . . . . . . . . . . . . . . . . . . . . . . . . . . . . . . . . . .
Contents Reinstalling from a local console . . . . . . . . . . . . . . . . . . . . . . . . . . . . . . . . . . . . . . . . . . . . . . . . . . . . . . . . Load the system image . . . . . . . . . . . . . . . . . . . . . . . . . . . . . . . . . . . . . . . . . . . . . . . . . . . . . . . . . . . . . . Specify server settings . . . . . . . . . . . . . . . . . . . . . . . . . . . . . . . . . . . . . . . . . . . . . . . . . . . . . . . . . . . . . . Reinstalling from a remote console . . . . . . . . . . . . . .
1 Planning the installation Installing a Microsoft Windows Server 2003 64-bit version operating system on an HP Integrity server involves preparing the hardware for the OS installation, loading the OS, and updating the system with the latest OS patches. This chapter helps you plan the installation based on the server model, the OS edition, and the source of the OS media, and your network environment. Subsequent chapters guide you through the installation process.
Planning the installation Overview Overview The HP Integrity server family, based on the Intel Itanium 2 processor, supports 64-bit Windows Server 2003 on a full range of server models, from entry-level servers such as the 2-processor rx1620, through mid-range servers such as the rx7620 and rx8620, up to the high-end 128-processor Superdome. Some HP Integrity servers, such as rx7620, rx8620, and Superdome, are based on the HP Super-Scalable Processor chipset (sx1000).
Planning the installation Choosing an installation scenario Choosing an installation scenario When you purchase an HP Integrity server, you can order additional hardware, support options, and an OS enablement kit (such as the HP Integrity Essentials Foundation Pack for Windows). You can also order factory-installation of the OS.
Planning the installation Choosing an installation environment Choosing an installation environment The installation environment consists of the server model, the OS edition, a local console or a remote console, and the media you need to perform the installation.
Planning the installation Choosing an installation environment Using a local console A local console is a VGA monitor, a USB keyboard, and a USB mouse connected to the server. (You may use a USB-to-PS2 dongle to connect to a console switch). If a VGA card is not already installed, you must install the HP Graphics and USB Combo Adapter (A6869A) to use a local console. No other graphics card is supported by HP Integrity servers.
Planning the installation Choosing an installation environment Using a remote console A remote console is a PC running terminal emulation software, such as PuTTY (can be installed from the Smart Setup media or from the Web) or HyperTerminal, connected to the server via the Management Processor (MP) serial port or LAN port.
Planning the installation Choosing an installation environment Using PXE/RIS A Remote Install Server (RIS) is a specialized Windows server used to perform multiple software installations across a network. The RIS server, working in conjunction with an agent (the PXE client) residing on target systems, performs automated installations.
Planning the installation Using EFI Using the HP Smart Setup media The HP Integrity Essentials Foundation Pack for Windows includes the HP Smart Setup media. You can use the HP Smart Setup media both before and after the OS is installed: • Before installing the OS, boot the server with the Smart Setup media in the CD/DVD drive. The server boots to the EFI-Based Setup Utility (EBSU).
Planning the installation Using EFI EFI Boot Manager First displayed when you power on the server, the EFI Boot Manager provides a menu-based interface (use arrow keys to traverse menus) with options for booting the OS, loading EFI applications, configuring the server, and other pre-boot operations.
Planning the installation Installation Process Installation Process The installation process involves preparing the server for the OS, loading the OS on the server, and updating the system with the latest firmware, drivers, utilities, security fixes, and OS fixes. Figure 1-5 shows the main tasks involved in each stage.
Planning the installation Installation Process In practice, there are minor differences—based on the choice of console and installation media—in the sequence of tasks or the interface you would use to perform them. Before perfoming these tasks, refer to the detailed task instructions in the following chapters, noting any warnings or cautions that applying to a given task.
Planning the installation Installation Process 16 Chapter 1
2 Preparing for installation Getting your server ready to undergo an operating system install involves setting up a console (either local or remote, or both), optionally setting up a PXE/RIS environment, if applicable, and preparing the hardware for installation. If you are migrating from another OS, you must also ensure that the server platform and its peripheral cards are compatible with Windows Server 2003 before proceeding. This chapter provides detailed instructions for each task.
Preparing for installation Ensuring platform compatibility Ensuring platform compatibility If you are migrating from another operating system to Windows Server 2003, ensure that the firmware is up to date, that the hardware is compatible, and any data on the server disk is backed up. Check system firmware version To check the system firmware version: Step 1. Boot the server to EFI. Step 2. At the EFI Shell prompt, type info fw.
Preparing for installation Ensuring platform compatibility Back up existing data If you want to restore the data on the hard disk of the server after migrating to Windows, you must back up the data and verify that you are able to restore it: Step 1. Perform a server-wide backup using your existing backup utilities. Step 2. Verify the integrity of the backup by restoring samples of data to another server. Step 3. Store the backup in a safe place.
Preparing for installation Setting up a console Setting up a console You can install the operating system and administer the server from either a local console, a remote console, or both: • A remote console is a terminal or a PC running terminal emulation software, such as PuTTY or HyperTerminal, connected to the server via the Management Processor (MP) serial port or LAN port.
Preparing for installation Setting up a console Set up a local console On servers configured with internal graphics card, you can connect a monitor, keyboard and mouse directly to the appropriate ports. On servers without internal graphics card, you must first install an HP Graphics and USB Combo card (A6869A) and connect the console to the appropriate ports. Then, from an existing remote console, modify system configuration to redirect the output to the local console.
Preparing for installation Setting up PXE/RIS Setting up PXE/RIS Remote Installation Services (RIS) enables you to create, maintain, and quickly install identical OS and software configurations on multiple remote systems with a predefined level of user interaction. RIS uses the Pre-boot eXecution Environment (PXE) to enable client computers without an operating system to boot remotely to a RIS server. The RIS server then installs the operating system over a TCP/IP network connection.
Preparing for installation Setting up PXE/RIS Figure 2-2 EFI Boot Option Menu Step 2. Select Add a Boot Option. Step 3. Select a NIC from the list of supported boot controllers. Figure 2-3 Select the PXE Boot NIC Step 4. Enter a description for the NIC. Figure 2-4 Describe the NIC Step 5. Press Enter to select the default options. Step 6. Enter Yes to save the settings.
Preparing for installation Preparing the server hardware Preparing the server hardware To set up the server hardware for OS installation, set up the boot drive, set up the CD/DVD drive, and—if the server is cell-based—verify that the ACPI boot option is set to windows. Set up the boot drive The operating system installs through the boot controller detected as adapter zero to the drive detected as drive zero. CAUTION If you do not disconnect all other drives, the OS may install to an unintended drive.
Preparing for installation Preparing the server hardware fs0 : Acpi(PNP0A03,0)/Pci(2|0)/Ata(Primary,Master)/CDROM(Entry1) blk0 : Acpi(PNP0A03,1)/Pci(1|0)/Scsi(Pun0,Lun0) blk1 : Acpi(PNP0A03,0)/Pci(2|0)/Ata(Primary,Master) blk2 : Acpi(PNP0A03,0)/Pci(2|0)/Ata(Primary,Master)/CDROM(Entry1 Step 3. Note the device name of the CD-ROM device (fs0). You will use this to explore the contents of the CD or DVD. See also The map command displays or defines a mapping between a user-defined name and a device handle.
Preparing for installation Locating the Microsoft Certificate of Authenticity Set Cell Local Memory to 100% (cell-based servers only) HP recommends that you set the Cell Local Memory (CLM) parameter to 100% to maximum server performance. This setting allocates all available local cell RAM for the use of that cell only, preventing unnecessary RAM reads and writes to physical RAM accessed over the server backplane.
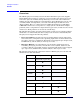
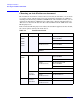
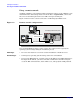
Preparing for installation Locating the Microsoft Certificate of Authenticity To locate the COA, reference the table below. Table 2-2 Locating the Microsoft COA Integrity server Location 1600 and 1620 COA is located on the underside of the pullout strip, as shown in the illustration below. 2620 COA is located on the front of the system as shown in the illustration below. 4640 COA is located as shown in the illustration below.
Preparing for installation Locating the Microsoft Certificate of Authenticity Table 2-2 Locating the Microsoft COA (Continued) Integrity server Location 5670 COA is located on the front of the system as shown in the illustration below. 7620 COA is located on the front of the system, as shown in the illustration below. If additional COAs are installed, the location is shown in the second illustration below. 8620 COA is located on the front of the system, as shown in the first illustration below.
Preparing for installation Locating the Microsoft Certificate of Authenticity Table 2-2 Locating the Microsoft COA (Continued) Integrity server Location Superdome The COA is located as shown in the illustration below. Step 3.
Preparing for installation Locating the Microsoft Certificate of Authenticity 30 Chapter 2
3 Installing the OS This chapter provides instructions for installing the OS using a local console, a remote console, or a PXE-enabled NIC. This chapter also shows you how to re-install Windows. Each method comprises a series of tasks, concluding with two tasks that verify that the OS was installed correctly. You must install the HP Smart Update Cd and the HP Support Pack after installing the OS.
Installing the OS Installing from a local console Installing from a local console This task involves using EBSU to prepare the server, using Windows Setup to prepare the OS, loading the OS on the server, and specifying system settings. Run EBSU EBSU provides an easy-to-use interface to flash the firmware, partition the hard disk, install diagnostic tools, configure storage controllers, and run other EFI utilities. Step 1. Power on the server. The server boots to EFI. Figure 3-1 Boot to EFI Step 2.
Installing the OS Installing from a local console Step 5. From the main menu, select Express Setup and press Enter. Figure 3-3 Select Express Setup Step 6. EBSU displays the Express Setup introduction. Press Enter to continue. Step 7. EBSU displays the firmware update screen, listing each device, its installed firmware version, and the firmware version on the Smart Setup media. Select the device(s) whose firmware you want to update. To continue, select Next and press Enter.
Installing the OS Installing from a local console Step 8. Specify the disk partitions you want to create (ESP Only or ESP + HPSP + MSR). We recommend the default—ESP + HPSP + MSR—as a means to simplify the maintenance of your server. Also, specify the option to install the Drive Explorer utility, which enables you to browse a drive in EFI. Select Next and press Enter. Figure 3-5 Partition disk Step 9.
Installing the OS Installing from a local console Step 11. EBSU prompts you to insert the Microsoft Windows Server 2003 CD in the DVD drive. Insert the Microsoft Windows Server 2003 CD and press Enter. Figure 3-7 Insert the Microsoft Windows Server 2003 CD Run Windows Setup Windows Setup prompts you to create a system partition on the boot disk if needed, copies the operating system files on to that partition, and attempts to reboot from the boot disk. Step 1.
Installing the OS Installing from a local console Figure 3-9 Choose install type Step 3. If Windows Setup cannot find a system partition, it prompts you to create one. Press Enter to continue. Windows creates a partition and then prompts you to format it. Step 4. Select the partition in which you want to install the OS and press Enter. Windows formats the partition if necessary, checks the partition for errors, and begins to copy the OS files. Figure 3-10 Choose install partition Step 5.
Installing the OS Installing from a local console Figure 3-11 Copy installer files to disk Upon completion, Windows Setup counts down to a reboot. Allow the system to reboot. NOTE If your server is cell-based and has an HP Graphics and USB Combo card installed, you must set the NOVESA OS load option. To set the NOVESA load option, break into the boot sequence by pressing any key before the Boot Manager menu is displayed.
Installing the OS Installing from a local console Enter VAR to modify: LoadIdentifier = Windows Server 2003, Enterprise OsLoadOptions = /redirect EfiOsLoaderFilePath = cf5f2ddc-b885-11d7-b831-000000000000 :: \efi\microsoft\winnt50\ia64ldr.efi OsLoaderFilePath = e605a034-b885-11d7-b831-000000000000 :: \windows Step 5. Select the second option—OsLoadOptions—by typing 2. Step 6. Type OsLoadOptions = /redirect /NOVESA.
Installing the OS Installing from a remote console Installing from a remote console Installing from a remote console involves booting from the HP Smart Setup media, running EBSU, launching Windows Setup, loading OS files to the boot disk, and then booting the server from the boot disk.
Installing the OS Installing from a remote console Step 5. From the main menu, select Express Setup and press Enter. Figure 3-14 Select Express Setup Step 6. EBSU displays the Express Setup introduction. Press Enter to continue. Step 7. EBSU displays the firmware update screen, listing each device, its installed firmware version, and the firmware version on the Smart Setup media. Select the device(s) whose firmware you want to update. To continue, select Next and press Enter.
Installing the OS Installing from a remote console Step 8. Specify the disk partitions you want to create (ESP Only or ESP + HPSP + MSR). We recommend the default—ESP + HPSP + MSR—as a means to simplify the maintenance of your server. Also, specify the option to install the Drive Explorer utility, which enables you to browse a drive in EFI. Select Next and press Enter. Figure 3-16 Partition disk Step 9.
Installing the OS Installing from a remote console Step 11. EBSU prompts you to insert the Microsoft Windows Server 2003 CD in the DVD drive. Insert the Microsoft Windows Server 2003 CD and press Enter. Figure 3-18 Insert the Microsoft Windows Server 2003 CD Run Windows Setup Windows Setup prompts you to create a system partition on the boot disk if needed, copies the operating system files on to that partition, and attempts to reboot from the boot disk. Step 1.
Installing the OS Installing from a remote console Figure 3-20 Choose install type Step 3. If Windows Setup cannot find a system partition, it prompts you to create one. Press Enter to continue. Windows creates a partition and then prompts you to format it. Step 4. Select the partition in which you want to install the OS and press Enter. Windows formats the partition if necessary, checks the partition for errors, and begins to copy the OS files. Figure 3-21 Choose install partition Step 5.
Installing the OS Installing from a remote console Figure 3-22 Copy installer files to disk Upon completion, Windows Setup counts down to a reboot. Allow the system to reboot. NOTE If your server is cell-based and has an HP Graphics and USB Combo card installed, you must set the NOVESA OS load option. To set the NOVESA load option, break into the boot sequence by pressing any key before the Boot Manager menu is displayed.
Installing the OS Installing from PXE Enter VAR to modify: LoadIdentifier = Windows Server 2003, Enterprise OsLoadOptions = /redirect EfiOsLoaderFilePath = cf5f2ddc-b885-11d7-b831-000000000000 :: \efi\microsoft\winnt50\ia64ldr.efi OsLoaderFilePath = e605a034-b885-11d7-b831-000000000000 :: \windows Step 5. Select the second option—OsLoadOptions—by typing 2. Step 6. Type OsLoadOptions = /redirect /NOVESA.
Installing the OS Installing from PXE Step 3. From the list of available boot sources, select the NIC to boot from and press Enter. Figure 3-23 Select NIC Step 4. At the PXE boot status window, press Enter to continue. Figure 3-24 Review PXE boot status Step 5. At the login screen, type a valid user name and password, and press Enter.
Installing the OS Reinstalling from a local console Figure 3-25 Log in to RIS server Step 6. At the OS selection screen, select the OS (Windows Server 2003, Enterprise Edition) to be installed and press Enter to start the installation. Figure 3-26 Select the OS to install Step 7. Complete the installation by following the instructions on screen.
Installing the OS Reinstalling from a local console Reinstallation overwrites all files on the Boot Disk. Please note the Boot Disk is determined by bus search order and may not be the disk you expect it to be. HP recommends disconnecting or unplugging ALL drives from the server except the Boot Disk. This includes all SAN storage too. WARNING Load the system image To install the Windows Server 2003 operating system on the server from the local console: Step 1. Power on the server.
Installing the OS Reinstalling from a remote console Step 1. Start the server. Windows displays a pop-up screen indicating that an EMS channel (headless server MP port) is present. It may take 2 to 15 minutes for the mouse and keyboard to start operating in this mode. Step 2. When prompted to enter setup information at the local console, click OK. Step 3. From the Windows Setup Wizard, enter the following setup information: 1. In the License Agreement window, click Accept and then Next. 2.
Installing the OS Reinstalling from a remote console Figure 3-28 Boot to EFI Step 2. Insert the HP Re-Installation media in the DVD drive. Step 3. Connect to the target system partition with the terminal emulator. Step 4. From the EFI Boot Menu, select Internal Bootable DVD and press Enter. The server boots from the Re-Installation media. Step 5. At the SAC> prompt, type cmd. Step 6. Switch to a new command prompt channel by pressing Esc+Tab. Step 7. Invoke the installation menu by typing txtrestore.
Installing the OS Reinstalling from a remote console Press for next channel. Press 0 to return to the SAC channel. Use any other key to view this channel. ***************************************************************** Step 2. Press any key and then press Page Down. Step 3. Accept the license agreement by pressing F8. On the Windows default terminal emulator, F8 is 8. Press 8 within two seconds after pressing Esc. Otherwise, the system will register only Esc and reboot. Step 4.
Installing the OS Verifying the installation Verifying the installation This section provides two tasks that verify that the OS is up and running. Both of these tasks should be performed before you connect your server to your intranet. Check hardware status The Windows Device Manager is a comprehensive tool for detecting and evaluating problems with installed hardware devices and resource conflicts. To check server hardware status: Step 1. From Windows, right-click on the My Computer icon. Step 2.
Installing the OS Verifying the installation To install adevice driver from the Smart Setup CD: Step 1. Insert the HP Smart Setup CD in the server CD/DVD drive. Step 2. Run the Windows Device Manager and use a menu path of View > Devices by Type to list the system devices Step 3. Expand the entry named Other devices. This shows a list of all devices whose drivers were not found during installation of the operating system.
Installing the OS Verifying the installation 54 Chapter 3
4 Updating the server This chapter provides instructions for performing administration tasks on Windows Server 2003 remotely. This chapter also provides links to web sites that enable you to keep your server up to date with the latest patches, fixes, and updates to utilities and documentation. You can also sign up for automated notifications to stay informed of available updates.
Updating the server Updating your system Updating your system There are three phases in updating your system after installing the OS: • Installing updates from the HP Smart Update CD • Installing updates from the HP Smart Setup CD • Installing the latest updates from the HP website NOTE Firmware updates for Superdome, rx8620, and rx7620 servers must be performed by HP CEs in compliance with the support agreement.
Updating the server Updating your system Step 7. Type in the machine name or IP address of the server you are updating in the Target Machine field. Step 8. Select the appropriate support pack from the Support Pack pulldown list. Step 9. Click Install. Install updates from the web The latest software updates are available on the HP website. Go to: http://www.hp.com/products1/servers/integrity/index.html and select Support and Drivers.
Updating the server Administering the system remotely Administering the system remotely When a server is running normally, you can connect to the server over the network and administer it using tools such as Windows Management Instrumentation (WMI), Terminal Services Remote Desktop for Administration, Microsoft Management Console (MMC), Telnet, Microsoft Script Host, and other third-party tools: • WMI: A management infrastructure in Windows that supports monitoring and controlling system resources through
Updating the server Administering the system remotely When SAC is active, it displays the SAC prompt: SAC>. SAC provides a set of commands you can use to perform a number of management tasks that help return your system to a normally functioning state: • restart: Restart the server. • shutdown: Shut down the computer. Do not use this command unless you can be physically present at the computer when you are ready to restart it. • T: List the processes and threads that are currently running.
Updating the server Administering the system remotely 60 Chapter 4
Index C Check hardware status, 52 Check Windows compatibility of existing I/O, boot device, and external Storage, 18 Checking OS functionality after the installation, 52 checking, 18 D DVD/CD drive mapping, 24 H hardware status checking, 52 I Install a PXE client on the server, 22 installation methods, 8 Installing the OS, 31 Installing Windows using a local console (custom and express mode), 9 Installing Windows using a PXE client and a RIS server, 11 L Locate and map the DVD/CD drive, 24 M map the DVD/C
Index 62