Cluster Installation and Configuration Guide HP Integrity Servers with Microsoft® Windows® Server 2003 Manufacturing Part Number: 5991-3694 January 2007 © Copyright 2007 Hewlett-Packard Development Company, L.P. All rights reserved.
Legal Notices © 2007 Hewlett-Packard Development Company, L.P. Microsoft and Windows are trademarks of Microsoft Corporation in the U.S. and other countries. Hewlett-Packard Company shall not be liable for technical or editorial errors or omissions contained herein. The information in this document is provided “as is” without warranty of any kind and is subject to change without notice. The warranties for HP products are set forth in the express limited warranty statements accompanying such products.
Contents 1. Introduction Clustering overview . . . . . . . . . . . . . . . . . . . . . . . . . . . . . . . . . . . . . . . . . . . . . . . . . . . . . . . . . . . . . . . . . . . 7 Server Cluster vs. Network Load Balancing . . . . . . . . . . . . . . . . . . . . . . . . . . . . . . . . . . . . . . . . . . . . . . . 9 Server Cluster . . . . . . . . . . . . . . . . . . . . . . . . . . . . . . . . . . . . . . . . . . . . . . . . . . . . . . . . . . . . . . . . . . . . . 10 Network Load Balancing (NLB). . . . .
Contents 4
1 Introduction This document describes how to install and configure clustered computing solutions using HP Integrity servers running Microsoft® Windows® Server 2003.
Introduction • Larger cluster sizes—64-bit Enterprise and Datacenter Editions now support up to 8 nodes. • Enhanced cluster installation wizard—Built-in validation and verification function to help ensure base components are ready to be clustered. • Installation—Clustering software is automatically copied during operating system installation. • Multi-node addition—Multiple nodes can now be added in a single operation instead of one by one.
Introduction Clustering overview Clustering overview A cluster is a group of individual servers, or nodes, configured to appear as a single, virtual server. The nodes making up the cluster generally run a common set of applications. They are physically connected by cables, and programmatically connected by the clustering software. Together these nodes appear as a single system to both users and applications.
Introduction Clustering overview Clustered systems can be created from nodes having different numbers of CPUs, or CPUs with different clock speeds, or even from different Integrity platforms. Diverse configurations are tested, qualified, and certified frequently by HP. However, the only limitations are that each node must be an HP Integrity platform, and each node must have the same Host Bus Adaptors (HBAs), HBA drivers, and HBA firmware.
Introduction Server Cluster vs. Network Load Balancing Server Cluster vs. Network Load Balancing Windows Server 2003 provides two types of clustering services: • Server Cluster—Available only in Windows Server 2003, Enterprise Edition or Datacenter Edition, this service provides high availability and scalability for mission-critical applications such as databases, messaging systems, and file and print services. The servers (nodes) in the cluster remain in constant communication.
Introduction Server Cluster vs. Network Load Balancing Server Cluster Use Server Cluster to provide high availability for mission-critical applications through fail-over. It uses a “shared-nothing” architecture, which means that a resource can be active on only one node in the cluster at any given time. Because of this, it is well suited to applications that maintain some sort of fixed state (for example, a database).
Introduction Server Cluster vs. Network Load Balancing For a detailed discussion of the key features of this technology, as well as its internal architecture and performance characteristics, see http://www.microsoft.com/windows2000/docs/NLBtech2.doc.
Introduction Cluster terminology Cluster terminology A working knowledge of clustering begins with the definition of some common terms. The following terms are used throughout this document. Nodes Individual servers, or members of a cluster, are referred to as nodes or systems (the terms are used interchangeably). A node can be an active or inactive member of a cluster, depending on whether or not it is currently online and in communication with the other cluster nodes.
Introduction Cluster terminology Resource state changes can occur either manually (when you use Cluster Administrator to make a state transition) or automatically (during the failover process). When a group is failed over, the states of each resource are altered according to their dependencies on the other resources in the group.
Introduction Cluster terminology There are two main reasons why the quorum resource is important in a cluster: • Consistency—Because the basic idea of a cluster is multiple physical servers acting as a single virtual server, it is critical that each physical server have a consistent view of how the cluster is configured. The quorum acts as the definitive repository for all configuration information relating to the cluster.
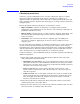
Introduction Cluster terminology The following is a sample diagram of a single quorum in a four-node cluster: Figure 1-2 Single quorum example Single quorums are sufficient for the majority of situations that most users encounter. Typical situations include: • Highly available data in a single location—Most customers that require their data to be highly available only need this on a per site basis. If they have multiple sites, each site has its own cluster.
Introduction Cluster terminology Majority node set (MNS) quorum A majority node set quorum appears as a single quorum resource from the perspective of the server cluster. However, the data is actually stored by default on the system disk of each node of the cluster. The clustering software ensures that the configuration data stored on the MNS is kept consistent across the different disks.
Introduction Cluster terminology MNS quorums have very strict requirements to ensure they work correctly, and therefore should only be considered by administrators who fully understand the issues involved in using MNS-based clusters. Their use should be limited to the following situations: • Geographically dispersed clusters—Involves a single MSCS cluster that has members in multiple geographic sites.
Introduction Cluster terminology Failback Failback is the process of returning a resource or group of resources to the node on which it was running before a failover occurred. Extending the preceding example, when node A comes back online, IIS can failback to node A.
2 Setup, configuration, validation, and maintenance of the cluster The procedures described in this chapter provide step-by-step installation and configuration directions for the HP Integrity clustered systems running Microsoft Windows Server 2003, 64-bit Edition.
Setup, configuration, validation, and maintenance of the cluster Verifying minimum software and hardware requirements Verifying minimum software and hardware requirements Use the following procedure to verify that you have all of the required software and firmware, and have completed all the necessary setup tasks before beginning your cluster installation. Step 1.
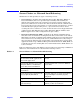
Setup, configuration, validation, and maintenance of the cluster Verifying minimum software and hardware requirements If you are using single connections between nodes and storage (or one HBA per node), MultiPath software is not required. However, this option is not recommended. Step 8. Locate your HP Fibre Channel switch firmware, and verify you have the latest supported version installed. Step 9.
Setup, configuration, validation, and maintenance of the cluster Verifying minimum software and hardware requirements Figure 2-1 Example cluster hardware cabling scheme PDC Client Client Client Client Client Client Client Computer Workstation Workstation Workstation ` Computer Computer Computer Switch-1 Public LAN Switch-2 NIC-1 Port-2 Team NIC-2 Port-1 Team NIC-1 Private LAN FC HBA Port-1 NIC-2 Port-2 FC HBA FC Switch-1 MultiPath MultiPath Node 1 Node “n” FC Switch-2 Shar
Setup, configuration, validation, and maintenance of the cluster Gathering all required installation information Gathering all required installation information The following table provides a means for recording the input parameters you will need to install the operating system and configure the cluster. Write the information in the “Value” column next to each description.
Setup, configuration, validation, and maintenance of the cluster Gathering all required installation information Table 2-1 Input parameters needed for OS/cluster installation and configuration Input Description Value Private network connection (cluster heartbeat) IP address and subnet mask for each node: Node 1 Node 2: IP address: IP address: Subnet mask: Subnet mask: Node 3 Node 4: IP address: IP address: Subnet mask: Subnet mask: Node 5: Node 6: IP address: IP address: Subnet mask: S
Setup, configuration, validation, and maintenance of the cluster Gathering all required installation information Table 2-1 Input parameters needed for OS/cluster installation and configuration Input Description Value Cluster name: Cluster IP address and subnet mask: IP address: Subnet mask: Default gateway IP address: WINS server IP address: DNS IP address: Local machine Admin password (used during OS installation): NOTE: For security reasons, do not write the password here! Domain name: Chapter 2
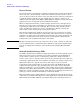
Setup, configuration, validation, and maintenance of the cluster Creating and configuring the cluster Creating and configuring the cluster The following sections describe the main steps needed to create and configure your cluster. Configuring the public and private networks NOTE Your private and public NICs must be configured in different subnets, otherwise the Cluster Service and Cluster Administrator utility will not be able to detect the second NIC.
Setup, configuration, validation, and maintenance of the cluster Creating and configuring the cluster • Article Number 142863, “Valid IP Addressing for a Private Network,” at http://support.microsoft.com/default.aspx?scid=kb;EN-US;142863 To configure your private network: Step 1. Right-click the My Network Places icon on your desktop, and select Properties. Step 2. Determine which Local Area Connection icon in the Network Connections window represents your private network.
Setup, configuration, validation, and maintenance of the cluster Creating and configuring the cluster Public networks To configure your public networks: Step 1. Right-click the My Network Places icon on your desktop, and select Properties. Step 2. Determine which Local Area Connection icon in the Network Connections window represents your public network. Right-click that icon, select Rename, and change the name to “Public”.
Setup, configuration, validation, and maintenance of the cluster Creating and configuring the cluster Step 5. A new connection icon now appears in the Network Connections window. This is the single “teamed” connection that now represents (to the outside world) the multiple networks you just teamed together. You must assign this new teamed network an IP address, subnet mask, etc. Step 6. Right-click the new icon, select Rename, and change the name to “TEAM”. Step 7.
Setup, configuration, validation, and maintenance of the cluster Creating and configuring the cluster For technical documentation regarding the installation, configuration, or troubleshooting of the MultiPath software, see http://h20000.www2.hp.com/bizsupport/TechSupport/Home.jsp?locale=en_US&prodType Id=12169&prodSeriesId=315586. HP Multi-Pathing IO (MPIO) Device Specific Module software can be used as an alternative to HP StorageWorks Secure Path to provide multipath support.
Setup, configuration, validation, and maintenance of the cluster Creating and configuring the cluster NOTE Do not upgrade the logical drives from Basic to Dynamic. Microsoft Cluster Services do not support Dynamic disks. Step 6. Close Disk Management for Microsoft Windows Server 2003, 64-bit Edition. Preparing node 2+ for clustering To prepare node 2 (or more) for clustering: Step 1. Power on and boot node 2. Step 2. Click Start->Control Panel->HP Management Agents. Step 3.
Setup, configuration, validation, and maintenance of the cluster Creating and configuring the cluster NOTE If the Tasks Completed bar turns red at any time during this process, this indicates there was an error and cluster analysis was aborted. See the log file to locate the source of the problem. Debug or reconfigure as necessary and try again. Step 7. Enter the cluster IP address and click Next. The cluster IP address must be on the same subnet as the public network. Step 8.
Setup, configuration, validation, and maintenance of the cluster Creating and configuring the cluster NOTE If the Tasks Completed bar turns red at any time during this process, this indicates there was an error and cluster analysis was aborted. See the log file to locate the source of the problem. Debug or reconfigure as necessary and try again. Step 8. Enter the Password for the cluster service account and click Next. Step 9. A detailed summary of the proposed cluster displays.
Setup, configuration, validation, and maintenance of the cluster Validating cluster operation Validating cluster operation To validate your cluster installation, use one or both of the following methods from any node in the cluster: Method 1 Step 1. Select Start->Programs->Administrative Tools->Cluster Administrator and connect to the cluster. Step 2. If your cluster has only 2 nodes, right-click one of the cluster groups and select Move Group.
Setup, configuration, validation, and maintenance of the cluster Validating cluster operation Also see the “Troubleshooting cluster node installations” section at http://www.microsoft.com/technet/prodtechnol/windowsserver2003/library/ServerHelp/7 9c8164e-ee17-4e6d-a46f-f3db9869d9ea.mspx.
Setup, configuration, validation, and maintenance of the cluster Upgrading individual nodes in the future Upgrading individual nodes in the future At some point after your initial installation and configuration you will want to upgrade the software and drivers installed on each node in your cluster, as well as add the latest system updates and security fixes. This is an inevitable system administration chore that must be done regularly if you want to keep your Integrity servers up-to-date and secure.