
Windows Integrity Cluster Installation and Configuration Guide


Setup, configuration, validation, and maintenance of the cluster
Creating and configuring the cluster
Chapter 2
29
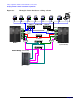
Step 5. A new connection icon now appears in the Network Connections window. This is the
single “teamed” connection that now represents (to the outside world) the multiple
networks you just teamed together. You must assign this new teamed network an IP
address, subnet mask, etc.
Step 6. Right-click the new icon, select
Rename, and change the name to “TEAM”.
Step 7. Right-click the
TEAM icon and select Properties.
Step 8. Click the
General tab, click the Internet Protocol (TCP/IP) item to highlight it, and then
click
Properties.
Step 9. Click the
General tab, and assign the IP Address and Subnet Mask values determined by
your network administrator.
Step 10. Click
OK several times to implement the changes and exit the connection properties
window.
NOTE Microsoft does not recommend the use of NIC Teaming for the private network.
Preparing node 1 for clustering
To prepare node 1 for clustering:
Step 1. Power on and boot node 1.
Step 2. Click
Start->Settings->Control Panel->HP Management Agents.
Step 3. Click the
Services tab, select Cluster Information on the right side, and then click Add to
move it to the left side. This action starts the Cluster Agent service on the node, which
forwards cluster status information and makes it accessible from the System
Management Homepage. Click
OK.
Step 4. Right-click the
My Computer desktop icon, and select Properties.
Step 5. Click the
Computer Name tab, and click Change. Select the Domain Name radio button, and
enter the domain name determined by your network administrator. Reboot when
prompted and log into the new domain.
Configuring the shared storage
To review the Microsoft recommendations and best practices for securing the shared
data in your cluster, see
http://www.microsoft.com/technet/prodtechnol/windowsserver2003/library/ServerHelp/b
7f1f826-5fe9-4c96-bb24-7b2d053db992.mspx.
To configure the shared storage:
Step 1. Power on node 1 and log into the domain.
Step 2. Install and configure your HP StorageWorks MultiPath for Windows software.
For an overview and general discussion of the MultiPath software, see
http://h18006.www1.hp.com/products/sanworks/secure-path/spwin.html.