nPartition Guide HP Integrity Servers with Microsoft® Windows® Server 2003 Manufacturing Part Number: 5991-3684 September 2006 © Copyright 2006 Hewlett-Packard Development Company, L.P. All rights reserved.
Legal Notices © 2006 Hewlett-Packard Development Company, L.P. Microsoft and Windows are trademarks of Microsoft Corporation in the U.S. and other countries. Hewlett-Packard Company shall not be liable for technical or editorial errors or omissions contained herein. The information in this document is provided “as is” without warranty of any kind and is subject to change without notice. The warranties for HP products are set forth in the express limited warranty statements accompanying such products.
Contents 1. Introduction Quick Start . . . . . . . . . . . . . . . . . . . . . . . . . . . . . . . . . . . . . . . . . . . . . . . . . . . . . . . . . . . . . . . . . . . . . . . . . . 9 Getting to know nPartitions . . . . . . . . . . . . . . . . . . . . . . . . . . . . . . . . . . . . . . . . . . . . . . . . . . . . . . . . . . . 10 Partitioning continuum . . . . . . . . . . . . . . . . . . . . . . . . . . . . . . . . . . . . . . . . . . . . . . . . . . . . . . . . . . . . .
Contents Modifying nPartitions. . . . . . . . . . . . . . . . . . . . . . . . . . . . . . . . . . . . . . . . . . . . . . . . . . . . . . . . . . . . . . . Booting and resetting nPartitions . . . . . . . . . . . . . . . . . . . . . . . . . . . . . . . . . . . . . . . . . . . . . . . . . . . . . Using the Management Processor Command menu . . . . . . . . . . . . . . . . . . . . . . . . . . . . . . . . . . . . . Using the EFI Shell. . . . . . . . . . . . . . . . . . . . . . . . . . . . . . . . . . . . . . . .
Contents Add cells to an nPartition. . . . . . . . . . . . . . . . . . . . . . . . . . . . . . . . . . . . . . . . . . . . . . . . . . . . . . . . . . . . 86 Set core cell choices. . . . . . . . . . . . . . . . . . . . . . . . . . . . . . . . . . . . . . . . . . . . . . . . . . . . . . . . . . . . . . . . . 89 Rename an nPartition . . . . . . . . . . . . . . . . . . . . . . . . . . . . . . . . . . . . . . . . . . . . . . . . . . . . . . . . . . . . . . 90 Cell-level tasks . . . . . . . . . . . . . . . . . .
Contents Parcreate, parmodify, and parremove: failure to update stable complex configuration data (SCCD) . . 148 Parremove: shutdown and reset instructions . . . . . . . . . . . . . . . . . . . . . . . . . . . . . . . . . . . . . . . . . . . 149 Parstatus -c -V: apparent incorrect output . . . . . . . . . . . . . . . . . . . . . . . . . . . . . . . . . . . . . . . . . . . . . 149 Parstatus -p -V: apparent incorrect output . . . . . . . . . . . . . . . . . . . . . . . . . . . . . . . . . . . . . . . . . . .
1 Introduction A cell-based HP Integrity server (such as the rx7620 or rx7640, the rx8620 or rx8640, or Superdome) can be configured either as a single system or partitioned into several independent systems.
Introduction executes its own operating system image. This chapter introduces node partitions (nPartitions) on cell-based HP Integrity servers running Microsoft® Windows® Server 2003 and the tools to manage them.
Introduction Quick Start Quick Start This section provides an overview of the installation and configuration steps needed to get you up and running as quickly as possible.
Introduction Getting to know nPartitions Getting to know nPartitions Partitions are physical or logical mechanisms for demarcating operational environments within a single system or across multiple systems. Partitioning lets you consolidate systems, allocate computing resources in response to fluctuations in demand, maximize resource utilization, and protect operating environments from disruptive events. Partitioning continuum HP offers a continuum of partitioning technologies, as shown in Figure 1-2.
Introduction Getting to know nPartitions Cell structure of nPartitions HP Integrity mid-range and high-end servers (rx7620/rx7640, rx8620/rx8640, and Superdome) are composed of basic building blocks known as cells or cell boards. A cell consists of up to four processor modules, contains memory modules (up to 32 DIMMs for Superdome cells, up to 16 DIMMs for rx7260 and rx8620 cells), and may connect to an I/O chassis that has I/O cards. A server cabinet may have several I/O chassis.
Introduction Getting to know nPartitions Base Cells All cells within an nPartition are base cells. If you do not specify the cell type, the nPartition administration tools automatically set the cell type to base cell. Active and Inactive Cells Active cells are assigned cells that boot to form an nPartition whose resources (processors, memory, and any attached I/O) can be actively used by software running in that nPartition.
Introduction Getting to know nPartitions rendezvous, and the system boot interface (EFI) has loaded and been displayed through the nPartition console. An operating system may be loaded and run from the system boot interface on an active nPartition. An inactive nPartition is considered to be in the shutdown for reconfig state because all cells assigned to the nPartition either remain at a boot-is-blocked state or are powered off.
Introduction Getting to know nPartitions 2. The management processor releases BIB for all cells assigned to the nPartition that have a “y” use-on-next-boot value and complete the cell boot phase in time. The management processor does not release BIB for any cell with a “n” use-on-next-boot value, or for any cell that did not complete the cell boot phase within ten minutes of the first cell to do so. Once BIB is release for a cell, the cell is considered to be active. 3.
Introduction Choosing a management tool Choosing a management tool You can manage nPartitions using the following tools: Partition Manager Partition Manager provides a graphical interface for managing nPartitions. You can run Partition Manager on the complex itself, or on management stations used to remotely manage the complex. nPartition commands You can manage nPartitions using commands such as parcreate, parmodify, parremove, parstatus, parunlock, fruled, frupower, and cplxmodify.
Introduction Management interface options Management interface options You can manage nPartitions remotely using one of two management interfaces: Intelligent Platform Management Interface (IPMI) and Web-Based Enterprise Management infrastructure (WBEM). This section provides a brief overview of these interfaces. Intelligent Platform Management Interface (IPMI) On cell-based HP Integrity servers, the management processor supports the Intelligent Platform Management Interface (IPMI).
Introduction Management interface options To secure communication between the client and the server, the IPMI specification uses the MD5 algorithm (RFC1321) to encrypt the IPMI password and to authenticate both the server and the client. Other security mechanisms protect against replay attacks. When the management tool sends a request, the nPartition Provider first downloads a large data structure containing static configuration information about the server from the MP.
Introduction Management interface options • If running Partition Manager on another system (not an nPartition): Partition Manager automatically displays the Switch Complexes dialog. Enter the hostname or IP address of the MP in the target complex, and type that MP’s IPMI password.
Introduction Management interface options • WBEM SSL Certificate (cert.pem file) The WBEM SSL Certificate file resides on the system that is being managed and contains the local WBEM server’s certificate. On a Windows system, the WBEM SSL Certificate file is in the location specified by the sslCertificateFilePath entry in the %PEGASUS_HOME%\cimserver_current.conf file, and is usually %SystemDrive%\hp\sslshare\cert.pem. • WBEM Trusted Certificate Store (known_hosts.
Introduction Management interface options • If running Partition Manager on another system (not an nPartition): Partition Manager automatically displays the Switch Complexes dialog. Running nPartition commands using WBEM To manage nPartitions remotely using WBEM, you must include two command-line options with each nPartition command: • -u username:[password] The -u option specifies a valid username on the remote nPartition.
Introduction Choosing a management mode Choosing a management mode As stated previously, the most common method for managing nPartitions involves a remote management station. This dedicated management station hosts the management tools and issues commands over a network connection to the server’s management processor, allowing the complex to be managed even if no nPartitions exist on the complex yet. This is called the “remote management” mode.
Introduction Choosing a management mode Remote management via IPMI Some of the advantages of remote management via IPMI are: • Simple installation: install all components onto a remote management station and you are ready to manage all complexes in the data center. • Allows a complex to be managed even if no nPars are currently configured in the complex. • Allows all complexes in the data center to be managed from a single management station.
Introduction Choosing a management mode • Authentication implemented solely by the OS login to the nPartition (the account used to login to Windows on the nPartition where the tools are run). • In the case of Partition Manager (a web application), you are asked for login credentials when first accessing an SMH or Partition Manager web page (either locally or from a remote browser).
Introduction Choosing a management mode • Next, you must specify a remote nPartition’s hostname/IP address and an OS account and password that are used to login to that remote nPartition. Authorization issues associated with the remote via WBEM management mode include: • Authorization is based on the OS authorization “group” that the account used for the remote login belongs to.
Introduction Setting up the management station Setting up the management station A management station is often used to configure and administer nPartitions on an HP Integrity server. NOTE The nPar tools can also be installed on, and run from, an nPartition on the server being managed. If your management station was provided by HP (for example, the PC-SMS management system supplied with Superdome servers), then all of the nPartition tools and support components have already been installed on that system.
Introduction Setting up the management station Remote Desktop If you are running Windows Server 2000 with Terminal Services, Windows Server 2003, or Windows XP on the management station and Windows Server 2003 or Windows XP on the remote terminal, you can take advantage of the remote desktop display feature provided by these operating systems. The Remote Desktop Connection feature is not enabled by default in Windows XP or Windows Server 2003.
Introduction Performing nPartition management tasks Performing nPartition management tasks This section provides an overview of common nPartition management tasks. Listing the status of an nPartition or complex To list server complex hardware details and nPartition configuration details: Using the Partition Manager Nearly every aspect of the complex — the status of its nPartitions, cells, and other hardware — can be viewed on a single page from within Partition Manager. To access this information: Step 1.
Introduction Performing nPartition management tasks frupower -d -C or frupower -d -I List power status for all cells (-C) or all I/O chassis (-I). Using the Management Processor Command menu You can list hardware and nPartition status with the following commands, which are available from the management processor Command menu. CP List nPartition configurations, including all assigned cells. PS List cabinet, power, cell, processor, memory, I/O, and other details.
Introduction Performing nPartition management tasks Creating a Genesis Partition for a server complex To create a Genesis Partition, use the management processor CC command to specify that an initial, one-cell nPartition be created within the server complex. The complex must not have any nPartitions defined or all nPartitions must be shutdown for reconfig (inactive).
Introduction Performing nPartition management tasks Remove (delete) an nPartition: Shutdown all open applications on the target nPartition. Shutdown Windows on the target nPartition. Then, in the Partition Manager Hardware tab, select the desired nPartition and use a menu path of nPartition > Delete nPartition. Or, use the parremove -p# command to remove a specified nPartition (-p#, where # is the partition number).
Introduction Performing nPartition management tasks Using the Management Processor Command menu The management processor provides the following commands, available from the Command menu, to support boot and reset operations: RS Reset an nPartition. Reset an nPartition only after all self tests and partition rendezvous have completed. RR Perform a shutdown for reconfig of an nPartition. Reset an nPartition only after all self tests and partition rendezvous have completed.
Introduction Performing nPartition management tasks shutdown /r Shuts down Windows and performs a reboot for reconfig of the nPartition. All cells are reset and nPartition reconfiguration occurs as needed. The nPartition then proceeds with the nPartition boot phase. shutdown /s Shuts down Windows and performs a shutdown for reconfig of the nPartition. The default behavior differs on HP Integrity Superdome servers and HP Integrity mid-range servers.
2 Installing nPartition Management Utilities HP provides two utilities — nPartition Commands and Partition Manager — that enable you to manage nPartitions on cell-based servers such as HP Integrity rx7620, rx7640, rx8620, rx8640, or Superdome.
Installing nPartition Management Utilities Manager on the server you want to manage or on a remote management station. The remote management station may be another HP Integrity server, a PC running a supported OS, or the HP SMS accompanying the Superdome. This chapter provides installation instructions for nPartition Commands and Partition Manager designed for the Microsoft Windows operating systems. Read the instructions carefully before you install the software.
Installing nPartition Management Utilities nPartition Commands nPartition Commands The nPartition commands provide a simple command-line interface that enables you to manage nPartitions on a cell-based HP Integrity server. You can run the nPartition commands either locally (from an nPartition on the server) or remotely (from a management station networked with the server).
Installing nPartition Management Utilities Partition Manager • If you are installing onto a 32-bit client machine that will be used to remotely administer the target server, click on HP nPartition Commands Bundle for Windows XP or Windows Server 2000/2003. • If you are installing onto the target server itself, click on HP nPartition Commands Bundle for Windows Server 2003 on Itanium-based systems. Step 5. At the top of the next page, click on the Download button. Step 6.
Installing nPartition Management Utilities Partition Manager Step 11. Through the next several screens, configure your SMH administrator and security settings as prompted, and the SMH installation begins. Step 12. When the SMH installation finishes, click Next in the HP Servlet Container for SMH wizard screen. Then click Next two more times to begin the installation. Step 13. Click Finish to complete the servlet container installation. Step 14. The HP Partition Manager installation starts next.
Installing nPartition Management Utilities Verifying the installation Verifying the installation To verify correct server configuration and software installation, perform the following simple tests: Verifying nPartition Commands Step 1.
Installing nPartition Management Utilities Verifying the installation Step 2. To continue the verification at the SMH, under the Tools tab, click View and Manage Complex. If Partition Manager is running, you will go directly to the top-level view of the local complex (no additional login is required).
Installing nPartition Management Utilities Miscellaneous installation issues Miscellaneous installation issues The installation-related issues described in this section may or may not apply to you, depending on your connection method and mode. Configuring for secure WBEM communications To configure for secure WBEM communications: Part 1 — On the Server: Step 1. Locate the WBEM SSL Certificate file (cert.pem) on the remote nPartition that you want to connect to. Step 2.
Installing nPartition Management Utilities Miscellaneous installation issues Upgrading service packs later (after installation) Until the required patches and hotfixes are incorporated into Windows service packs, it is possible that upgrading the service pack level of the OS after installing nPartition components could affect operation.
Installing nPartition Management Utilities Miscellaneous installation issues 42 Chapter 2
3 Using Partition Manager Partition Manager (parmgr) is a Web-based application for system administrators that gives you a convenient graphical user interface (GUI) for creating, configuring, and managing the nPartitions on your HP Integrity server. Partition Manager generates a graphical representation of all your system's hardware components, nPartitions, and available resources.
Using Partition Manager Partition Manager helps you perform complex configuration tasks without having to remember commands and parameters. You select the nPartitions, cells, I/O chassis, or other components from the graphical display, then select an action from a menu. The actions available to you are always appropriate to the current view and the selected objects. Partition Manager also displays the command(s) it uses to perform your management tasks.
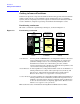
Using Partition Manager After logging in, Partition Manager displays a high-level view of the cells and I/O chassis in the complex, and how they are currently configured into nPartitions (see Figure 3-1). Figure 3-1 Partition Manager (Hardware tab) As shown above, a graphical representation of the entire complex displays on the left side of the Hardware tab. Additional tabs include nPartitions, Power and Cooling, Cells, I/O, and General.
Using Partition Manager Once a device is selected you can do something to it. For example, now that “rex01” is selected, you can expand the nPartition action item and see that the Delete nPartition and Modify nPartition submenu items are now available (see Figure 3-2). The other items remain greyed-out because they are inactive. They are either inappropriate at this time, or inappropriate for the device you have selected.
Using Partition Manager The General tab is the default here. Use it to name or rename the selected nPartition. Clicking on the Add/Remove Cells tab lets you add cells to the selected nPartition or remove cells from it (see Figure 3-4). Figure 3-4 Actions menu (nPartition > Modify nPartition, General tab) Once again, your choices here are context-sensitive.
Using Partition Manager In this view you can even click on the cell itself to find out more information about it (see Figure 3-5).
Using Partition Manager Finally, you can determine the current status of any device or component in the system simply by looking at its status icon. The meaning of these status icons is defined in the hardware status legend which is usually located on the right side of the view (see Figure 3-6).
Using Partition Manager 50 Chapter 3
4 Using Other Tools for Managing nPartitions This chapter describes some of the other tools and methods for managing nPartitions on HP Integrity servers. In nearly every case you can use Partition Manager to perform these tasks, and HP recommends that you do so whenever possible.
Using Other Tools for Managing nPartitions HP also recommends that you put the target nPartition into a Shutdown for Reconfig state before changing any of its cell assignments, such as adding cells to the nPartition or deleting cells from it. In addition, the ACPI flag must be enabled for modified and newly-created nPartitions after (not before) performing management tasks on them, by running the EFI’s acpiconfig windows command, followed by a reset.
Using Other Tools for Managing nPartitions Complex-level tasks Complex-level tasks The following section describes tasks you can perform for the entire complex. Rename a server complex You can assign a name for each server complex in order to better identify the complex as you work with it. The server complex name serves as a helpful identifier; changing the name does not affect the way in which commands and utilities interact with the complex.
Using Other Tools for Managing nPartitions Complex-level tasks Unlock a Complex Profile entry using the following procedure: Complex profile unlocking [par commands] This procedure unlocks a Complex Profile entry by using the parunlock nPartition configuration command. Step 1. Login to Windows on the Management Station PC. Step 2. Issue the parunlock command with the command-line option appropriate for the Complex Profile entry or entries you want to unlock.
Using Other Tools for Managing nPartitions Complex-level tasks Aborting cell assignment changes You can cancel a pending change to an active cell by using this procedure. Only changes involving the unassignment (deletion) of an active cell from an nPartition can practically be canceled. Step 1. After issuing a request to unassign an active cell from its nPartition, do not perform a shutdown or reset of the nPartition.
Using Other Tools for Managing nPartitions nPartition-level tasks nPartition-level tasks The following section describes tasks you can perform on individual nPartitions within the complex. Boot configuration options for nPartition systems This section briefly discusses the system boot options you can configure on nPartition-capable servers. You can configure boot options that are specific to each nPartition in the server complex.
Using Other Tools for Managing nPartitions nPartition-level tasks To change the nPartition behavior when an OS is shutdown and halted use either the acpiconfig enable softpowerdown EFI Shell command or the acpiconfig disable softpowerdown command and then reset the nPartition to make the ACPI configuration change take effect.
Using Other Tools for Managing nPartitions nPartition-level tasks For details see the help map command. Also see the help search command for details on using the search command to load drivers for bootable devices. Step 3. Exit the console and management processor interfaces if finished using them. To exit the EFI environment type ^B (Control-B); this exits the nPartition console and returns to the management processor Main Menu. To exit the management processor, type X at the Main Menu.
Using Other Tools for Managing nPartitions nPartition-level tasks NOTE You must include the correct remote administration options when issuing par commands (-h and -g for IPMI over LAN connections; -h and -u for WBEM/WMI connections). For a complete explanation of these options, refer to the command description in “nPartition Commands Reference” on page 109.
Using Other Tools for Managing nPartitions nPartition-level tasks Configure boot paths and options CAUTION On HP Integrity servers, when configuring Windows boot options you must do so from EFI by using the MSUtil\nvrboot.efi utility to import boot options from the EFI\Microsoft\WINNT50\Boot00... file on the device from which Windows is to be loaded.
Using Other Tools for Managing nPartitions nPartition-level tasks Cold Reset Exit Step 4. Exit the console and management processor interfaces if finished using them. To exit the EFI environment type ^B (Control-B); this exits the nPartition console and returns to the management processor Main Menu. To exit the management processor, type X at the Main Menu.
Using Other Tools for Managing nPartitions nPartition-level tasks Configure autoboot options Configure autoboot options using any of the following procedures: Configuring autoboot options [EFI boot manager] From the EFI Boot Manager environment use the Boot option maintenance menu > Set Auto Boot TimeOut menu operation to configure an nPartitions autoboot setting. Step 1. Access the EFI Boot Manager menu for the nPartition whose autoboot options you want to configure.
Using Other Tools for Managing nPartitions nPartition-level tasks Step 1. Access the EFI Shell environment for the nPartition whose autoboot options you want to configure. Login to the management processor and enter CO to access the Console list. Select the nPartition console. When accessing the console, confirm that you are at the EFI Boot Manager menu (the main EFI menu). If at another EFI menu, select the Exit option from the sub-menus until you return to the screen with the EFI Boot Manager heading.
Using Other Tools for Managing nPartitions nPartition-level tasks Configure boot-time system tests Configure boot-time system tests (self tests) for an nPartition by using the following procedure: Configuring boot-time system tests [EFI shell] From the EFI Shell environment use the boottest command to manage the self test configuration for the local nPartition. Step 1. Access the EFI Shell environment for the nPartition whose boot-time tests you want to configure.
Using Other Tools for Managing nPartitions nPartition-level tasks • boottest testname on — Enable the specified test (testname). For example: boottest io_hw on enables I/O hardware selftests. • boottest testname off — Disable the specified test (testname). For example: boottest io_hw off disables I/O hardware selftests. Step 3. Exit the console and management processor interfaces if finished using them.
Using Other Tools for Managing nPartitions nPartition-level tasks Each item in the boot options list references a specific boot device and provides a specific set of boot options or arguments to be used when booting the device. Step 3. Press Return or Enter to initiate booting using the selected boot option. Step 4. Once Windows begins loading, wait for the Special Administration Console (SAC) to become available.
Using Other Tools for Managing nPartitions nPartition-level tasks EFI Boot Maintenance Manager ver 1.10 [14.60] Boot From a File. Select a Volume IA64_EFI [Acpi(000222F0,269)/Pci(0|0)/Scsi(Pun8,Lun0)/HD(Part1,S Removable Media Boot [Acpi(000222F0,2A8)/Pci(0|1)/Scsi(Pun2,Lun0 Load File [Acpi(000222F0,200)/Pci(1|0)/Mac(001083FD5D9B)] Load File [EFI Shell [Built-in]] Exit Step 4. Exit the console and management processor interfaces if finished using them.
Using Other Tools for Managing nPartitions nPartition-level tasks Shut down Windows Server 2003 You can shut down the Windows Server 2003 operating system on HP Integrity servers using the Start menu or the shutdown command. CAUTION Do not shut down Windows using Special Administration Console (SAC) restart or shutdown commands under normal circumstances. Issuing restart or shutdown at the SAC> prompt causes the system to restart or shutdown immediately and can result in the loss of data.
Using Other Tools for Managing nPartitions nPartition-level tasks For example, access the system console and use the Windows SAC interface to start a command prompt, from which you can issue Windows commands to shut down the system. Step 2. Check to see whether any users are logged in. Use the query user or query session command. Step 3. Issue the shutdown command and the appropriate options to shut down the Windows Server 2003 on the system.
Using Other Tools for Managing nPartitions nPartition-level tasks NOTE On HP Integrity servers you should reset an nPartition only after all self tests and partition rendezvous have completed. For example, when the nPartition is inactive (all cells are at BIB) or is at EFI. Be certain to correctly select which nPartition to be reset. GSP:CM> RS This command resets the selected partition.
Using Other Tools for Managing nPartitions nPartition-level tasks To exit the EFI environment type ^B (Control-B); this exits the nPartition console and returns to the management processor Main Menu. To exit the management processor, type X at the Main Menu. Rebooting and resetting nPartitions [EFI shell] From the EFI Shell environment, issue the reset command to reset the local nPartition. Step 1. Access the EFI Shell environment for the nPartition that you want to reboot.
Using Other Tools for Managing nPartitions nPartition-level tasks This command initiates a Windows system shutdown-and-reboot after a timeout period of 60 seconds. The /c option specifies a message that is broadcast to any other users of the system. For more details use the help shutdown command.
Using Other Tools for Managing nPartitions nPartition-level tasks Reboot for reconfiguration During a reboot for reconfig of an nPartition, the command that you issue performs the following tasks: 1. Shuts down the operating system and resets all cells that are assigned to the nPartition, including any inactive cells. 2. Reconfigures the nPartition if necessary (if there is a pending change to the Stable Complex Configuration Data, it occurs during the reboot for reconfig). 3.
Using Other Tools for Managing nPartitions nPartition-level tasks Shut down to a shutdown for reconfig (inactive) state NOTE On HP Superdome servers, performing a shutdown for reconfig always keeps all cells assigned to the nPartition at a boot-is-blocked state. NOTE On HP Integrity mid-range servers you can configure the nPartition behavior when an OS shuts down to the shutdown for reconfig state.
Using Other Tools for Managing nPartitions nPartition-level tasks GSP:CM> RR This command resets for reconfiguration the selected partition. WARNING: Execution of this command irrecoverably halts all system processing and I/O activity and restarts the selected partition in a way that it can be reconfigured. # --0) 1) Name ---jules00 jules01 Select a partition number: 1 Do you want to reset for reconfiguration partition number 1? (Y/[N]) y -> The selected partition will be reset for reconfiguration.
Using Other Tools for Managing nPartitions nPartition-level tasks To exit the EFI environment type ^B (Control-B); this exits the nPartition console and returns to the management processor Main Menu. To exit the management processor, type X at the Main Menu.
Using Other Tools for Managing nPartitions nPartition-level tasks Boot an inactive nPartition When all cells in an nPartition are at boot-is-blocked, the nPartition is inactive. This is the case, for example, when an nPartition is held at the shutdown for reconfig state. You can boot an nPartition past the shutdown for reconfig state to make it active by using the BO (boot) command at the management processor Command menu.
Using Other Tools for Managing nPartitions nPartition-level tasks Perform a transfer of control (TOC) reset You can perform a transfer of control (TOC) reset by using the management processor TC command, as described in the following procedure. If crash dump is configured for the operating system on the nPartition and you TOC the nPartition while it is running the operating system, then the nPartition performs a crash dump.
Using Other Tools for Managing nPartitions nPartition-level tasks ******* Unexpected TOC. Processor HPA FFFFFFFF’FC07C000 ******* GENERAL REGISTERS: r00/03 00000000’00000000 00000000’0099CA2C 00000000’00000000 00000000’010BB790 r04/07 00000000’00000002 00000000’010BC140 00000000’0080F000 00000000’00AA2490 r08/11 00000000’00000001 00000000’0099A800 00000000’0099A800 00000000’0099C800 .... Processor 8 TOC: pcsq.pcoq = 0’0.0’12675c isr.ior = 0’10340004.0’2f8bfd30 Boot device reset done.
Using Other Tools for Managing nPartitions nPartition-level tasks You can put it in a shutdown for reconfig state by using the shutdown /s command in Windows, the reconfigreset command at the EFI Shell, or the RR command at the management processor Command menu. Step 4. Login to the management processor for the server complex. Login as a user with administrator privileges, which are required for creating a Genesis Partition. Step 5. Enter CM to access the management processor Command menu. Step 6.
Using Other Tools for Managing nPartitions nPartition-level tasks --0) ---Partition 0 Select a partition number : 0 Do you want to boot partition number 0, named Partition 0 ? (Y/[N]) y -> The selected partition will be booted. GSP:CM> Step 8. Access the console for the Genesis Partition and configure the nPartition as appropriate and necessary. From the management processor Command menu, enter MA to return to the Main menu, then enter CO to access the Console menu.
Using Other Tools for Managing nPartitions nPartition-level tasks # parstatus -AC [Cell] CPU OK/ Hardware Actual Failed/ Location Usage Max ========== ============ ======= cab0,cell1 absent cab0,cell3 absent cab0,cell4 power on 4/0/4 cab0,cell5 absent cab0,cell6 power on 4/0/4 cab0,cell7 absent - Memory (GB) OK/ Failed ======= 2.0/0.0 2.0/0.
Using Other Tools for Managing nPartitions nPartition-level tasks — The valid use_on_next_boot values for cells are: y Participate in reboot (the default). n Do not participate in reboot. — The only valid failure_usage value is: ri (reactivate with interleave, the default). — You can specify the clm value in either of two forms: percentage or absolute amount of memory. — Percentage cell-local memory (CLM). The percent number can be any number in the range 0–100 with a suffix of %.
Using Other Tools for Managing nPartitions nPartition-level tasks # parstatus -V -p1 [Partition] Partition Number : 1 Partition Name : hostname05 Status : inactive IP address : Prmary Boot Path : 4/0/1/0/0.9 ALternate Boot Path : 0/0/0/0/0/0/0/0.0.0 HA Alternate Boot Path : 0/0/0/0/0/0/0/0.0.0 PDC Revision : 104.1 IODCH Version : 23664 CPU Speed : 552 MHz Core Cell : ? Core Cell Alternate : 0. cab0,cell4 1.
Using Other Tools for Managing nPartitions nPartition-level tasks NOTE You must include the correct remote administration options when issuing par commands (-h and -g for IPMI over LAN connections; -h and -u for WBEM/WMI connections). For a complete explanation of these options, refer to the command description in “nPartition Commands Reference” on page 109. To check the local partition number, use the parstatus -w command.
Using Other Tools for Managing nPartitions nPartition-level tasks 2. Issue the parremove -F -p# command to force-remove (-F) the local nPartition (-p# where # is the number of the local nPartition). Note that the local nPartition remains active following the parremove -F -p# command, until you perform a shutdown for reconfig to complete the removal.
Using Other Tools for Managing nPartitions nPartition-level tasks Reboot for reconfig guidelines for adding cells In some situations, you must immediately perform a reboot for reconfig of a modified nPartition after adding cells to it. • You must perform a reboot for reconfig of an active nPartition after you have added a cell to it. The reboot for reconfig enables the newly assigned cell to rendezvous and be actively used when the nPartition reboots.
Using Other Tools for Managing nPartitions nPartition-level tasks cell The cell to be added to the nPartition. You can specify the cell in global (cell) format or in hardware location (cabinet/slot) format. type The cell type: base is the only supported cell type and it is the default. use The cell use-on-next-boot value: y or n. Use y (the default) if the cell is to be an active member of the nPartition, or use n if the cell is to remain an inactive member.
Using Other Tools for Managing nPartitions nPartition-level tasks Set core cell choices The core cell choice settings for an nPartition are optional preferences that establish which cells in the nPartition are preferred to be selected as the core cell for the nPartition. NOTE You do not need to specify core cell choices for a valid core cell to be chosen.
Using Other Tools for Managing nPartitions nPartition-level tasks Hardware Location =================== cab0,bay0,chassis1 cab0,bay1,chassis3 Usage ============ active active Core IO ==== yes yes Connected To ========== cab0,cell0 cab0,cell2 Par Num === 0 0 # Step 3. Modify the nPartition core cell choices using the parmodify -p# -r#... command. You can modify the core cell choices for the local nPartition or any remote nPartition in the server complex.
Using Other Tools for Managing nPartitions nPartition-level tasks NOTE You must include the correct remote administration options when issuing par commands (-h and -g for IPMI over LAN connections; -h and -u for WBEM/WMI connections). For a complete explanation of these options, refer to the command description in “nPartition Commands Reference” on page 109. Specify both the nPartition number (-p#, where # is the nPartition number) and the new name for the nPartition (-P name).
Using Other Tools for Managing nPartitions Cell-level tasks Cell-level tasks The following section describes tasks you can perform on individual cells within an nPartition. List processor configurations Processor (CPU) configuration details include the CPU population, CPU type, and the clock speed.
Using Other Tools for Managing nPartitions Cell-level tasks NOTE You must include the correct remote administration options when issuing par commands (-h and -g for IPMI over LAN connections; -h and -u for WBEM/WMI connections). For a complete explanation of these options, refer to the command description in “nPartition Commands Reference” on page 109.
Using Other Tools for Managing nPartitions Cell-level tasks NOTE You must include the correct remote administration options when issuing par commands (-h and -g for IPMI over LAN connections; -h and -u for WBEM/WMI connections). For a complete explanation of these options, refer to the command description in “nPartition Commands Reference” on page 109. If using remote administration features to modify an nPartition, you can login to any Windows system.
Using Other Tools for Managing nPartitions Cell-level tasks • Guidelines for removing an inactive cell When removing an inactive cell from an nPartition you do not need to specify the -B option to parmodify and do not need to perform a reboot for reconfig of the nPartition to which the cell is assigned. When you use parmodify to remove an inactive cell, the cell is immediately unassigned from its nPartition.
Using Other Tools for Managing nPartitions Cell-level tasks Step 1. Login to Windows on the Management Station PC. Step 2.
Using Other Tools for Managing nPartitions Cell-level tasks This number is rounded to 12.5%, 25%, 37.5%, 50%, 62.5%, 75%, 87.5% or 100%. If the cell contains less than 4 GBytes of memory, then the percentage is rounded to 25%, 50%, 75% or 100%. Percentages are rounded up or down to the nearest value, but are not rounded up to 100%. — Absolute CLM specification. (The default.) The absolute number is interpreted as an absolute number of gigabytes of memory and can optionally have a suffix of GB.
Using Other Tools for Managing nPartitions Power-, status-, and hardware-level tasks Power-, status-, and hardware-level tasks The following section describes tasks you can perform in order to manage or view the status of I/O components or other hardware within the complex, or individual nPartitions, or individual cells.
Using Other Tools for Managing nPartitions Power-, status-, and hardware-level tasks • parstatus -B — List all cabinets in the server complex. • parstatus -V -b# — View a detailed status for the specified cabinet (-b# where # is the cabinet number). NOTE You must include the correct remote administration options when issuing par commands (-h and -g for IPMI over LAN connections; -h and -u for WBEM/WMI connections).
Using Other Tools for Managing nPartitions Power-, status-, and hardware-level tasks Step 1. Login to Windows on the Management Station PC. Step 2. Issue commands to list details about system power status. • parstatus -B — Fan and blower status summary for all cabinets. • parstatus -V -b# — Detailed fan and blower status for the specified cabinet (-b#, where # is the cabinet number).
Using Other Tools for Managing nPartitions Power-, status-, and hardware-level tasks • PCI card slot LEDs On all HP nPartition-capable systems, each PCI card slot has an attention indicator that you can use to select the card slot. You can view the attention indicator for a PCI card slot when accessing the card cage. On HP Integrity mid-range servers only, you also can view the attention indicator for each PCI slot beneath the corresponding slot, on the external chassis at the rear of the server cabinet.
Using Other Tools for Managing nPartitions Power-, status-, and hardware-level tasks Specify the I/O chassis using cabinet/bay/chassis notation (#/#/#). — Turn Off: The fruled -f -i#/#/# command turns off the attention indicator for the specified I/O chassis (-i#/#/#). To turn off all I/O chassis attention indicators use the fruled -f -I command. — Blink: The fruled -o -i#/#/# command blinks the attention indicator for the specified I/O chassis (-i#/#/#).
Using Other Tools for Managing nPartitions Power-, status-, and hardware-level tasks Any nPartition whose state is “OS heartbeat” is running an OS and thus should not have its hardware powered off until after the OS is shut down. Type ^b (Control-b) to exit the VFP. Step 3. Shut down the OS running on any cabinet hardware that you plan to power off. Step 4. Confirm that nobody else is using or servicing the cabinet hardware you plan to power on or off.
Using Other Tools for Managing nPartitions Power-, status-, and hardware-level tasks I - IO Chassis Select Device: b Enter cabinet number: 1 The power state is ON for Cabinet 1. In what state do you want the power? (ON/OFF) Power cells and I/O chassis on and off You can control power for cells and I/O chassis from remote locations, without physically accessing the system hardware.
Using Other Tools for Managing nPartitions Power-, status-, and hardware-level tasks # frupower -f -c0 Error: Can not power off active cell 0. # frupower -f -c2 # frupower -o -c2 # frupower -f -c6 Error: Cell 6 belongs to partition 1. Can not power off cell. # # frupower -f -i0/1/1 Error: I/O chassis 0/1/1 is attached to a powered-on free cell 4. Please power off the free cell. # In the above example, cell 0 is active and thus cannot be powered off using frupower.
Using Other Tools for Managing nPartitions Power-, status-, and hardware-level tasks Step 4. Reboot the nPartition to use the cells’ new configuration (the new use-on-next-boot values). If you have changed any cell use-on-next-boot settings for the nPartition then reboot the nPartition in either of two ways: • Use the Windows shutdown /r command to perform a standard reboot. If you have only changed use-on-next-boot values from y to n, then perform a reboot.
Using Other Tools for Managing nPartitions Power-, status-, and hardware-level tasks cpuconfig cell cpu on configures the processor on the cell. Enter help cpuconfig for more details on configuring and deconfiguring processors from the EFI Shell. Step 4. Reboot the nPartition using the reset command. Whenever changing processor configurations you must reboot the corresponding nPartition to allow the configuration changes to take place. Step 5.
Using Other Tools for Managing nPartitions Power-, status-, and hardware-level tasks NOTE When you deallocate a DIMM, all other DIMMs in the echelon also will not be used the next time the nPartition boots. dimmconfig cell dimm OFF deconfigures the specified DIMM (dimm) on the cell (cell) indicated. dimmconfig cell dimm ON configures the DIMM on the cell. Use dimmconfig cell to display the DIMM configuration for a cell. Enter the help dimmconfig command for more details. Step 4.
5 nPartition Commands Reference This chapter provides a reference of the syntax, options, and arguments usage for all nPartition commands. For detailed descriptions of the options and arguments available for any of the nPartition commands listed below, you can also refer to the on-line help by using a Windows menu path of Start > Programs > Hewlett-Packard > nPar Management > nPar Commands Manual.
nPartition Commands Reference parcreate parcreate The parcreate command creates a new nPartition. This command assigns the specified cells (and any attached I/O chassis) to an nPartition, assigns a number to the new nPartition, and returns the partition number of the newly created nPartition. Root permission or IPMI LAN access is required to use parcreate. Synopsis parcreate [-P PartitionName] [-I IPaddress] [-L clm_value] -c cell:[celltype]:[use_on_next_boot]:[failure_usage][:clm] [-c...
nPartition Commands Reference parcreate -c cell:[type]:[use_on_next_boot]:[failure_usage][:clm] Specifies the cell(s) to be added to the nPartition. • The only valid type value is: base Base cell. (The default.) • The valid use_on_next_boot values for cells are: y Participate in reboot. (The default.) n Do not participate in reboot. • The only valid failure_usage value is: ri Reactivate with memory interleave (the default). Specifies to integrate the cell into the nPartition as normally occurs.
nPartition Commands Reference parcreate Note: For Windows nPartitions on HP Integrity servers, boot paths cannot be viewed or set using nPartition commands. Use the EFI Boot Manager or the Windows bootcfg command to view/configure boot paths for Windows nPartitions. -s path Specifies the secondary boot path. Note: For Windows nPartitions on HP Integrity servers, boot paths cannot be viewed or set using nPartition commands.
nPartition Commands Reference parcreate Finally, you issue the parstatus command again to verify the change. Step 1. Open a command window on the management station (Start > Run > type cmd > click OK). Step 2. At the command prompt, type the following: parstatus -h 192.168.24.68 -g password -AC and press Enter. Step 3. Information about the available cells appears (cab1/cell2 and cab1/cell4).
nPartition Commands Reference parcreate Note: The -g option may require up to 2 minutes to complete. Please wait... Partition Created. The partition number is: 3 C:\>parstatus -h 192.168.24.68 -g password -P Note: The -g option may require up to 2 minutes to complete. Please wait...
nPartition Commands Reference parmodify parmodify You can use the parmodify command to modify the following attributes of an existing nPartition: • Partition name • Cell assignments (add cells or remove cells) • Attributes of existing cells: — Cell type — Use-on-next-boot value — Failure usage — Cell local memory (CLM) value • Core cell choices • Boot paths (the primary, alternate, and HA alternate paths) • IP address (if set, this value should be consistent with the IP address assigned to the nPartition w
nPartition Commands Reference parmodify -a cell:[celltype]:[use_on_next_boot]:[failure_usage][:clm] Specifies the cell(s) to be added to the nPartition. • The only valid type value is: base Base cell. (The default.) • The valid use_on_next_boot values for cells are: y Participate in reboot. (The default.) n Do not participate in reboot. • The only valid failure_usage value is: ri Reactivate with memory interleave (the default). Specifies to integrate the cell into the nPartition as normally occurs.
nPartition Commands Reference parmodify Specifies the core cell choices. One to four core cell choices can be specified. -d cell Remove the specified cell from the nPartition. -b path Specifies the primary boot path. Note: For Windows nPartitions on HP Integrity servers, boot paths cannot be viewed or set using nPartition commands. Use the EFI Boot Manager or the Windows bootcfg command to view/configure boot paths for Windows nPartitions. -t path Specifies the alternate boot path.
nPartition Commands Reference parmodify When you modify an active nPartition and specify the -B option, you must perform a reboot for reconfig of the modified nPartition. You must perform this reboot for reconfig before any other cell assignments can take place in the server complex. -u username:[passwd] Specifies the account and authorization to access an nPartition other than the local nPartition. The -h option is required if this option is used.
nPartition Commands Reference parmodify parmodify -h 192.168.24.68 -g password -p 3 -P Goldilocks and pressing Enter. Step 4. After a brief period the command prompt reappears, indicating the change was successful. Verify the change by typing the following: parstatus -h 192.168.24.68 -g password -P and pressing Enter. The entire sequence is shown here: C:\>parstatus -h 192.168.24.68 -g password -P Note: The -g option may require up to 2 minutes to complete. Please wait...
nPartition Commands Reference parmodify 4 Inactive 1 1 ? 5 Active 2 1 cab0,cell2 Partition 5 120 Partition 4 Chapter 5
nPartition Commands Reference parremove parremove The parremove command removes an existing nPartition. This removes all cells from the nPartition and destroys the nPartition definition. Root permission or IPMI LAN access is required to run this command. • To remove the local nPartition, you must specify the -F option. The local nPartition is either the one where the command is issued, or if the -u... -h... options are specified it is the nPartition whose host is specified by -h.
nPartition Commands Reference parremove -h IPaddress|hostname This option is only used in combination with either the -u or -g option. IPaddress|hostname specifies the IP address or hostname of the target nPartition (-u) or management processor (-g). -k s_lock Specifies the lock keys for the Stable Complex Configuration Data and Partition Configuration Data provided by other system management tools that invoke this command programmatically. Command line users should avoid this option.
nPartition Commands Reference parremove Par # of # of I/O Num Status Cells Chassis Core cell Partition Name (first 30 chars) === ============ ===== ======== ========== =============================== 0 Inactive 8 5 ? Partition 0 1 Inactive 1 1 ? Partition 1 2 Active 2 2 cab1,cell0 Partition 2 3 Active 2 2 cab1,cell2 Goldilocks 4 Inactive 1 1 ? 5 Active 2 1 cab0,cell2 Partition 5 Partition 4 C:\>parremove -h 192.168.24.
nPartition Commands Reference parstatus parstatus The parstatus command displays information about the nPartitions or hardware within a server complex. If you specify no arguments, parstatus lists information about several of the major components of the server complex. You can specify an individual entity (cell, I/O chassis, cabinet, or nPartition) to restrict the output to information about that component. All users can issue this command.
nPartition Commands Reference parstatus -C Show information for all the cells in the complex. -I Show information for all I/O chassis in the complex. -B Show information for all cabinets in the complex. -P Show information for all nPartitions in the complex. -c cell Show information about the specified cell. -i IOchassis Show information about the specified I/O chassis. -b cabinet Show information about the specified cabinet. -p partition Show information about the specified nPartition.
nPartition Commands Reference parstatus Step 2. At the command prompt, type the following: parstatus -h 192.168.24.68 -g password -P and press Enter. Step 3. After a brief delay, the information displays. For example: C:\>parstatus -h 192.168.24.68 -g password -P Note: The -g option may require up to 2 minutes to complete. Please wait...
nPartition Commands Reference parunlock parunlock The parunlock command unlocks the Stable Complex Configuration Data or Partition Configuration Data. It can also unlock Dynamic Complex Configuration Data and cell data and can cancel pending changes to the Stable Complex Configuration Data. Use this command with caution. Root permission is required to run this command. Synopsis parunlock [-p PartitionNumber] [-s] [-d] [-p][-c cell] parunlock -A [-P] parunlock [-c cell] [-P] • The -h... -g...
nPartition Commands Reference parunlock -g [passwd] Allows access to the complex specified by the -h option. The accessed complex is then considered the target complex. Access is through the management processor LAN port. The -h option is required if this option is used. passwd specifies the IPMI password of the management processor. If this field is omitted, the command prompts for the password. -h IPaddress|hostname This option is only used in combination with either the -u or -g option.
nPartition Commands Reference fruled fruled The fruled command blinks hardware attention indicators (LEDs) or turns them off. This command can control the cell attention LEDs in all HP nPartition servers, as well as the I/O chassis LEDs on Superdome servers. The fruled command also can start and stop blinking the cabinet number LCDs on HP Superdome compute cabinets and I/O expansion cabinets. Synopsis fruled [-f|-o] [-B] -c cell [-c...] fruled [-f|-o] [-B] -i IOchassis [-i...
nPartition Commands Reference fruled -l cabinet Limit the scope of the -C or -I option to a given cabinet. -u username:[passwd] Specifies the account and authorization to access an nPartition other than the local nPartition. The -h option is required if this option is used. • username specifies a configured user name on the target nPartition. • passwd specifies the password associated with the username. If this field is empty, the command prompts for the password.
nPartition Commands Reference fruled Step 4. Type the following to make the indicator light blink on the target cell (indicated by “1/2”, for “cab1/cell2”), and to make the number blink on the front of the cell cabinet: fruled -h 192.168.24.68 -g password -o -B -c 1/2 The sequence of commands and results is shown here: C:\>parstatus -h 192.168.24.68 -g password -P Note: The -g option may require up to 2 minutes to complete. Please wait...
nPartition Commands Reference frupower frupower The frupower command turns on, turns off, or displays the current status of power for cells and I/O chassis in nPartition servers. Root permission is required to run this command. • By default, the frupower command permits you to power on or off inactive cells and I/O chassis that either are assigned to the target nPartition or are not assigned to any nPartition.
nPartition Commands Reference frupower -f Power off the specified cells or I/O chassis. -c cell The specified cell is powered on/off or the power status is displayed. A cell can be specified either in the local (cabinet/slot) or global (cell_ID) format. -i IOchassis The specified IOchassis is powered on/off or the power status is displayed. -C Display power status of all cells. By default the scope is the entire complex if the -l option is not specified. -I Display power status of all I/O chassis.
nPartition Commands Reference frupower Step 2. At the command prompt, type the following: frupower -h 192.168.24.68 -g password -C and press Enter. The sequence of commands and results is shown here: C:\>frupower -h 192.168.24.68 -g password -C Note: The -g option may require up to 2 minutes to complete. Please wait... Global cell 0; cabinet 0, cell 0 is powered off. Global cell 1; cabinet 0, cell 1 is powered on. Global cell 2; cabinet 0, cell 2 is powered on.
nPartition Commands Reference cplxmodify cplxmodify The cplxmodify command modifies attributes of an nPartition-capable server complex, such as the complex name. Root permission is required to run this command. Synopsis cplxmodify -N ComplexName [ -u username:[passwd] -h IPaddress|hostname | -g [passwd] -h IPaddress|hostname ] • The -h... -g...
nPartition Commands Reference cplxmodify 136 Chapter 5
6 Troubleshooting Additional information about failures or error messages is usually obtained by examining the Application Event Log, or AEL. Locate the AEL by right-clicking on the My Computer icon on nPartition Window Server 2003 desktop and selecting Manage from the pop-up menu.
Troubleshooting Tools and Event Viewer items, then select Application by clicking on it. A list of system-wide Error, Warning, and Informational messages displays in the right pane of the window. To view detailed information about a specific message, double-click on it.
Troubleshooting Installation problems Installation problems Services (WMI Mapper + nPartition Provider) fail to start during installation Possible causes for this error are: • You must be logged in with privileges (an account in the local Administrators group) to install/uninstall these components on the local system • The Services Control Panel (Start > Control Panel > Administrative Tools > Services) was open during installation; it cannot be open during installation or the services will fail nPartitio
Troubleshooting Checking component installation and operation Checking component installation and operation Verify WMI Mapper installation To verify that the WMI Mapper files are installed correctly, and are accessible via the current system PATH, open a Command Prompt window and run the following command: wmiop ei Win32_ComputerSystem This command requests that WMI enumerate the instances of all known objects of type Win32_ComputerSystem.
Troubleshooting Checking component installation and operation NumberOfProcessors = 1 OEMStringArray[?] = "SMBIOS 2.
Troubleshooting Checking component installation and operation set CIM_NOSSL=1 wmiop ei Win32_ComputerSystem The output should be the same as in the previous test. If an error occurs, ensure that the WMI Mapper service is started. If not, start it and repeat the test. If it is running, you should uninstall and then reinstall the WMI Mapper component. If you see the following error: Cannot connect to localhost: 5988. Connection failed.
Troubleshooting Checking component installation and operation The output should be the same as in the previous test. If an error occurs, you should uninstall and then reinstall the WMI Mapper component. If an SSL certificate problem is suspected, try deleting the entire %PEGASUS_HOME% and %HP_SSL_SHARE% directories after uninstalling and before reinstalling. This deletes all of the installed certificates, causing the certificates to be re-generated during installation.
Troubleshooting Checking component installation and operation __NamespaceDeletionEvent __NamespaceModificationEvent __ClassOperationEvent __ClassCreationEvent __ClassDeletionEvent __ClassModificationEvent __InstanceOperationEvent __InstanceCreationEvent __InstanceDeletionEvent __InstanceModificationEvent __TimerEvent __AggregateEvent __EventConsumer __EventFilter __FilterToConsumerBinding __EventGenerator __TimerInstruction __AbsoluteTimerInstruction __IntervalTimerInstruction __TimerNextFiring __NotifyStat
Troubleshooting Checking component installation and operation HP_NParCell HP_NParIOChassis HP_NParProfile HP_NParComplex HP_NParPartition HP_NParDynamicProfile HP_NParCellConnectedToIOChassis HP_NParComponentInSlot HP_NParIOChassisInSlot HP_NParCellInSlot HP_NParSlotInCabinet HP_NParCellSlotInCabinet HP_NParIOChassisSlotInCabinet HP_NParCellSlotInPartition HP_NParDomainInCabinet HP_NParLocalPartition HP_NParRemoteComplex If an obvious error occurs, or if the output looks significantly different from what is
Troubleshooting Checking component installation and operation Otherwise, if you see the following error: Error: [6] CIM_ERR_NOT_FOUND: The requested object could not be found. This indicates that the nPartition Provider is either not running, or not handling requests appropriately. Verify that the WMI nPartition Provider service is started. If not, start it from the Services control panel, or reboot and repeat the test.
Troubleshooting Operational problems Operational problems The problems described below are generally associated with the use of specific commands. They are grouped in alphabetical order, by command, with any generic or non-specific problems listed at the beginning. All commands: ordinal not found This problem may be due to a conflict between the version of the OpenSSL libraries used by the nPartition commands and nPartition Provider and the versions installed by other tools.
Troubleshooting Operational problems You will see this error message if you try to power off an I/O chassis independently from its attached cell. This can only be done successfully in very limited circumstances. See the on-line documentation for the frupower command for those circumstances. HP recommends that customers power off the cell, which automatically powers off the I/O chassis.
Troubleshooting Operational problems Step 4. Check whether the complex name has been set with the parstatus -X -g -h command. Set the complex name to any string other than all blanks (this is the default setting) using the cplxmodify command: cplxmodify -N yourcomplexname -g -h See the on-line documentation or refer to “cplxmodify” on page 135 for details on the valid syntax of complex names.
Troubleshooting Operational problems Parstatus: local partition error After using the parstatus command you may see the following message: Note: The -g option may require up to 2 minutes to complete. Please wait... Error: Unable to get the local partition number. This error occurs when the -w and -g options are used in the same command. This is actually a syntax error, since there is no local partition when using the -g option.
Troubleshooting Using WMIOP.EXE to pinpoint problems Using WMIOP.EXE to pinpoint problems When relying on multiple software components that are running simultaneously, locating the source of a problem can sometimes be difficult. In cases where an error message does not adequately describe the source of the problem, or when the error could have multiple causes, using the “wmiop.exe” utility that is included with the WMI Mapper component can help track the problem down. Wmiop.
Troubleshooting Using WMIOP.EXE to pinpoint problems CIM_NAMESPACE -- if not defined use root/cimv2 CIM_HOST -- local connect if not defined CIM_PORT -- port number (default determined by CIM_NOSSL) CIM_NOSSL -- if defined, connect unencrypted to 5988, else 5989 CIM_USER -- user CIM_PASSWORD -- password Notes: • Set the value for CIM_NAMESPACE appropriately, so that instances of __Namespace can be enumerated, created, and deleted.
Troubleshooting Error messages and corrective actions Error messages and corrective actions nPartition commands messages The following messages are written to standard output by the commands. This list does not include messages resulting from syntax errors, or errors caused by attempting a change that is not valid for the current configuration (for example, removing a cell from a partition when the cell was not assigned to that partition in the first place). Those messages are generally self-explanatory.
Troubleshooting Error messages and corrective actions Table 6-1 nPartition commands messages (Continued) Message Cause Recommended Action Cannot determine the state of the nPartition Configuration Privilege. The command cannot retrieve this data from the provider. In most cases, this is caused by excessive lost packets during data retrieval. Retry the command, or use a management PC with more reliable network communications to the MP. Cannot determine if the platform is partitionable. 1.
Troubleshooting Error messages and corrective actions Table 6-1 nPartition commands messages (Continued) Message Cause Recommended Action Cannot read . In most cases, these messages are caused by lost datagrams over an unreliable network connection. See the AEL entry for more information. Retry the command, or use a management PC with a more reliable network connection to the target MP or nPartition. Unable to read . Unable to get . No information available for .
Troubleshooting Error messages and corrective actions Table 6-2 Application Event Log messages Message Cause Recommended Action Operation failed. Request could not be completed. See additional information in AEL. Firmware error. System firmware failed to perform the requested operation. Service processor error. MP firmware failed to perform requested operation. The power-on request could not be satisfied because an N- power condition would result.
Troubleshooting Error messages and corrective actions Table 6-2 Application Event Log messages (Continued) Message Cause Recommended Action Operation is not supported by either operating system or firmware. Neither the local OS nor system firmware supports the requested operation. Cannot perform the request on this target system. May require updating the OS or system firmware. Operation is not supported by the provider. The provider does not support the requested operation.
Troubleshooting Error messages and corrective actions Table 6-2 Application Event Log messages (Continued) Message Cause Recommended Action Command processing resources are temporarily unavailable. The MP is busy with another request. Retry the command. IPMI session error. Error in the IPMI communication between the provider and the MP. Retry the command. No changes can be made because the profile is already in the process of being changed. Another user has initiated a complex reconfiguration.
Index A ACPI configuration value (how to set), 65 add cells to partition, 86 Application Event Log error messages, 155 B boot config options, 56 boot inactive partition, 77 boot over a network, 66 boot Windows Server 2003, 65 C cancel changes to complex profile, 54 configure autoboot options, 62, 64 configure boot paths and options, 60 configure/deconfigure cells, 105 configure/deconfigure memory, 107 configure/deconfigure processors, 106 cplxmodify command, 135 create genesis partition, 79 create new parti
Index configure/deconfigure processors, 106 list cabinets in complex, 98 list fan/blower status, 99 list I/O configurations, 98 list power status/supplies, 99 power cabinets on/off, 102 power cells/chassis on/off, 104 turn LEDs on/off, 100 R reboot and reset, 69 reboot for reconfiguration, 73 remove cells from partition, 93 rename partition, 90 rename server complex, 53 S service packs upgrading after installation, 41 set cell attributes, 95 set core cell choices, 89 setting the ACPI configuration value, 65