
Windows Integrity nPartition Guide

nPartition Commands Reference
parcreate
Chapter 5
113
Finally, you issue the parstatus command again to verify the change.
Step 1. Open a command window on the management station (
Start > Run > type cmd > click OK).
Step 2. At the command prompt, type the following:
parstatus -h 192.168.24.68 -g password -AC
and press Enter.
Step 3. Information about the available cells appears (cab1/cell2 and cab1/cell4). Since there are
8 cells per cabinet, and the cabinets are named starting from zero (cab0, cab1, cab2, and
so on), you determine that “cab1/cell2” is actually “Cell #10”, and “cab1/cell4” is “Cell
#12”.
Type the following to create the new nPartition:
parcreate -c 10::: -c 12::: -r 10 -P Frodo -h 192.168.24.68 -g password -B
and press Enter.
Cells #10 and #12 are assigned to the nPartition, Cell #10 becomes the core cell, the
nPartition is named “Frodo”, and the nPartition boots automatically after being created.
Step 4. Verify the change by typing:
parstatus -h 192.168.24.68 -g password -P
and pressing Enter.
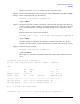
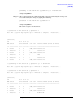
The sequence of commands and results is shown here. Notice at the end that “Frodo” is
active:
C:\>parstatus -h 192.168.24.68 -g password -AC
Note: The -g option may require up to 2 minutes to complete. Please wait...
[Cell]
CPU Memory Use
OK/ (GB) Core On
Hardware Actual Deconf/ OK/ Cell Next Par
Location Usage Max Deconf Connected To Capable Boot Num
========== ============ ======= ========= =================== ======= ==== ===
cab1,cell2 Inactive 8/0/8 32.0/0.0 cab1,bay0,chassis1 yes - -
cab1,cell4 Inactive 8/0/8 32.0/0.0 cab1,bay1,chassis1 no - -
Notes: * = Cell has no interleaved memory.
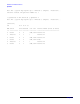
C:\>parcreate -c 10::: -r 10 -c 12::: -P Frodo -h 192.168.24.68 -g password -B