
Installation Guide, Third Edition - HP Integrity rx2620 (August 2006)


Chapter 3
Installing Additional Components
Installing Internal Hard Disk Drives
37
Installing Internal Hard Disk Drives
This section provides information about removing and replacing internal hard disk drives.
The HP Integrity rx2620 server supports up to three hot-pluggable, low-voltage differential (LVD) hard disk
drives. These hard disk drives are 3.5-inch form factor devices that connect to Ultra 320 Wide LVD SCSI
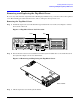
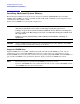
interfaces on the disk cage backplane. See Figure 3-5 for hard disk drive locations.
There is a significant difference between the terms hot-pluggable and hot-swappable:
• Hot swapping happens at the device level. A hot-swappable device is removed and installed without
assistance from operating system commands.
• Hot-plugging allows you to replace a defective disk drive in a high-availability system while it is running.
CAUTION A hot-plug device may require interaction with the operating system before you install it into
the server. Verify that the operating system supports installing disk drives while the operating
system is running. If the operating system does not support this feature, shut down the
operating system before attempting this procedure. Failure to observe this caution results in
system failure.
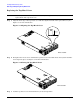
Figure 3-5 Front View of the HP Integrity rx2620 Server
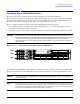
Two additional hard disk drive may be added to your HP server in slots 2 and 3. Always use low profile disk
drives (1.0” height) in your server. The drives may be locked in position by a toggle switch inside the server.
CAUTION If you try to remove a hard disk drive without unlocking it from the system, you will damage
the hard drive bay.
NOTE If the drive bay is not locked, you can install additional hard disk drives without removing the
server from the rack, and it is not necessary to remove the top metal cover. Completion of the
procedure does not require locking the disk bay, replacing the top metal cover, or replacing the
server in the rack. If the drive bay is not locked, go to step 4.
HDD 1
HDD 2
HDD 3