
Installation Guide, Third Edition - HP Integrity rx2620 (August 2006)

Chapter 3
Installing Additional Components
Installing an Additional Power Supply
48
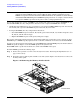
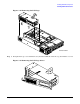
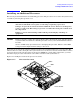
Step 1. Remove the front bezel from the system and remove the power supply filler panel. Figure 3-15
shows how to remove the power supply filler panel.
Figure 3-15 Removing the Power Supply Filler Panel
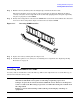
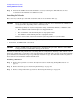
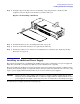
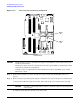
Step 2. Open the power supply release lever and slide the power supply into place. Figure 3-16 shows how
to install a power supply.
Figure 3-16 Replacing the Power Supply
Step 3. Push in on the power supply release lever to lock the retaining clip in place.
Step 4. Verify that both power supply LEDs, visible through the front of the power supply, are illuminated.
Step 5. Replace the front bezel.
Step 6. Install the top metal cover, unless you are installing more components. See “Replacing the Top
Metal Cover” on page 36.
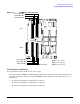
Power supply 1
Front of server
Power supply 1
Power supply 2
Front of server