
HP Integrity rx2660 Server User Service Guide


2. If rack mounted, slide the server completely out from the rack. See “Extending the Server from
the Rack” (page 141).
3. Remove the top cover. See “Removing the Top Cover” (page 142).
4. Disconnect all internal and external cables attached to the PCI-X/PCIe cards in the I/O
backplane assembly.
5. Remove the I/O backplane assembly. See “Removing the I/O Backplane Assembly” (page 163).
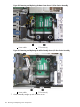
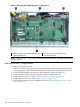
6. Remove the slotted T-15 screw that attaches the card bulkhead to the server; use a T-15 driver
to turn the screw counter-clockwise until it is free from the server. See Figure 60 (page 164).
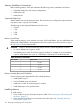
NOTE: Figure 61 (page 164) shows both the PCIe/PCI-X I/O backplane and the PCI-X
backplane.
7. Pull the gate latch to release the edge of the PCI-X/PCIe card.
8. Grasp the card by the edges and lift it out of the server.
Installing a PCI-X/PCIe Card
Before installing a PCI-X/PCIe card, ensure that you install the proper drivers for the PCI-X/PCIe
card.
To install a PCI-X/PCIe card:
1. Power off the server and disconnect the power cables. See “Powering On and Powering Off
the Server” (page 77).
2. If rack mounted, slide the server completely out from the rack. See “Extending the Server from
the Rack” (page 141).
3. Remove the top cover from the server. See “Removing the Top Cover” (page 142).
4. Disconnect all internal and external cables attached to the PCI-X/PCIe cards in the I/O
backplane assembly.
5. Remove the I/O backplane assembly from the server. See “Removing the I/O Backplane
Assembly” (page 163).
6. Select an empty slot that is appropriate for the card you are installing. Depending on the type
of board purchased, this is a PCI-X or PCIe card.
7. Remove the PCI-X/PCIe bulkhead filler if required.
8. Insert the replacement card into the card slot.
a. Insert the tab at the base of the card bulkhead into the slot in the server.
b. Align the card connectors with the slots on the I/O backplane.
c. Apply firm, even pressure to both sides of the card until it fully seats into the slot.
CAUTION: Ensure that you fully seat the card into the slot or the card could fail after power
is applied to the slot.
9. Close the gate latch to secure the end of the card.
10. Replace the slotted T-15 screw that attaches the card bulkhead to the server; use a T-15 driver
to turn the screw clockwise until it tightens to the server.
11. Install the I/O backplane assembly into the server. See “Replacing the I/O Backplane
Assembly” (page 165).
12. Connect all internal and external cables to the PCI cards in the I/O backplane assembly.
13. Replace the top cover. See “Replacing the Top Cover” (page 142).
14. If rack mounted, slide the server completely into the rack. See “Inserting the Server into the
Rack” (page 141).
15. Reconnect the power cables and power on the server. See “Powering On and Powering Off
the Server” (page 77).
166 Removing and Replacing Server Components