
HP Integrity rx2660 Server User Service Guide


3. Remove the top cover from the server. See “Removing the Top Cover” (page 46).
4. Complete the following memory installation prerequisite tasks before installing the memory:
a. Determine the DIMM load order. For more information, see “Memory Load Order”
(page 170).
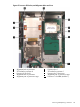
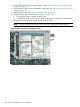
b. See Figure 63 to determine the DIMM slots to populate.
c. Read, understand, and follow the general guidelines to install memory in the server. See
“Memory Loading Rules and Guidelines” (page 170).
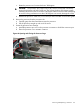
5. Install the DIMM:
a. Align the DIMM with the slot located on the memory board, and align the key in the
connector with the notch in the DIMM.
b. Firmly and evenly push on each end of the DIMM until it seats into the slot.
c. Ensure the extraction levers are in the fully closed position.
6. Verify the DIMM installation by using the one of the following system utilities:
• iLO 2 MP DF command
• EFI info mem command
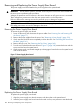
7. Replace the airflow guide. See “Replacing the Airflow Guide” (page 145)
8. Replace the top cover. See “Replacing the Top Cover” (page 142).
9. If rack mounted, slide the server completely into the rack. See “Inserting the Server into the
Rack” (page 141).
10. Reconnect the power cables and power on the server. See “Powering On and Powering Off
the Server” (page 77).
TIP: If you see abnormal error lights after installing DIMMS, try uninstalling and reinstalling the
DIMMs to make sure the DIMMS are correctly seated.
Removing and Replacing a Processor
The server uses single- or dual-core processors. A single-core processor contains one core, while
a dual-core processor contains two cores that function as separate processors. Dual-core processors
double the processing power of the server while maintaining the physical dimensions of a single
processor.
Table 65 Supported Processor Configurations
Number of Logical Processors
(Hyperthreading on)
Number of CoresNumber of Installed
Processors
Processor TypeConfiguration
211Single-core1 P / 1 C
421Dual-core1 P / 2 C
422Single-core2 P / 2 C
842Dual-core2 P / 4 C
Removing and Replacing a Processor 171