
Installation Guide - HP AD397A rx2660 SAS Smart Array P400 Controller


Chapter 1
5
1 Installing the SAS Smart Array P400
Controller
This chapter provides information to help you plan the installation and configuration of each Smart Array
Controller. This chapter addresses the following topics:
“Overview of Installation Steps” on page 5
“Installing the Smart Array Controller” on page 6
“Checking and Updating Smart Array P400 Controller Firmware” on page 15
“Creating Logical Drives” on page 19
Overview of Installation Steps
Complete Smart Array documentation (including the HP Smart Array RAID Controllers Support Matrix) is
available at:
http://docs.hp.com/en/netcom.html#Smart%20Array%20%28RAID%29
To view a detailed list of support accessories visit the system configuration site at:
http://h30099.www3.hp.com/configurator/index.asp
Following is a summary of the steps to install your Smart Array Series Controller:
Step 1. Plan your disk configurations. See “RAID Technology Overview” in the HP Smart Array P400
Support Guide, available at:
http://docs.hp.com/en/netcom.html#Smart%20Array%20%28RAID%29
Step 2. Verify that you have all of the components of the upgrade kit:
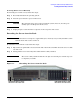
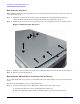
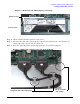
Step 3. Install the controller. See “Installing the Smart Array Controller” on page 6.
Step 4. Check the controller firmware version, and upgrade or downgrade the firmware if necessary. See
“Checking and Updating Smart Array P400 Controller Firmware” on page 15.
Step 5. Create one or more logical drives.
Table 1-1 HP AD397A Smart Array P400 Controller Option Kit Components
Part Number Description
012760-001 Smart Array P400 Controller
AB419-60008 PCI-e Expansion Card
012764-004 Smart Array P400 controller cache module, 256 MB
381573-001 Smart Array P400 controller battery charger module
408658-001 Smart Array P400 controller battery cable assembly, 11.5-in