
Installation Guide, Third Edition - HP Integrity rx2660 Server


Installing Additional Components
This section describes how to install components into the server that are not factory-installed. If
you have additional components to install, be sure to install the additional components before
installing the server into your rack or pedestal configuration. Most servers are pre-configured
with all components installed prior to shipping from the HP factory.
This section addresses the following topics:
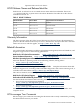
• “Introduction” (page 16)
• “Installing a SAS Hard Drive and Removing a SAS Hard Drive Filler” (page 16)
• “Installing a Hot-Swappable Power Supply” (page 18)
• “Removing the Top Cover” (page 19)
• “Removing the Airflow Guide” (page 20)
• “Installing System Memory” (page 22)
• “Installing a Processor” (page 24)
• “Replacing the Airflow Guide” (page 29)
• “Installing Additional PCIe/PCI-X Cards” (page 30)
• “Installing the SAS Smart Array and PCIe Expansion Boards” (page 33)
• “Replacing the Top Cover” (page 35)
Introduction
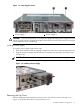
The rx2660 server contains external components (installable without removing the top cover),
and internal components that are accessed by removing the top cover.
The externally accessible components are as follows:
• SAS hard drives
• Power supplies
The internal components are as follows:
• System memory
• Processors
• PCIe/PCI-X cards
WARNING! Ensure that the system is powered off and all power sources are disconnected
from the server prior to removing or installing server hardware (unless you are removing
or installing a hot-swappable or hot-pluggable component).
Voltages are present at various locations within the server whenever an ac power source is
connected. This voltage is present even when the main power switch is turned off.
Failure to observe this warning can result in personal injury or damage to the equipment.
Installing a SAS Hard Drive and Removing a SAS Hard Drive Filler
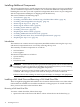
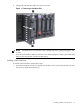
There are eight hot-pluggable SAS hard drive slots located on the front of the server. Slots without
SAS hard drives installed have slot fillers installed for cooling purposes. To install a SAS disk
drive you must first remove the hard drive filler.
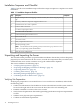
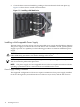
Removing a SAS Hard Drive Filler
To remove a hard drive filler, follow these steps:
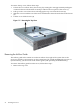
1. Squeeze the tabs on the front of the filler to release it from the slot in the drive bay (1).
16 Installing the Server