
Boot from SAN Guide


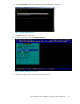

15. Select Configure Boot Devices.
NOTE:
If there is an entry in the boot table, press Enter and then select Clear Flash Boot Info. This
creates an empty table. Continue with the procedure.
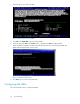
16. Select Scan Targets to return to the empty Boot Table screen.
The HBA is now logged into the switch.
17. Follow the steps in “Step 4b - Setting up swich zoning” on page 23
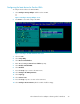
18. On the boot server, select the first line and then press Enter.
19. Select Scan Targets.
A single WWN appears. This is the node to which your boot device is attached.
20. Using a storage configuration application, or following the procedures in from Step 4c - Create
a LUN, create one LUN and give it access to the HBA WWN.
NOTE:
For Disk Array XP, you must run Scan Targets a second time after you create LUN 0 and
present it to the host. Doing so makes the WWNN of the boot HBA available so it can be
presented to the LUN.
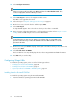
21. On the boot server, press Enter to display a LUN. (This is the LUN to which your boot device has
access.) Press Enter.
22. Select Boot this device via WWN.
The boot table has one entry that displays the boot device target WWN and LUN information.
23. Press ESC until you exit the utility.
Configuring QLogic HBAs
To install the operating system, select one of the following procedures:
• Installing from the Re-install CD-ROM, page 30
• Installing from the Microsoft CD-ROM, page 31
• Special procedures for RX8620 or RX7620 systems, page 34
Installing from the Re-install CD-ROM
To install the operating system using the Re-install CD-ROM:
1. Insert the Windows operating system Re-install CD-ROM.
Boot from SAN30