
HP Integrity rx2660 Server User Service Guide
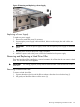

4. Observe the following SAS hard drive LEDs to ensure the drive is functional.
• Drive activity LED
• Drive status LED
Removing and Replacing the DVD Drive
The DVD drive is located in the front of the server.
WARNING! Ensure that the system is powered off and all power sources are disconnected from
the server prior to performing this procedure.
Voltages are present at various locations in the server whenever an AC power source is connected.
These voltages are present even when the main power switch is in the off position.
Failure to observe this warning can result in personal injury or damage to equipment.
CAUTION: Observe all ESD safety precautions before attempting this procedure. Failure to follow
ESD safety precautions can result in damage to the server.
Removing the DVD Drive
To remove the DVD drive:
1. Power off the server and disconnect the power cables. See “Powering On and Powering Off
the Server” (page 77).
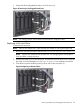
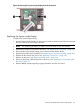
2. Insert a tool (such as a flat head screwdriver) that fits into the release slot to the left of the DVD
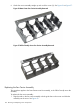
drive, and then push firmly to eject the drive out of the bay (1).
3. Pull the DVD drive straight out to remove it from the server (2).
Figure 51 Removing the DVD Drive
Replacing the DVD Drive
To replace a DVD drive:
1. Insert the DVD drive into the slot on the server, and then push it straight into the drive bay until
it clicks into place.
2. Reconnect the power cables and power on the server. See “Powering On and Powering Off
the Server” (page 77).
Removing and Replacing the Front Bezel
The front bezel provides server control and port access, and LED interfaces. You must power off
the server to remove the front bezel.
154 Removing and Replacing Server Components