
HP Integrity rx2660 Server User Service Guide
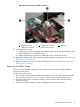

5. Attach the PCIe/PCI-X card to the I/O backplane by tightening the T-15 screw on the I/O
backplane.
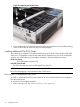
Replacing the I/O Backplane Card Cage
To replace the I/O backplane card cage into the server:
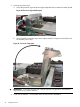
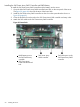
1. Align the tabs with the guide slots in the server and slide the I/O backplane assembly into
place.
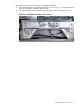
2. Tighten the two captive screws.
a. Press the black knob down while turning it clockwise until it is fully tightened.
b. While holding the black knob and pressing down, press and release the blue button to
lower the black knob to the locked position.
3. If you are done installing additional components, replace the top cover. See “Replacing the
Top Cover” (page 61). If you have more components to install, continue on to the next section.
Installing the SAS Smart Array and PCIe Expansion Boards
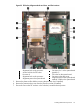
The rx2660 server has two slots dedicated for the SAS Smart Array P400 controller and PCIe
expansion boards. If you purchase the RAID option, you must install these boards on the system
board. See for the slot locations on the system board.
Installing the PCIe Expansion Board
To install the PCIe expansion board into the server:
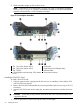
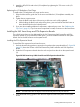
1. Pinch the board locking guides to expose the slot guides to the system board slot (1). Figure 28
(page 59) shows the location of the SAS Smart Array P400 controller and PCIe expansion
board.
2. Guide the PCIe expansion board down the rails and push into the slot on the system board
(2).
Figure 28 SAS Smart Array P400 Controller and PCIe Expansion Board Slots
NOTE: The board and slot are keyed, so the board only fits one way into the slot.
3. Close the board locking guides to lock the PCIe expansion board into place on the system
board.
Installing Additional Components 59