Microsoft Windows Server 2008 SP2 and Windows Server 2008 R2 on HP Integrity Servers SmartSetup Scripting Toolkit Administrator's Guide Abstract This document describes how to use the SmartSetup Scripting Toolkit (SSTK). This document is for system administrators who write scripts to automate hardware configuration and software installation operations for HP Integrity® server deployments.
© Copyright 2011 Hewlett-Packard Development Company, L.P Confidential computer software. Valid license from HP required for possession, use or copying. Consistent with FAR 12.211 and 12.212, Commercial Computer Software, Computer Software Documentation, and Technical Data for Commercial Items are licensed to the U.S. Government under vendor's standard commercial license. The information contained herein is subject to change without notice.
Contents 1 Overview..................................................................................................6 Minimum requirements..............................................................................................................6 SSTK environment.....................................................................................................................6 SSTK boot image...............................................................................................................
Enabling a boot device on a SAN............................................................................................30 Increasing security in SSTK.......................................................................................................31 Encrypting the repository password......................................................................................31 Setting permissions for repository access...............................................................................
sstkencrypt.............................................................................................................................50 Synopsis...........................................................................................................................50 Description........................................................................................................................50 Example..................................................................................................
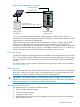
1 Overview The SmartSetup Scripting Toolkit (SSTK) provides utilities and scripts that simplify the tasks of deploying Windows on HP Integrity® servers by automating hardware configuration and software installation. Using the SSTK, you can deploy a large number of servers efficiently by replicating a server configuration and performing a Windows unattended installation. This reduces the time, effort, and errors involved in these high-volume server deployments.
Figure 1 Simple SSTK Deployment Scenario CommandPrompt ReadHWConf ApplyHWConf, ApplySASConf and Deploy SSTK repository (Workstation) SSTK boot image (Target Server) You use a workstation to unpack the toolkit, edit the configuration files, and set up the boot mechanism. The workstation typically hosts the SSTK repository, which holds the configuration files, scripts, utilities, and Windows installation files.
Typically, you perform steps 1 and 2 only once. Steps 3 and 4 are performed multiple times, depending on the number of target servers you need to deploy. The following section describes how to extract the SSTK package. The remaining chapters describe the other steps. Extracting the SSTK package The SSTK software package is a self-extracting package component. You can extract files by double-clicking the SSTK package component cp012164.exe. Figure 2 shows the Package Setup screen.
applied to Smart Array controllers with the hpacuscripting tool. This file is created when the readhwconfig option is executed. conrep.dat A file into which the conrep tool saves the values of the EFI variables contained in the conrep.xml configuration file. This file is created when the readhwconf action is executed. hwdisc.dat The hwdiscovery output file that contains a system inventory to be used by the ifhw and hwquery utilities. This file is created when the readhwconf action is executed.
Overview ApplyHWConf Called if the configured action is applyhwconf. It calls conrep, the Emulex and QLogic configuration tools, and hpacuscripting. See “applyhwconf action” (page 20). SetHBABootDevice.cmd Capture the Fibre Channel Controller HBA INI file (hba_emulex.ini or hba_qlogic.ini), updates it with information about WWID and LUN, and applies the new configuration in the card. For Emulex, it also sets the HostAdapterBiosEnable and SelectBootEnable parameters.
CopyISP, CopySmartUpdate, PostInstall2008SP2, PostInstall2008R2 After Windows installation, the post-Install script calls the Integrity Support Pack (ISP) installer if ISP installation files are available on the repository. For information on configuring the SSTK repository, see “Uploading the Windows installation files” (page 22). diskpart\default_layout_2008.txt A diskpart script that specifies the installation disk partition layout for Windows Server 2008 SP2 and Windows Server R2.
2 Creating an SSTK boot image After you set up the workstation, you create an SSTK boot image. The boot image starts the target server in order to execute an SSTK action. NOTE: The network location of the SSTK repository share is configured in the boot image. If you want to change or access a different repository share, you must edit the SSTKStart.cmd file and create the boot image again. Creating a boot image consists of the following tasks: 1. Editing the SSTKStart.cmd file. 2.
1 2 SSTK only supports DHCPv6 and Router Advertisement IPv6 addresses. If you need to use the IPv6 address directly, you must convert the IPv6 address to the Microsoft ipv6-literal namespace format. Convert the colon symbol (:) to the hyphen symbol (-) and append ipv6-literal.net . For example, convert the Router Advertisement IPv6 Address 2001:db8:100:f101:21a:4bff:fecd:8697 to 2001-db8-100-f101-21a-4bff-fecd-8697.ipv6-literal.net. For example, convert the DHCPv6 IPv6 Address: 2002::2 to 2002--2.
NOTE: • The repository must be on the same letter drive on which the AIK was installed. Creates the default path for EFI booting in the winpe\iso folder as follows: efi\boot\bootia64.efi Where: bootia64.efi is the SSTK boot loader utility. After creating a boot image, you must set up a boot mechanism (CD/DVD, USB or PXE). See “Setting up the boot mechanism” (page 14). Setting up the boot mechanism The SSTK supports three boot mechanisms: CD/DVD, USB device, or network boot.
Figure 4 Configuring virtual media using the iLO interface Figure 5 shows this process for the iLO 3 interface.
Figure 5 Configuring virtual media using the iLO 3 interface When the EFI Shell starts at the target server, a virtual file system is available with the SSTK boot files. You can add a new boot entry using the EFI Boot Manager. Creating a Bootable USB flash device To create a bootable USB flash device, use the xcopy command to copy the appropriate files from your workstation to the USB flash device. For example: xcopy winpe\iso\*.* /s /e /f f:\ Where: winpe\iso The folder created by the mkbootimg.
Figure 6 Sample SSTK Network Environment CORPNET Gateway/VPN Isolated network 10.51.201.0/24 Target / dynamic IP Active Directory / DHCP / SSTK Repository Windows Deployment Services Windows Deployment Services (WDS) is included in Windows Server 2003 SP2. You can integrate the SSTK with the WDS Server Components, which include a Pre-Boot Execution Environment (PXE) server.
5. 6. Enter the name and description of the boot image or accept the defaults. When the image copy has completed successfully, click Finish to exit the wizard. To add another image, repeat the preceding steps. WDS now displays a boot menu. NOTE: WDS. 18 You must use the default IA64 boot loader, which is already set to bootmgfw.
3 Configuring an SSTK action After you create the boot image, you must configure an SSTK action. When the target server boots up, the SSTK boot image initiates the SSTK action (ReadHWConf, ApplyHWConf, ApplySASConf, CommandPrompt, SetHBABootDevice, or Deploy) specified in the repository. The process runs without user intervention. You set the SSTK action in the SSTKConfig.cmd file located under the scripts folder.
Configuring conrep By default, the conrep utility reads the following EFI variables as configured in the conrep.xml file and saves the variable data saved to conrep.dat file: • Lang • Default • UIOption • CPUTreadControl • Timeout • AutobootRetry or AutobootRetries To read (replicate) another EFI variable, edit the conrep.xml file and add it. Use the EFI Shell dmpstore command to list the variables and their values on the target server.
2. 3. 4. Boot to WinPE. Open a command prompt window. Run the hpshowdisk utility as follows: run y:\utilities\hpshowdisk -n 5. 6. 7. 8. Find the disk you want in the list of disks and get the disk ID. Set the hbabootdevicediskid variable to the disk ID in the SSTKConfig.cmd script. Set the default_action variable to sethbabootdevice in the SSTKConfig.cmd script. Reboot to WinPE. IMPORTANT: Be sure there is at least one presentation configured to some Fibre Channel controller.
Edit the file with a text editor or by using SIM as explained in “Modifying the answer file” (page 24). NOTE: For Storage Area Network (SAN) disks, make sure the installation disk is a boot device (available on EFI for booting). For information on how to set a boot device, see “Enabling a boot device on a SAN” (page 30).
After the specific Windows folder exists, copy the contents of the Windows installation CD to the respective folder under os\windows. Uploading the Integrity Support Pack 7.1 The Integrity Support Pack (ISP) provides a set of tools and device drivers for Integrity servers that can be automatically installed after Windows installation. Figure 8 shows the destination folder of ISP installation files.
4. Edit the diskpart\default_layout_2008.txt file Uploading OEM device drivers Adding OEM drivers for Windows Server 2008 SP2 and Windows Server R2 installation in the drivers repository folder is not necessary. The Windows Server 2008 SP2 and Windows Server R2 setup uses the OEM drivers installed in the SSTK boot image. See “Installing OEM drivers in the boot image” (page 13).
Figure 10 Editing the Windows Server 2008 R2 answer file using WSIM Figure 11 Adding Windows packages to the answer file using WSIM For information about Windows Server 2008 SP2 and Windows Server 2008 R2 answer files and WSIM, see the AIK User’s Guide. Click Program Files→Microsoft Windows AIK→Documentation→Automated Windows Installation Kit User's Guide. Editing the SSTKConfig.cmd file The SSTKConfig.
os_deploy Set to the name of the folder in which the Windows installation files are stored: 2008-server-sp2 or 2008-server-r2. languageid By default, set to en. Specifies the Windows target language. For Japanese Windows Server 2008 deployments, set this to jp. Editing the default_layout_2008.txt file The default_layout_2008.txt file is located in the scripts\diskpart folder. To make changes to this file, follow these steps: 1. 2. 3. Run the hpshowdisk utility. Search for the Disk ID you want.
4 Booting the server After configuring an SSTK action, you are ready to boot the target server. This chapter describes how to boot the server (model and target), how to monitor the deployment process, and provides some troubleshooting information. Boot instructions This section describes how to boot from the CD/DVD, USB device, and from the network Booting from the CD/DVD 1. 2. 3. Insert the CD in the CD drive Integrity server. Reboot the machine.
SSTK log file When the SSTK scripts run, SSTK records event messages and errors in a log file. Each time you boot the target server, a new log file is created with the proper time stamp. SSTK creates a file with the following name: SystemName-SerialNumber-yyyymmdd-hhmmss.log Where: SystemName The system name. SerialNumber The system serial number. yyyymmdd The current date (yyyy = year, mm = month, and dd = day). hhmmss The current time (hh = hour, mm = minute, and ss = second).
console output. In order to access the server console, type the MP IP address in Internet Explorer (for iLO interface) or in a telnet session or SSH client (for MP interface). If you must force the target server to reboot, you can type restart at the WinPE SAC or use the MP command line interface. To use the MP command line interface, follow these steps: 1. 2. Connect to the target server through either telnet or SSH in order to access the MP. At any time, type Ctrl+B to return to the MP.
5 Advanced topics This chapter describes the following advanced topics: • Customizing the SSTK boot image • Enabling a boot device on a SAN • Increasing security in SSTK • Checking the CLM mode • Enabling the maximum payload size Customizing the SSTK boot image The mkbootimg.cmd script executes all the steps needed to create a customized SSTK WinPE 3.0 image. The mkbootimg.cmd scripts steps are as follows: 1.
You can obtain the BootDeviceWWID and BootDeviceLUN information from the hpacuscripting output, as follows: ; Controller Specifications ; Controller HP MSA1500 CS Controller Controller= WWN 500508B30090F5B1 1 . . . SSPState= Disabled ; Unassigned Parallel SCSI Drives ; 1:5 (36.4 GB),1:6 (36.4 GB) ; Array Specifications Array= A ; Array Drive Type is Parallel SCSI ; 1:1 (72.8 GB),1:2 (72.8 GB),1:3 (72.
repository_letter=y: For information on valid characters for the repository password, see “Editing the SSTKStart.cmd file” (page 12). Setting permissions for repository access To increase security, restrict write permission for some folders in the SSTK repository. This also guarantees the integrity of files that must have read-only permission. The repository structure allows users to have read-write permissions for the data_files folder only. Set all other folders to read-only permission.
NOTE: SSTK does not provide a tool to configure Cell-Local Memory mode. Enabling Max Payload Size The Max Payload Size (MPS) enables or disables hardware optimizations to the installed operational system. Enable MPS on the EFI Shell by using the following command: EFI Shell> ioconfig mps_optimize on This activates on the PcieMpsOptimization EFI variable. This optimization is implemented in systems with firmware version 3.01 or greater.
6 Utilities reference This chapter contains reference information and usage examples for the utilities provided in the toolkit. You can get online help for each utility by using the -h or -? option. conrep Synopsis conrep { -s | -l | -c | -d } [-F] [-v] [-f data file] [-x XML file] [-- ] [--version ] [-h ] Description The conrep utility replicates the configuration data stored in the EFI variables. It reads the EFI variables from the NVRAM of a server and writes the results to a data file.
Examples Example 1 Sample conrep.dat file 4c 00 61 00 6e 00 67 00 00 ... 44 00 65 00 66 00 61 00 ... 43 00 50 00 55 00 54 ... 54 00 69 00 6d 00 ... 43 00 6f 00 6e 00 ... 43 00 6f 00 6e 00 49 ... 45 00 72 00 72 00 ... 43 00 6f 00 6e 00 ...
Table 2 conrep Return Codes (continued) Value Meaning Cause Action 2 Usage error An error occurred while using conrep for some unexpected reason, such as the wrong parameters. Run conrep -h to display available options and usage. 3 Data file not found The data file was not found in the current directory or in the path specified with the -f option. Put the data file in the same directory as the conrep executable or specify the correct path with the -f option.
Options -c Captures the current configuration to a script file. The default file is acuoutput.ini. -i Inputs configuration information from a script file. The default file is acuinput.ini. -internal Limits the operation to internal controllers. This is the default. NOTE: Do not use this option to capture information about Storage Area Network controllers. -external Limits the operation to external controllers. -reset Resets the controller configuration before applying another one.
WriteCache= 50 RebuildPriority= Low ExpandPriority= Low SurfaceScanDelay= 15 ; Array Specifications Array= A ; Array Drive Type is SAS ; 1E:1:1 (36 GB),1E:1:2 (36 GB),1E:1:3 (36 GB) Drive= 1E:1:1,1E:1:2,1E:1:3 OnlineSpare= No ; Logical Drive Specifications LogicalDrive= 1 RAID= 5 Size= 69399 Sectors= 32 StripeSize= 16 ArrayAccelerator= Enabled Error reporting When using the hpacuscripting utility, any errors are logged to the error.ini file.
Table 4 hpacuscripting Error Codes Warning Code Message Reason 0 — No error exists. The program completed successfully. 2053 Too many coinciding expansion, migration, or extension operations The new configuration requires more transformations than are possible at one time. For example, you cannot expand a logical volume and transform its RAID level at the same time. 2056 Controller does not support The controller does not support license key entry or deletion.
Table 4 hpacuscripting Error Codes (continued) 40 Warning Code Message 2836 New Logical Drive ID does The script file specifies a logical drive ID that is not the first unused not match the next available ID in the sequence. For example, if the controller has only Logical Drive 1 and the script file attempts to create Logical Drive 3 Logical Drive ID (without Logical Drive 2), the script generates this error.
Table 4 hpacuscripting Error Codes (continued) Warning Code Message Reason 2865 Invalid Preferred Path The preferred path specified is not a valid chassis slot for an available active controller, or the controller is not available. 2866 Failure opening capture file — text 2867 Failure opening input file text — 2868 Failure opening error file text — 2877 There are no suitable spares ACU found no drives that can be used as spares for the specified array.
Table 4 hpacuscripting Error Codes (continued) Warning Code Message Reason 3019 Cannot create Array - no physical disks specified ACU cannot create an array unless physical disks are specified in the input file DRIVE parameter. 3020 SSP must be enabled in order For the specified operation, ACU requires SSP to be supported and enabled. to perform this operation 3021 Invalid connection name 3022 The connectionname cannot — be removed when the hostmode has a nondefault value.
Options -y Eliminates the press any key prompt for automation purposes. -n Suppress the event logging feature. Example C:\>hpchkclm.exe –y –n HPCHKCLM - HP NUMA Configuration Checker Version 1.2.0.0, built May 18 2010 16:58:47 Manufacturer: Product name: SKU: BIOS version: BIOS date: Computer name: Windows version: Build: Processor: Ident: L1: L1: L2: L2: L3: hp Integrity rx2800 i2 AH395A 01.09 10/18/2010 MININT-8K9IQ46 6.
-d Outputs the PCI ID for the device in the vendor:device:subvendor:subdevice format. -l Displays the disk LUN. -s Displays the size of the disk, in bytes. -n | -no_showdisk Do not use the Altiris showdisk command to sort the disk list. -v | --version Outputs the hpshowdisk utility version. -w Displays the disk WWID in 16-digit hexadecimal format. -h | --help Prints this help. NOTE: The -w and -c do not run correctly if the hbaapi.
Table 5 hpshowdisk return codes (continued) Return Code Name Meaning 7 ERROR_NO_SHOWDISK The Altiris showdisk utility was not found. 8 ERROR_INVALID_DISK An invalid disk index was specified with the –i option. 9 ERROR_INVOKING_SHOWDISK A problem occurred while invoking the Altiris showdisk utility. 10 ERROR_NO_MEMORY The utility tried to allocate memory and failed. For example, the system memory is exhausted.
-v | --version Displays the utility version. Example A sample hwdisc.dat output file is as follows: Server rx2660 US43880166 abcdef 5.48 04.03 E.03.
Table 6 hwdiscovery error codes (continued) Value Description 7 Error creating XML file 8 General error hwquery Synopsis hwquery hwdisc.dat allboards.xml [query]... Description The hwquery utility is executed from a script file, in conjunction with other utilities, to control the install process. The hwquery utility uses data from the hardware discovery file in your own scripts. The hwquery utility cannot alter environment variables directly.
[path]allboards.xml Specifies the allboards.xml PCI device list file, which is used to convert PCI IDs found in hardware discovery into device names, such as “Smart Array 6402 Controller.” expression Specifies the query expression. Examples The ifhw utility can use XML files as input to query the hardware discovery file. For example: ifhw hwdisc.dat allboards.
Table 7 ifhw Operators (continued) Operator or term Result string A literal string, used for comparison. number A literal number, used for comparison. Return Codes Table 8 ifhw return codes Value Description 0 (True) The device is present. 1 (False) The device is not present. 2 (Error) The expression was not understood. -1 or 255 An incorrect number of parameters was specified. 1 1 Because of known issue TT1000754871, error code 2 is never returned.
BootDeviceLUN=3 . . . Return Codes Table 9 sethbaini return codes Return Code Value Description SUCCESS 0 The tool executed successfully. ERROR_USAGE 1 You specified an invalid option, or specified invalid values on the command line. ERROR_INVALID_WWID 2 You specified a controller WWID that was not found in the specified file. ERROR_INVALID_CTRL_NAME 3 ERROR_FILE_NOT_FOUND 4 ERROR_INVALID_HBA_INI 5 You specified an invalid controller name. Valid values are emulex or qlogic.
\\repository_name\share_name The address of the remote machine and the share folder name. repository_encrypted_password The encrypted password to the share folder obtained using sstkencrypt. repository_user The user name with which to log on to the remote machine. Example sstkmount z: \\192.168.0.
7 Support and other resources Contacting HP For the name of the nearest HP authorized reseller: In the United States, see the HP US service locator webpage at: http://www.hp.com/service_locator In other locations, see the Contact HP worldwide (in English) webpage at: http://welcome.hp.com/country/us/en/wwcontact.html For HP technical support: In the United States, for contact options see the Contact HP United States webpage at: http://welcome.hp.com/country/us/en/contact_us.
A Support Matrix For a list of supported servers and components, see the Release Notes for Windows Server 2008 SP2 and Windows Server 2008 R2 SP1, available on Smart Setup CD ISO Image File for HP Integrity Servers, in the contents\doc\en_us folder. The Smart Setup CD ISO Image File for HP Integrity Servers is available at http://www.hp.com/ support/itaniumservers.