
HP Integrity rx3600 Server User Service Guide


• Doorbell board
• Display board
• SAS backplane board
• Interconnect board
• Midplane board
Accessing a Rack-Installed Server
The following procedure explains how to gain access to the HP Integrity rx3600 that is installed
in an approved rack. For rack installation instructions, review the document titled Installation Guide,
Mid-Weight Slide Kit, 5065-7291. You can access this document at:
http://h18004.www1.hp.com/products/servers/proliantstorage/bcs-rackandpower/
information_library.html
WARNING! Ensure that all anti tip features are employed (front and rear anti tip feet installed;
adequate ballast properly placed; and so on) are employed prior to extending the server from the
rack.
Extending the Server from the Rack
NOTE: Ensure that there is enough area (approximately 1.5 meters [4.5 ft.]) to fully extend the
server from the front of the rack.
To extend the server from the rack, follow these steps:
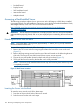
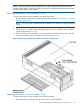
1. Remove the T25 screws with the orange tags that fasten the front of the server to the rack
(Figure 51).
2. Remove the large orange screws from the rear of the rack located on the left and right server
slide rails. The server will not slide forward if these screws are not removed.
3. Flip out the two pull handles located on both ends of the front bezel (Figure 51).
4. Slowly pull the server forward by the handles until it is fully extended.
NOTE: The server is fully extended when the rail clips are locked in place and the top cover
is completely accessible.
Figure 51 Rack Screw Locations
Inserting the Server into the Rack
To insert the server into the rack, follow these steps:
1. Press the rail clips on both sides of the server inward.
2. Push the server into the rack until it stops.
164 Removing and Replacing Server Components