
HP Integrity rx3600 Server User Service Guide

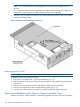


2. Slide the cover toward the right side of the server until it is flush with the center chassis wall.
3. Slide the top cover forward until it is flush with the front of the chassis; push firmly.
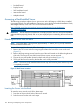
4. Push the cover release lever down into the latched position (Figure 53).
5. Lock the cover release lever by turning the cam approximately 90 degrees clockwise.
Removing and Replacing a Hot-Swappable Chassis Fan Unit
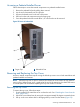
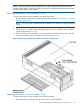
There are three interchangeable, hot-swappable chassis fan units in the server. Fan unit one is
located behind the memory carrier assembly. Fan units two and three are located in the center of
the chassis between the disk drives and the I/O board assembly. You can replace the hot-swappable
fans using the procedures in this section when system power is on or off.
CAUTION: Observe all ESD safety precautions before removing or replacing a fan unit. Failure
to follow ESD safety precautions can result in damage to the server.
NOTE: A hot-swappable device does not require interaction with the operating system before
the device is removed from or installed into the server.
The DC power to the server does not have to be off to remove or replace a hot-swappable chassis
fan unit.
Removing a Hot-Swappable Chassis Fan Unit
To remove a hot-swappable chassis fan unit, follow these steps:
1. If rack installed, slide the server completely out from the rack. See “Extending the Server from
the Rack” (page 164).
2. Remove the top cover. See “Removing the Top Cover” (page 165).
3. Insert thumb and forefinger into the openings on the top of the fan and squeeze until the fan
releases from the socket.
4. Pull the fan straight up and out of the chassis.
CAUTION: To prevent server components from overheating, replace the fan within 20
seconds. Failure to observe this caution results in an automatic server shut down in two minutes
to prevent an overtemperature condition.
168 Removing and Replacing Server Components