
HP Integrity rx3600 Server User Service Guide
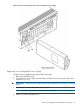
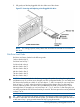
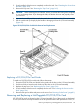
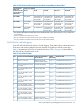

2. Pull gently until the hot-pluggable disk drive slides out of the chassis.
Figure 57 Removing and Replacing a Hot-Pluggable Disk Drive
NOTE: For cooling purposes, always leave disk drive fillers in slots that do not contain a
disk drive.
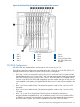
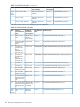
Disk Drive Load Order
Disk drive are factory loaded in the following order:
1st drive load in Bay 8
2nd drive load in Bay 7
3rd drive load in bay 6
4th drive load in bay 5
5th drive load in Bay 4
6th drive load in Bay 3
7th drive load in bay 2
8th drive load in bay 1
CAUTION: Drives are loaded in the factory, starting with number 8, working from right to left
and bottom to top. If you have never changed your SAS configuration before, you can safely move
SAS devices downwards as a block. If you have bays 6, 7, and 8 occupied you can move them
down to bays 1, 2, and 3 without having the hardware paths change during a cold-install or
recovery while the system is shut down, but you must move the disks in order and you cannot
rearrange them. For example, you can move bay 6 to 1, 7 to 2, and 8 to 3. After doing this you
can safely populate the SAS enclosure from bay 4 onwards. The same procedure can be performed
on bays 9 to 16.
TIP: When you receive an HP Integrity rx3600 or HP Integrity rx6600 server from HP, if you
ever plan to add other SAS devices into the system, you should consider moving the SAS devices
so they start in bay 1 going upwards instead of Bay 8 going downwards.
Removing and Replacing a Hot-Pluggable Disk Drive 173