
HP Integrity rx3600 Server User Service Guide

Replacing a Hot-Pluggable Disk Drive
NOTE: The replacement disk drive must have the same product number as the disk drive that
you replace.
To install a hot-pluggable disk drive, follow these steps:
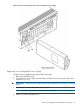
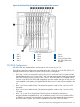
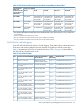
1. Use Figure 58 to determine the next available disk drive installation slot.
Figure 58 Disk Drive Slot IDs
2. Remove the disk drive filler. See “Removing a Hot-Swappable Disk Drive Filler” (page 48).
NOTE: Save the disk drive filler for future use. For cooling purposes, always place disk drive
fillers in slots that do not contain a disk drive.
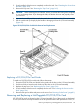
3. Insert the hot-pluggable disk drive into the slot guides, and slide the drive into the slot until it
seats into the socket on the disk backplane.
4. Close the extraction handle by pushing it inward until it clicks into place.
5. Observe the following disk drive LEDs to ensure the drive is functional. For more information
see “Hot-Pluggable Disk Drive LEDs” (page 30).
• Drive status LED
• Drive activity LED
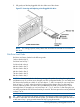
Removing and Replacing PCI/PCI-X/PCIe Card Dividers
PCI/PCI-X/PCIe card dividers are located on the I/O board assembly, between the PCI/PCI-X/PCIe
cards. Eight dividers provide short circuit protection to the hot-pluggable PCI/PCI-X/PCIe cards by
preventing inadvertent contact between cards during the replacement, addition, or removal of a
card.
WARNING! Ensure that the system is powered off and all power sources have been disconnected
from the server prior to performing this procedure.
Voltages are present at various locations within the server whenever an AC power source is
connected. This voltage is present even when the main power switch is in the off position.
Failure to observe this warning can result in personal injury or damage to equipment.
CAUTION: Observe all ESD safety precautions before attempting this procedure. Failure to follow
ESD safety precautions can result in damage to the server.
Removing a PCI/PCI-X/PCIe Card Divider
To remove a PCI/PCI-X/PCIe card divider, follow these steps:
1. Power off the server and disconnect the power cables. See “Powering Off the Server”
(page 82).
174 Removing and Replacing Server Components