
HP Integrity rx3600 Server User Service Guide

2. If rack installed, slide the server completely out from the rack. See “Extending the Server from
the Rack” (page 164).
3. Remove the top cover. See “Removing the Top Cover” (page 165).
CAUTION: When extracting the card divider, ensure you release the locking tabs completely
or you can damage them. If you damage the tabs, the divider does not seat properly when
you reinsert it.
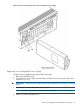
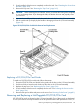
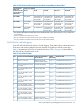
4. Use a tool to carefully push the two tabs that attach the card divider to the I/O board assembly.
5. Pull the card divider up sharply by the handle to disengage it from the I/O board assembly
(Figure 59).
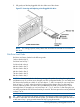
Figure 59 PCI/PCI-X/PCIe Card Divider Removal and Replacement
Replacing a PCI/PCI-X/PCIe Card Divider
To replace a PCI/PCI-X/PCIe card divider, follow these steps:
1. Insert the PCI/PCI-X/PCIe card divider locking tabs into the slots on the I/O board assembly.
2. Push down firmly to seat the card divider into the slots on the I/O board assembly.
3. Replace the top cover. See “Replacing the Top Cover” (page 166).
4. If rack installed, slide the server completely into the rack. See “Inserting the Server into the
Rack” (page 164).
5. Reconnect the power cables and power on the server. See “Powering On the Server” (page 81).
Removing and Replacing a Hot-Pluggable PCI/PCI-X/PCIe Card
PCI/PCI-X/PCIe cards are located on the I/O board assembly. Two of these cards are dedicated
to core I/O functions and require that the server be powered off for card replacement. Core I/O
Removing and Replacing a Hot-Pluggable PCI/PCI-X/PCIe Card 175