
HP Integrity rx3600 Server User Service Guide


5. Remove the PCI/PCI-X/PCIe bulkhead filler.
CAUTION: When inserting the PCI/PCI-X/PCIe card, be careful that you do not accidentally
touch an Attention button on the other PCI/PCI-X/PCIe MRLs; this shuts down another
PCI/PCI-X/PCIe card/slot. If you do this, push the Attention button again within five seconds
to cancel the shutdown.
Also, ensure that you fully seat the card into the slot or the card can fail after power is reapplied
to the slot.
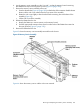
6. Insert the PCI/PCI-X/PCIe card into the empty slot, and use firm, even pressure to seat the
card in the slot.
7. Connect all internal and external cables to the PCI/PCI-X/PCIe card.
8. Close the MRL.
a. Rotate the MRL downward 90 degrees.
b. Push the edge of the MRL down until it clicks into place on the PCI/PCI-X/PCIe card
bulkhead.
9. Close the gate latch to secure the end of the card if it is full-length.
10. Activate the PCI/PCI-X/PCIe card and slot.
a. Press the red Attention button located on the MRL of the appropriate slot. The power LED
starts to blink.
b. Wait until the power LED goes from blinking to steady on.
NOTE: After pushing the Attention button, you have five seconds to cancel the operation by
pushing the Attention button again. After five seconds, pressing the Attention button initiates
slot powerdown.
11. Replace the top cover. See “Replacing the Top Cover” (page 166).
Online Replacement (OLR)
CAUTION: For HP-UX 11i version 1 (and later), you can only replace an existing card with a
like card.
To remove and replace a PCI/PCI-X/PCIe card into a populated slot, follow these steps:
1. If rack installed, slide the server completely out from the rack. See “Extending the Server from
the Rack” (page 164).
2. Remove the top cover from the chassis. See “Removing the Top Cover” (page 165).
3. Deactivate the PCI/PCI-X/PCIe card and slot.
a. Press the red Attention button located on the MRL of the appropriate slot, and the power
LED starts to blink.
b. Wait until the power LED goes from blinking to steady off.
NOTE: After pushing the Attention button, you have five seconds to cancel the operation by
pushing the Attention button again.
4. Pull the gate latch toward the front of the chassis to completely unlock the PCI/PCI-X/PCIe
card.
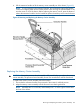
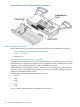
5. Open the MRL.
a. Press the indentation on the MRL to release it from the chassis wall.
b. Lift the edge of the MRL, and rotate it upward 90 degrees until it rests against the chassis
wall and the PCI/PCI-X/PCIe card bulkhead is fully exposed.
6. Disconnect all external and internal cables attached to the PCI/PCI-X/PCIe card.
182 Removing and Replacing Server Components