
HP Integrity rx3600 Server User Service Guide
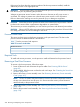

5. Complete the following memory installation prerequisite tasks before installing the memory:
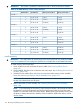
a. Determine the DIMM load order as appropriate for the 8-DIMM or 24-DIMM memory
carrier. For more information, see “Memory Load Order” (page 191).
b. Determine the DIMM slots to populate using Figure 65 (page 192) or Figure 66 (page 193)..
c. Read, understand, and follow the general guidelines to install memory in the server. See
“Memory Loading Rules and Guidelines” (page 193).
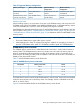
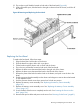
6. Lay the memory carrier assembly on side 0 or side 1 so that the memory carrier side that
contains the DIMM slots that require servicing faces upward (Figure 63).
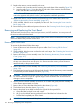
7. Remove the memory carrier assembly side cover.
a. Press the release tabs (Figure 63) on both sides of the extraction handle release button
until the side cover releases from the top center of the assembly.
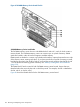
b. Rotate the side cover slightly to free the tabs from the retaining slots at the base of the
assembly (Figure 64).
c. Lift the side cover off the assembly.
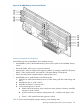
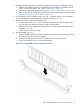
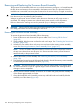
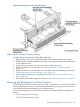
8. Install the DIMM (Figure 67).
a. Align the DIMM with the correct slot located on the memory board, and align the key in
the connector with the notch in the DIMM.
b. Firmly and evenly push on each end of the DIMM until it seats into the slot.
c. Ensure the extraction levers are in the locked position.
Figure 67 Inserting DIMM into Memory Board Connector
Removing and Replacing the Memory Carrier Assembly 195