
HP Integrity rx3600 Server User Service Guide
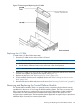
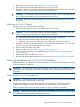

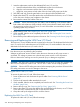

Figure 77 Removing and Replacing the I/O VRM
Replacing the I/O VRM
To replace the I/O VRM, follow these steps:
1. Insert the I/O VRM into the socket on the I/O board.
NOTE: The I/O VRM is keyed to fit into the socket in only one direction.
a. Firmly and evenly push on each end of the I/O VRM until it seats into the slot.
b. Ensure that the extraction levers on the socket are in the closed position.
NOTE: You may need to manually close the extraction levers on the socket.
2. Place the I/O VRM cover on top of the I/O VRM and turn the knurled thumb screw clockwise
until the cover tightens into place on the chassis wall (Figure 77).
3. Replace the top cover. See “Replacing the Top Cover” (page 166).
4. If rack installed, slide the server completely into the rack. See “Inserting the Server into the
Rack” (page 164).
5. Reconnect the power cables and power on the server. See “Powering On the Server” (page 81).
Removing and Replacing the Trusted Platform Module
The Trusted Platform Module (TPM) is an optional security component which enhances security
capabilities for the server if it is running the HP-UX operating system. The TPM is a security chip
that is unique to the server. It performs key security processes independent of other hardware
components. The TPM creates and stores additional encryption keys at the system root. The
encryption keys created by the TPM encapsulate system application encryption keys to provide an
additional layer of security for sensitive system data.
Removing and Replacing the Trusted Platform Module 213