
HP Integrity rx3600 Server User Service Guide
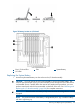
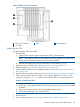

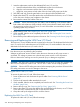

Figure 78 TPM Location on I/O Board
431
Core I/O Board Slot System BatteryTPM
2
I/O VRM
Replacing the TPM
To replace the TPM, follow these steps:
1. Insert the TPM.
a. Align the TPM connector pinouts with the pins on the I/O board socket.
NOTE: The female connector on the TPM has one pinout plugged, which aligns with a
missing pin on the male connector on the I/O board assembly.
b. Push the TPM straight down into the socket until it is fully seated (Figure 78).
2. Replace the core I/O board. See “Replacing the Core I/O Board” (page 217).
3. Replace the top cover. See “Replacing the Top Cover” (page 166).
4. If rack installed, slide the server completely into the rack. See “Inserting the Server into the
Rack” (page 164).
5. Reconnect the power cables and power on the server. See “Powering On the Server” (page 81).
6. Set the TPM to the prior state, if available, or to a customer preference. Example 1 is an
example of using the secconfig command to enable the TPM as a customer preference.
Example 1 Enabling the TPM
1. Access the EFI Shell.
2. Enter info sec to display the server security settings on the screen. The TPM is disabled
by default.
3. Enter secconfig to display a list of configurable security settings.
4. Enter secconfig tpm on to enable the TPM.
7. Reset the server.
8. Boot the operating system. See “Booting and Shutting Down HP-UX” (page 110).
Removing and Replacing the Trusted Platform Module 215