
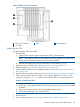
HP Integrity rx3600 Server User Service Guide


6. Restore the iLO 2 MP configuration settings using the server console. For additional information
about using the iLO 2 MP see the HP Integrity Integrated Lights-Out 2 Operations Guide.
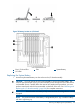
Removing and Replacing the SAS Core I/O Card
The SAS core I/O card connects to the SAS disk backplane and controls internal data storage
operations for the server. There are four types of SAS core I/O cards supported on the server:
• Half length generic SAS card (PCI-X)
• Full length SAS card with RAID capability (PCI-X or PCIe)
• Full length SAS card with RAID capability able to connect to external storage (PCIe)
Slots 1 and 2 are dedicated for the PCI-X core I/O cards. The LAN core I/O card is installed either
in slot 2 or slot 10 depending on the configuration. PCIe SAS core I/O cards are installed in slots
3 or 4 on the PCIe I/O backplane.
WARNING! Ensure that the system is powered off and all power sources have been disconnected
from the server prior to performing this procedure.
Voltages are present at various locations within the server whenever an AC power source is
connected. This voltage is present even when the main power switch is in the off position.
Failure to observe this warning can result in personal injury or damage to equipment.
CAUTION: PCI/PCI-X slots 1 and 2 are dedicated for use by core I/O cards. Do not place any
other PCI/PCI-X expansion cards in slots 1 and 2. Slots 1 and 2 are not hot-plug capable.
CAUTION: Observe all ESD safety precautions before attempting this procedure. Failure to follow
ESD safety precautions can result in damage to the server.
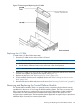
Removing the SAS Core I/O Card
NOTE: You may need to remove the LAN core I/O card to access the SAS core I/O card.
To remove the SAS core I/O card, follow these steps:
1. Power off the server and disconnect the power cables. See “Powering Off the Server”
(page 82).
2. If rack installed, slide the server completely out from the rack. See “Extending the Server from
the Rack” (page 164).
3. Remove the top cover. See “Removing the Top Cover” (page 165).
CAUTION: When disconnecting the SAS cables, note the labeling on the cables. Both cables
and sockets are clearly marked with the correct channel. When reconnecting these cables,
match each cable with the appropriate socket on the SAS core I/O card. If the cables are
mismatched, the server operating system may not reboot.
4. Disconnect the internal SAS cables attached to the card.
5. Remove the slotted T15 screw that attaches the card bulkhead to the chassis; use a T15 driver
to turn the screw counterclockwise until it is free from the chassis.
6. SAS RAID card only, pull the gate latch toward the front of the chassis to unlock the SAS core
I/O card.
7. Grasp the card by the edges and lift it out of the chassis.
Replacing the SAS Core I/O Card
To replace the SAS core I/O card, follow these steps:
Removing and Replacing the SAS Core I/O Card 219