
HP Integrity rx3600 Server User Service Guide


Removing the Display Board
To remove the display board, follow these steps:
1. Power off the server and disconnect the power cables. See “Powering Off the Server”
(page 82).
2. If rack installed, slide the server completely out from the rack. See “Extending the Server from
the Rack” (page 164).
3. Remove the top cover. See “Removing the Top Cover” (page 165) .
NOTE: The USB cable connector is an RJ45 connector; it is not a typical USB connector.
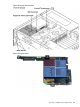
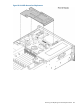
4. Remove the air baffle (Figure 83).
5. Remove the clear plastic cover.
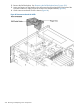
6. Disconnect the USB cable from the connector on the display board (Figure 80).
7. Remove the DVD drive. See “Removing the DVD Drive” (page 185).
8. Locate the knurled thumbscrew behind the DVD drive that holds the display board in place
(Figure 80).
9. Turn the thumbscrew counterclockwise until the board releases from the chassis.
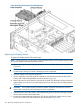
10. Remove the top two screws from the right side of the bezel. Pull the bezel out from the chassis
approximately one half inch so that the display board can clear the locator and Power buttons
(Figure 80).
CAUTION: Do not pull the bezel out from the chassis more than one half inch. Do not use
the USB connector as a handle to remove the display board. Failure to observe these cautions
can result in damage to server components.
11. Hold the bezel out from the chassis, and use the diagnostic panel light guide as a handle to
simultaneously push the board to the left to unplug it from the socket on the interconnect board.
NOTE: Use the guide pins on the chassis and the L-shaped keyways on the display board
to help you with the display board removal procedures.
12. Slide the board toward the rear of the chassis until it stops against the guide pins.
13. Tilt the board toward the front of the chassis, and lift it out at an angle.
14. Remove the diagnostic panel light guide by squeezing the plastic tabs until they disengage
from the slots on the board (Figure 82).
IMPORTANT: Do not discard the diagnostic panel light guide. You must install it onto the
replacement display board.
222 Removing and Replacing Server Components