
HP Integrity rx3600 Server User Service Guide


8. Replace the top cover. See “Replacing the Top Cover” (page 166).
9. If rack installed, slide the server completely into the rack. See “Inserting the Server into the
Rack” (page 164).
10. Reconnect the power cables and power on the server. See “Powering On the Server” (page 81).
Removing and Replacing the Interconnect Board
The interconnect board attaches the midplane board to the display board and the SAS backplane
board.
WARNING! Ensure that the system is powered off and all power sources have been disconnected
from the server prior to performing this procedure.
Voltages are present at various locations within the server whenever an AC power source is
connected. This voltage is present even when the main power switch is in the off position.
Failure to observe this warning can result in personal injury or damage to equipment.
CAUTION: Observe all ESD safety precautions before attempting this procedure. Failure to follow
ESD safety precautions can result in damage to the server.
IMPORTANT: System information is stored on the interconnect board. You must write serial number
and model string information to the new interconnect board after installation.
Removing the Interconnect Board
To remove the interconnect board, follow these steps:
NOTE: Use the guide posts located on the chassis and the keyways located on the interconnect
board to help you with the interconnect board removal and replacement procedures.
1. Power off the server and disconnect the power cables. See “Powering Off the Server”
(page 82).
2. If rack installed, slide the server completely out from the rack. See “Extending the Server from
the Rack” (page 164).
3. Remove the top cover. See “Removing the Top Cover” (page 165).
4. Remove the air baffle (Figure 83).
5. Remove the clear plastic cover.
6. Disconnect the USB cable from the connector on the display board (Figure 80).
7. Remove the DVD drive. See “Removing the DVD Drive” (page 185).
8. Remove the display board. See “Removing the Display Board” (page 222).
9. Slide the SAS drives and fillers approximately two inches out of the drive bays. See “Removing
a Hot-Pluggable Disk Drive” (page 172).
CAUTION: When disconnecting the SAS cables, note the labeling on the cables. Both cables
and sockets are clearly marked with the correct channel.When reconnecting these cables,
you must match each cable with the appropriate socket on the SAS core I/O card. If the cables
are mismatched, the server operating system may not reboot.
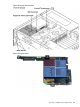
10. Disconnect the SAS data and power cables from the connectors on the SAS backplane
(Figure 84).
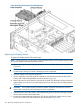
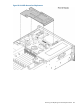
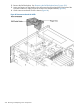
11. Remove the interconnect board air baffle (Figure 85).
a. Insert your finger into the opening on the interconnect board air baffle and pull upward
to release the air baffle from the chassis.
b. Lift the air baffle out of the chassis at an angle.
Removing and Replacing the Interconnect Board 229