
Installation (Smart Setup) Guide, Windows Server 2008 R2, v6.5


1. Configure your boot controller and drive. If you are using a RAID adapter, follow the RAID
installation documentation to prepare the adapter and configure the RAID type. Then
disconnect or unplug all drives except the one connected to the boot controller, to prevent
unintentional data loss.
CAUTION: Reinstallation overwrites all files on the boot disk. The boot disk is determined
by bus search order and might not be the disk you expect it to be. HP strongly recommends
disconnecting or unplugging all drives from the server except the boot disk. This includes
all SAN storage.
2. Since Windows Server 2008 R2 cannot create a boot entry if one already exists, you must
delete all existing boot entries. To delete boot entries, choose one of the following methods:
• Use the EFI Maintenance menu:
— If you are using the Enhanced EFI Boot Manager Menu (gray background), select
EFI Boot Manager Menu → Boot Configuration → Remove Boot Entry.
— If you are using the Legacy EFI Boot Manager Menu (black background), select
EFI Boot Manager Menu → Boot Option Maintenance Menu → Delete Boot
Option(s).
Then scroll down to the desired boot entry and press Enter.
• Clear the NVRAM using the instructions in your Platform Reference Guide.
3. Insert the HP Reinstallation media into the DVD drive.
4. Boot from the Reinstallation media using one of the following methods:
• Method 1: Select EFI Boot Manager menu → Internal Bootable DVD from EFI Boot
Manager (if this choice is available). If you use this method, you can skip steps 5 and 6
and go directly to step 7.
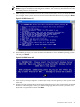
• Method 2: Select EFI Shell and go to the /CDROM(Entry0) file system by typing fs0:
and pressing Enter.
5. Start the WinPE OS Loader by typing cd \efi\boot and pressing Enter.
6. Type bootia64.efi and press Enter.
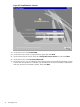
7. Click Reinstall when the HP Reinstall screen displays.
8. A Warning message appears stating that all data, including the partition table, will be lost
upon reinstallation. Read the message and confirm the target drive (DRIVE 0) and controller.
To continue, press y and then Enter. If you want to abort, press n and then Enter instead.
9. Select the partition size (64 GB is the default, and in most cases, the minimum recommended
size) and press Enter. The maximum partition size is limited to the size of the drive.
10. Select Y to continue. The installation process copies files to the hard disk. Do not power off
the server during the installation.
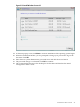
11. When all files from the DVD drive are copied to the server boot disk, read the displayed
message. If there were any errors during this process you must address the cause of those
errors and repeat this procedure over again from the beginning. If the installation was
successful, the system displays: Reinstall Finished. Click OK to continue.
12. At the prompt, press a letter from the menu displayed (E = Exit; R = Reboot; S = Restart the
restore process) and press Enter to proceed.
13. The system will reboot one or more times and then boot to Windows.
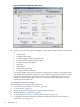
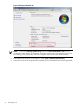
14. You are logged in automatically as Administrator the first time that Windows Server 2008
R2 boots. However, after any period of inactivity, a timeout screen saver displays and you
must log back in again using the default system password (case-sensitive): Abcdef12.
15. Go to the next section for instructions on how to specify the server settings and complete
the reinstallation.
48 Installing the OS